How to send alert SMS from Nagios
Adopt SMS technology into your Nagios based system in order to send SMS notifications or alerts from PC to mobile devices. With SMS functionality the generated reports of Nagios can be sent directly to the technical staff to make immediate intervention possible. For this purpose, install Ozeki NG SMS Gateway and start to send text message from Nagios via SMS gateway. It is a software product that forwards messages to the mobile network either with GSM modem or IP SMS connection. Learn more about this SMS solution below this page.
| Download: | sms_send.sh (259 bytes) |
| Video: | Send SMS from Nagios via SMS gateway (part 1/2, configure your modem) | |
| Video: | Send SMS from Nagios (part 2/2, configure your system) |
Send SMS from Nagios via SMS gateway (part 1/2, configure your modem)
Send SMS from Nagios (part 2/2, configure your system)
Introduction to SMS messaging
As IT infrastructures of companies are becoming more and more
complex and complicated, monitoring applications, such as Nagios, are widely
used. These monitoring systems help identify and resolve IT problems in a way
that they generate reports about these system failures. These reports usually
can be forwarded to multiple recipients as email messages. The disadvantage of
this
method is that it is not sure that the recipient is sitting in front of his
computer in the critical moment. So if you wish to improve your monitoring
system, first you need to ensure that alerts reach the attention of the
technical staff.
SMS technology can be a solution as it makes it possible to
send SMS notifications from your IT environment to mobile phones. In
this way,
you can be sure that the intended person receives the message alert in real time
and he can make the necessary steps to solve IT issues in time. It is
also possible to send these SMS alerts to multiple recipients so the members of
the IT staff and management can be informed about events occur in the IT system
at the same time. You can receive a notification message even if you are on the
move to be well-informed and up-to-date about the condition of your system.
To achieve these excellent features you need to install a powerful SMS gateway
such as Ozeki NG SMS Gateway on your computer.
Ozeki NG SMS Gateway provides the SMS functionality for Nagios. It has
a unique capacity on the market. The SMS
messages can be sent with a GSM modem attached to the computer or the SMS
gateway connects directly to the SMS center of the mobile service provider over
the Internet. With this solution you can build a stable SMS system to improve
your monitoring application while you save time and money. In this article
a step by step configuration guide will be provided, as well.
Preconditions
To adopt this solution you will need a connection between the mobile network and your
system. You can establish this connection in two ways: using an Internet connection
or using a wireless connection by attaching a GSM phone or GSM modem to your PC. Please
check this website if you need some help for your decision: Internet based SMS connections
vs. GSM modem based (wireless) SMS connections. According to your decision, you will
different preconditions.
Preconditions for Internet based connection to the Mobile network
To establish the connection between your system and an SMS service provider via the Internet, you will need these devices:

Figure 1/a - Prerequisites for Ozeki NG SMS Gateway IP SMS connection
With this type of connection you will need an SMS service provider
who provides access to its services and ensures Internet based SMS services. On our
webpage we have collected some providers to help you in your decision:
SMPP SMS Service
providers. After you have decided which provider and which service is the most
appropriate for you, you need to sign a contract and you will receive connection
parameters from your provider. Once you got the necessary parameters you can setup
your Ozeki NG SMS Gateway software.
Preconditions for wireless (GSM modem) connection to the Mobile network
With this type of connection all you need is a GSM modem or a GSM phone and you can join it easily to your PC with a data cable. The GSM device will be operated by your Ozeki NG SMS Gateway software and it will be able to handle SMS messaging wirelessly. You will need the following components to use this type of connection:

Figure 1/b - Prerequisites for Ozeki NG SMS Gateway GSM modem connection
System overview
After you checked the system requirements you can take a look
at the system overview (Figure 2). The SMS system will work in the following way:
Once an error occurs in your IT environment Nagios detects it and generates a
report about this malfunction. This generated report will be forwarded to Ozeki
NG SMS Gateway with a HTTP request through a shell file. The SMS gateway
processes the message and sends out as an SMS text message to a predefined
cellphone.

|
Figure 2 - Sending SMS in Nagios with Ozeki NG SMS Gateway
As it was mentioned above Ozeki NG SMS Gateway forwards messages to the mobile network over GSM modem or IP SMS connection. Please note that GSM modem connection is highly recommended to be start with as it can be safer than IP SMS connectivity. Later if you need to increase capacity you can attach more than one GSM modem to your computer or you can still switch to IP SMS connection if it is required.
Advantages of sending SMS from Nagios
If you decide to implement this solution you will gain a stable and effective SMS system with several advantages. The most important one is that you can ensure continuous availability. Therefore, the intended person will always be notified if an error occurs in the system. SMS alerts can be forwarded even in cases when the recipient is on the move. In this way, you do not need to check your emails all the time as you will be alerted on your mobile phone. This solution does not require internet connectivity to forward SMS notifications and can be implemented for other SMS solutions beside Nagios. With SMS solution all the problems can be solved in the right time before they affect your customers and business partners.
How to configure Nagios SMS solution
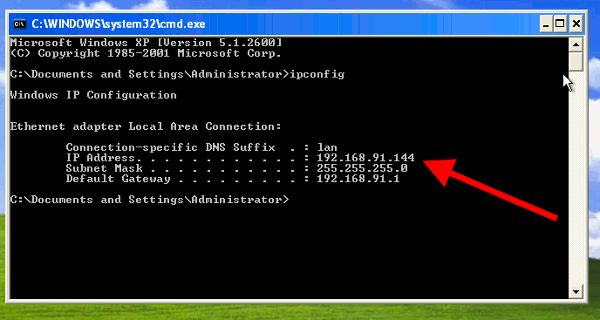
First I have installed NSClient++ program on the computer to be monitored. The IP address of this computer is "192.168.91.144" (Figure 3).
|
Figure 3 - Monitored computer's IP address
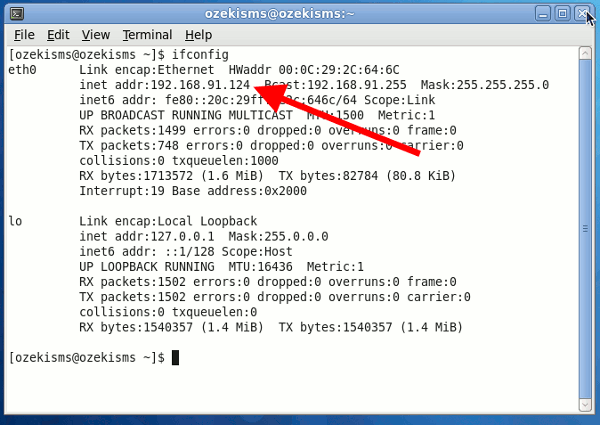
I have also installed Nagios on Fedora Linux, and the IP address of this computer is "192.168.91.124" (Figure 4).
|
Figure 4 - Nagios computer's IP address
First open "nagios.cfg" file to edit. Start "Terminal"
and login as administrator then open "nagios.cfg" file with "vi" editor.
To do so type in the follows (Figure 5):
vi /usr/local/nagios/etc/nagios.cfg |
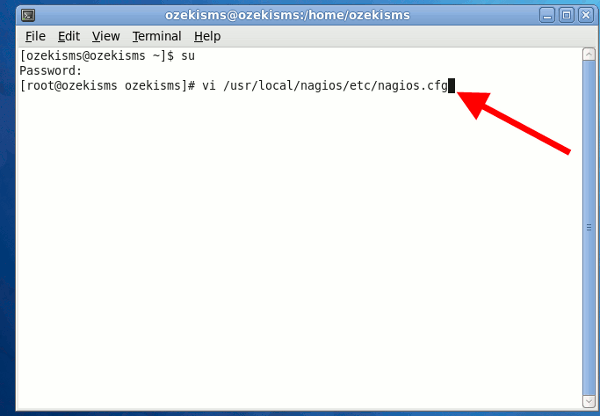 |
Figure 5 - Edit Nagios' configuration file
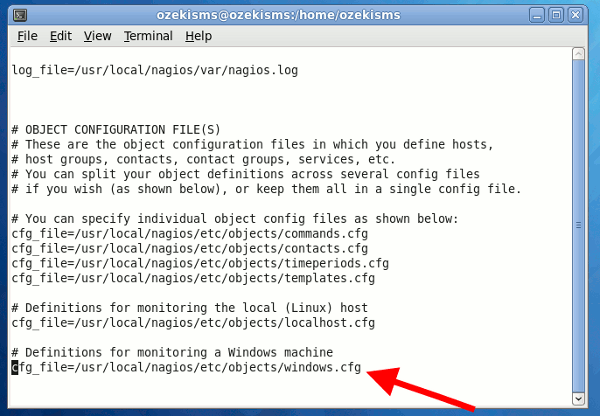
Find the following row:
# Definitions for monitoring Windows machine
Press "i" to enter Insert mode and in the row below it, delete the comment mark.
The final row will look like as follows (Figure 6):
cfg_file=/usr/local/nagios/etc/objects/windows.cfg
Then press "Escape" and type the follows to exit and save the file:
:wq |
|
Figure 6 - Remove comment from configuration file
Now open "windows.cfg" file with "vi" editor. You can do this
if you type in the following command (Figure 7):
vi /usr/local/nagios/etc/objects/windows.cfg |
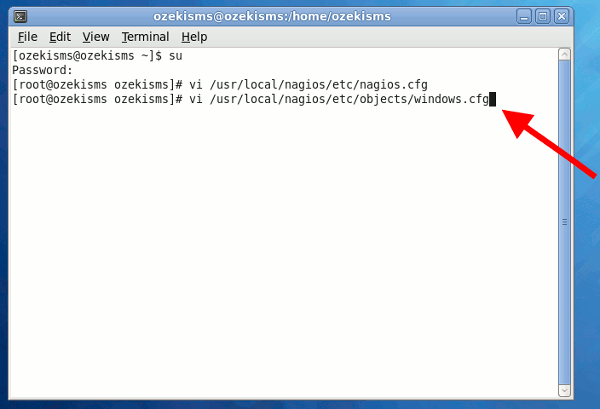 |
Figure 7 - Edit windows configuration file
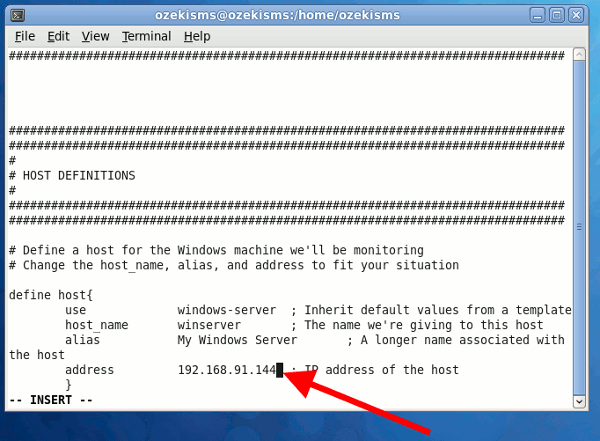
Press "i" to enter Insert mode, then find the row beginning
with "address". Now type the IP address of the computer you wish to monitor. In
our example the row will look like as follows (Figure 8):
address
192.168.91.144
|
Figure 8 - Insert monitored computer's IP address
Then press "Escape" and type the follows to exit and save the
file:
:wq |
I have already downloaded "sms_send.sh" shell script to the desktop. Now I copy it to "libexec" directory of Nagios (Figure 9):
cp /home/ozekisms/Desktop/sms_send.sh /usr/local/nagios/libexec/ |
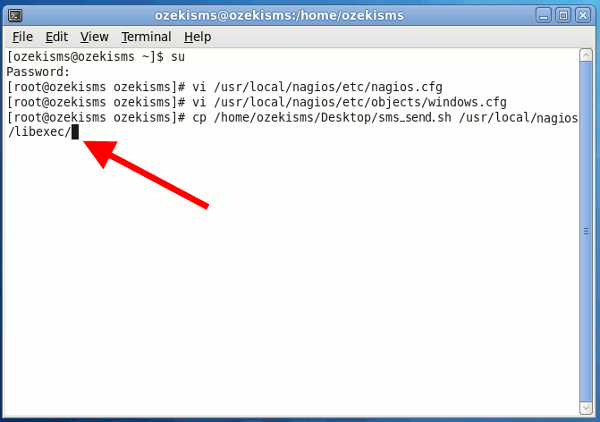 |
Figure 9 - Copy the shell script
You can customize the "send_sms.sh" if you change "url1". In our example it is customized in the following way:
#!/bin/bash |
You can customize url1 variable in the following way:
http://127.0.0.1:9501 is the computer on which Ozeki NG SMS
Gateway has been installed
username=admin is
the username you use to log into Ozeki NG SMS Gateway
password=abc123 is the
password of the user
recipient=06203105366 recipient's phone number
Now open "commands.cfg" file with "vi" editor (Figure 10):
vi /usr/local/nagios/etc/objects/commands.cfg |
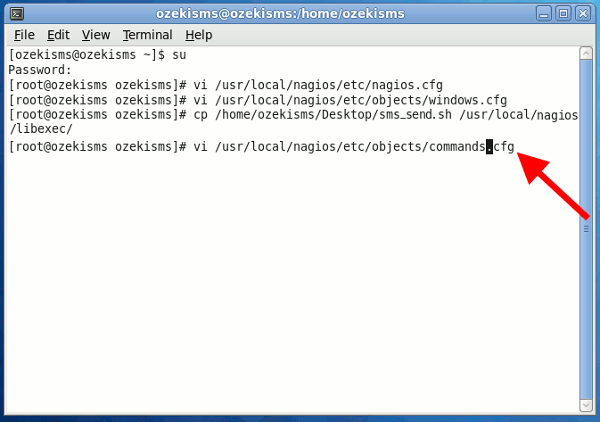 |
Figure 10 - Edit commands configuration file
Press "i" to enter Insert mode and insert a new row after
"notify-service-by-email" and "notify-host-by-email" and provide the following
commands (Figure 11):
# 'notify-service-by-sms' command definition
|
Then press "Escape" and type the follows to exit and save the
file:
:wq |
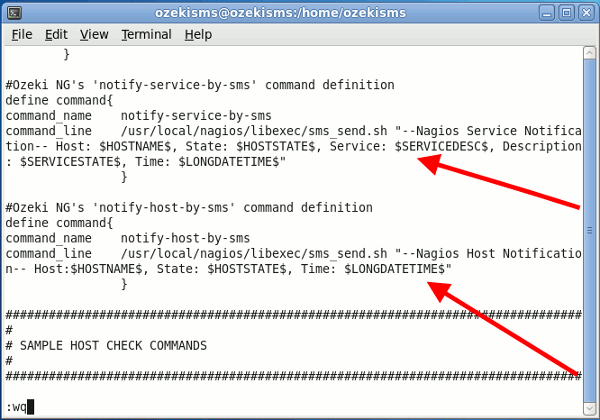 |
Figure 11 - Notification commands
Open "contacts.cfg" file with "vi" editor (Figure 12):
vi /usr/local/nagios/etc/objects/contacts.cfg |
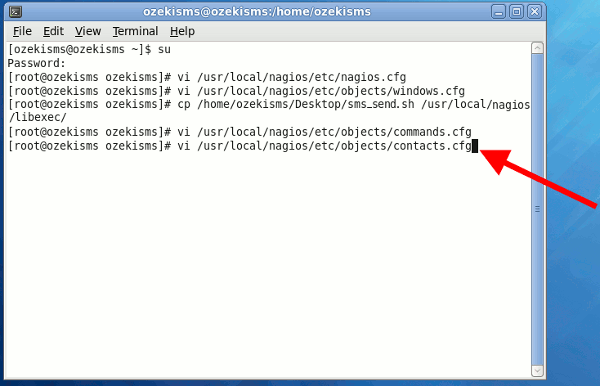 |
Figure 12 - Edit contacts file
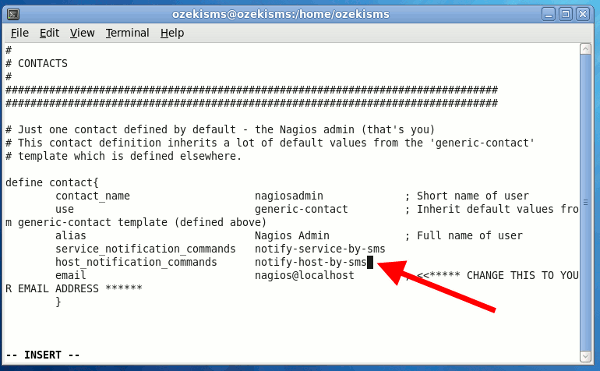
Press "i" to enter Insert mode and insert a new row before the
one beginning with "e-mail". Type the follows (Figure 13):
service_notification_commands notify-service-by-sms host_notification_commands notify-host-by-sms |
|
Figure 13 - Notification commands for admin
Then press "Escape" and type the follows to exit and save the
file:
:wq |
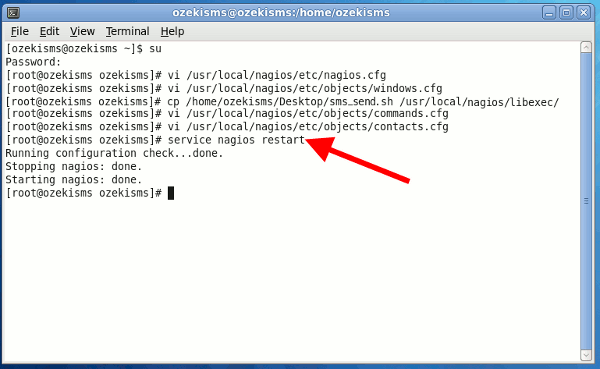
Then restart Nagios service to have changes come into operation. Type in the following command (Figure 14):
service nagios restart |
|
Figure 14 - Restart Nagios service
After Nagios has been restarted, start your web browser and
type in the follows:
http://localhost/nagios |
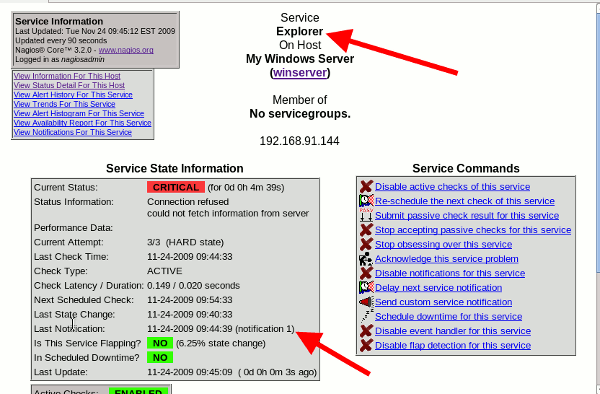 |
Figure 15 - Critical error in Nagios
If you take a look at Ozeki NG SMS Gateway you can see that the message has been sent out (Figure 16).
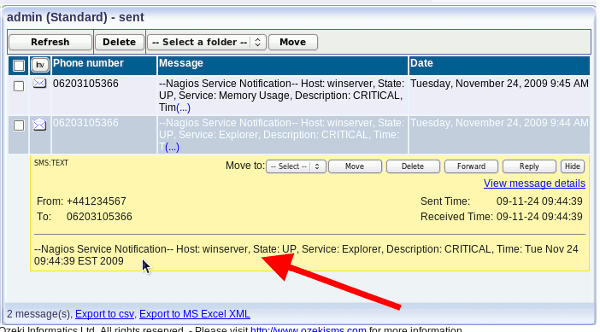 |
Figure 16 - Sent message
Conclusion for Nagios SMS solution
To summarize the above mentioned Nagios with Ozeki NG SMS Gateway is the best solution if you want to ensure continuous availability. With this solution you will gain a reliable, stable and very effective monitoring system as SMS alerts will be forwarded to the recipient even if he is on the move. In this way further problems and harms can be foregone and critical problems can be solved before they affect your business processes. It will result in considerable time and money savings and you can satisfy your customers and business partners in an efficient way furthermore you can attract new ones.
- If you have not downloaded Ozeki NG SMS Gateway yet, you can do it right now on the product page >>>
- To learn more about the possible network connections, read GSM modem vs IP SMS connection page >>>
- Please find how to benefit from implementing SMS solutions in your business on SMS solutions for businesses page >>>
