Configure notification SMS in MS Exchange 2010
| Video: | Send SMS from MS Exchange 2010 (part 1/2, configure your modem) | |
| Video: | Send SMS from MS Exchange 2010 (part 2/2, configure your system) |
Send SMS from MS Exchange 2010 (part 1/2, configure your modem)
Send SMS from MS Exchange 2010 (part 2/2, configure your system)
Utilization of SMS technology in MS Exchange 2010
SMS technology offers endless benefits to your corporate
communication. By implementing SMS messaging you can gain competitive
advantage on the market. SMS solutions allow to send text messages from your
computer to mobile phones and receive response messages from mobile phones to
the PC. In this way, all the important corporate communication processes can
be sped up with SMS messaging.
To achieve this function you can introduce an SMS gateway to MS Exchange 2010.
Therefore, you will be able to forward your incoming email messages as SMS
messages; and you can also receive response messages from mobile phones to
your mail box on the computer due to the two-way nature of SMS messaging. So
you can use your existing mailbox to text messaging that allows a convenient
and efficient communication.
Such a powerful SMS gateway software is Ozeki NG
SMS Gateway. This software ensures that you will be able to
connect to the mobile network to transmit SMS messages. This
connection can be made with a GSM modem
attached to the computer or over
the Internet. Due to its
Email-to-SMS function, you can easily introduce the above mentioned SMS
solutions in your corporate IT system. Implementing this solution will ensure
you more satisfied customers and business partners as you can provide them
SMS services at the highest level. Read this article to
learn how to configure this solution in your corporate IT network.
Advantages of implementing SMS messaging into MS Exchange 2010
- Time and cost efficient
- Ensures availability
- Bi-directional (allows two-way messaging)
- Improves corporate communication and efficiency by reducing response time
- Email-to-SMS function is available
- Helps keep contact with customers and partners in a discreet but effective way
- Provides competitiveness on the market
- Satisfies customers by ensuring availability
- Improves public relations by its fast nature
|
| Ozeki NG SMS Gateway can be obtained by opening the download page: Download Ozeki NG SMS Gateway! |
How it works
Figure 1 demonstrates how your system will work
after setup:
As the first step, you need to enter the IP address of the PC Ozeki NG SMS Gateway
has been installed on, into MS Exchange 2010. This way, when there is an incoming
email message for a specific user, the MS Exchange 2010 forwards this message
to the built-in SMTP server of Ozeki NG SMS Gateway. Once the SMS gateway
processes the message, it sends the SMS text to the given mobile phone.
On the other hand, you can also configure your system for receiving SMS messages
from mobile phones to the corporate IT system. In this case, the Ozeki gateway
connects to the SMTP server of MS Exchange and sends incoming text messages as
e-mail messages to the corporate email box of a user.
SMS
messages are sent to the mobile network with a GSM phone or GSM
modem attached to the computer with a cable, or over the Internet
with IP SMS connection.

|
Figure 1 - SMS sending in MS Exchange 2010 with Ozeki NG SMS Gateway
How to configure MS Exchange 2010 SMS solution
In order to start SMS messaging ASAP, please follow the steps of this guide.
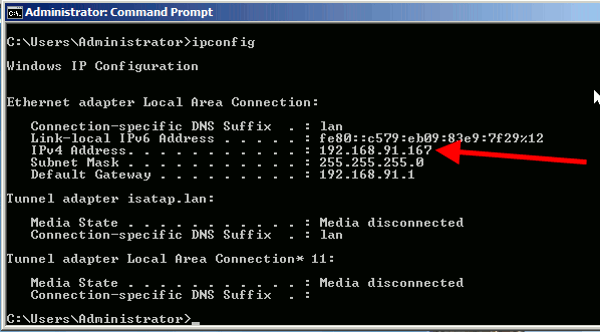
Please note that the IP address of the computer on which MS Exchange 2010 has been installed is "192.168.91.167" in our example (Figure 2).
|
Figure 2 - Server IP address
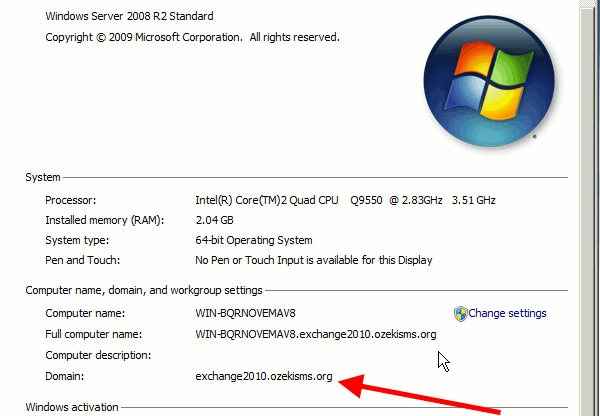
The computer in which MS Exchange has been installed is the domain controller of "exchange2010.ozekisms.org" domain (Figure 3).
|
Figure 3 - Server name
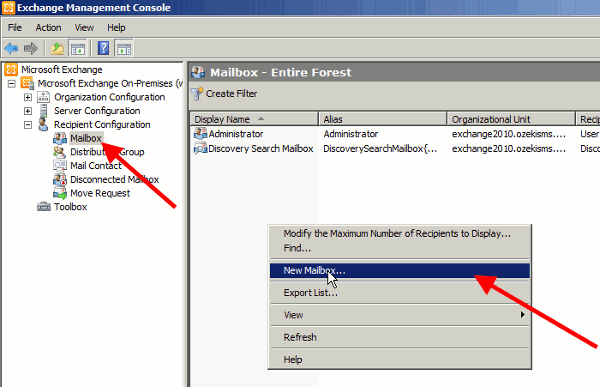
First start "Exchange Management Console". Expand "Recipient Configuration" menu and select "Mailbox" menu item. Right click on the pane and select "New Mailbox" option (Figure 4).
|
Figure 4 - Create a new mailbox
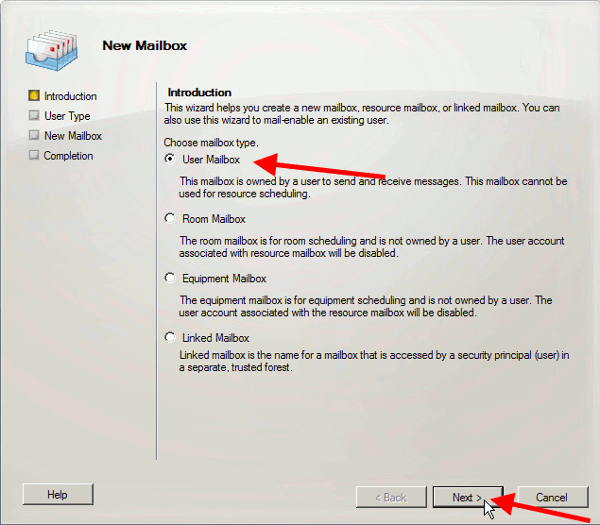
In the pop up window select "User Mailbox" option and click on "Next" (Figure 5).
|
Figure 5 - Create user mailbox
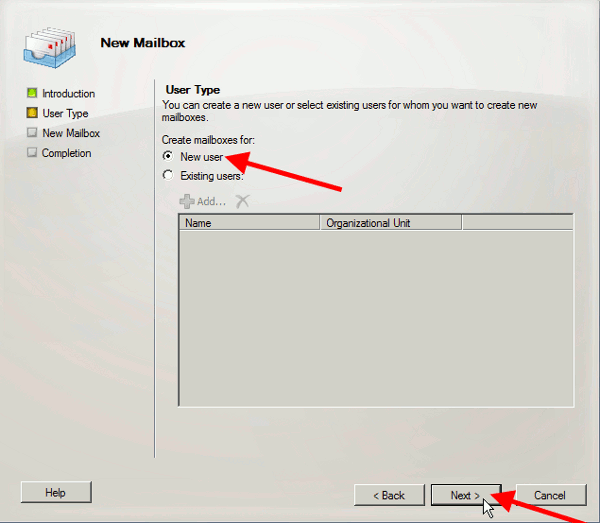
Now I will create a new user so I select "New User" option and click on "Next" (Figure 6).
|
Figure 6 - Mailbox for a new user
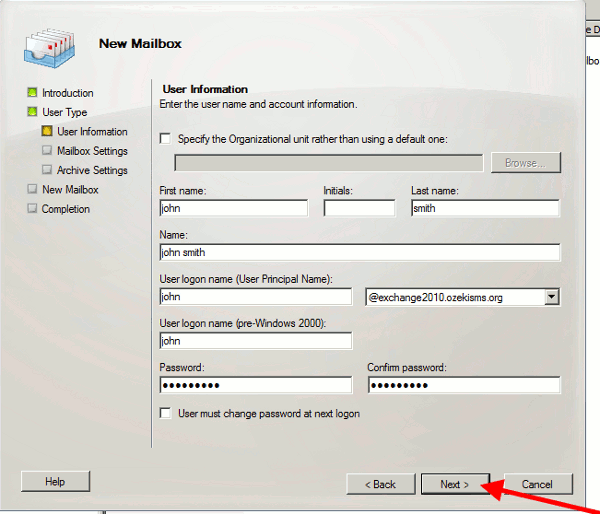
Enter the user name and the account information on the form to create a user and click on "Next" (Figure 7).
|
Figure 7 - Complete the form
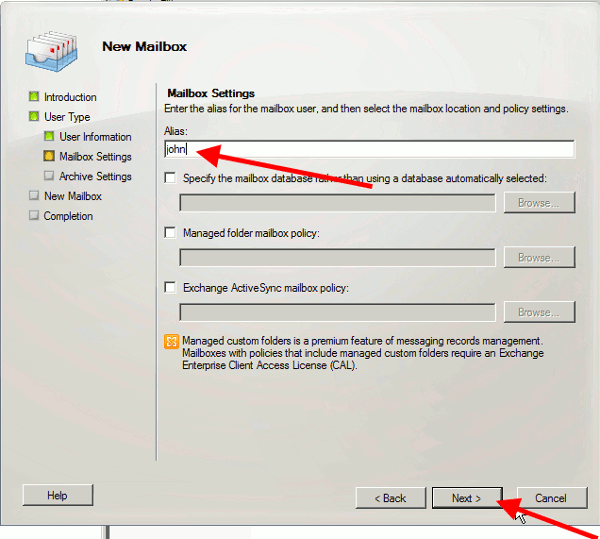
Provide the "Alias" for the mailbox user (e.g. john) and click on "Next" (Figure 8).
|
Figure 8 - Alias for the user
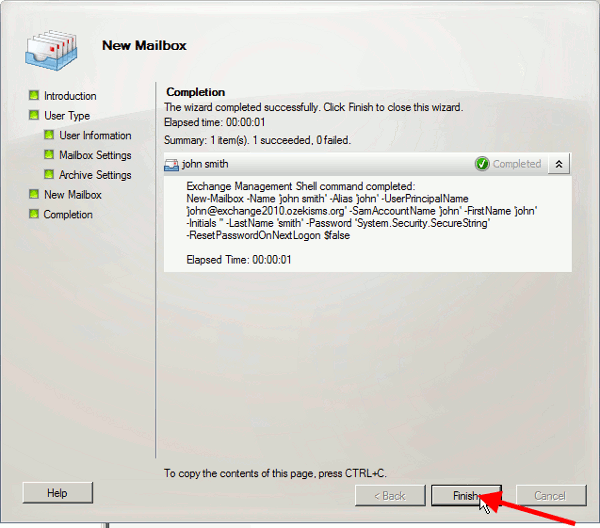
If it is done a window appears with a summary on the information of the created user (Figure 9).
|
Figure 9 - Finished mailbox
For a better demonstration I create an other user
with the name "edward". To do so I follow the same process.
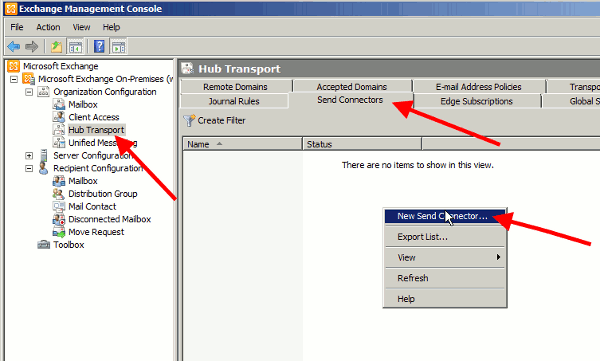
Then click on "Organization Configuration" menu. Select "Hub transport"
menu item and "Send Connectors" tab. Right click on the pane and select
"New Send Connector" option (Figure 10).
|
Figure 10 - New Send Connector
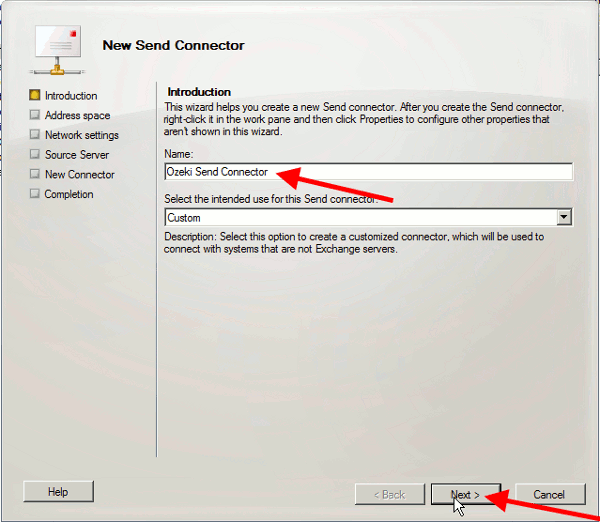
Provide a name for the Send Connector. In our example it is "Ozeki Send Connector". Click on "Next" (Figure 11).
|
Figure 11 - Provide a name for the Send Connector
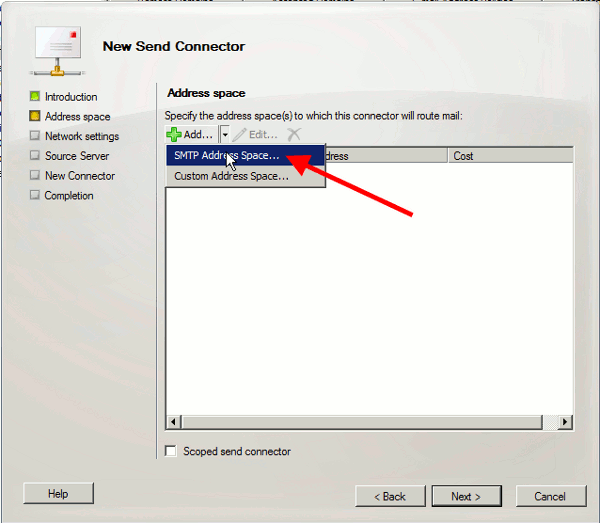
Now specify an address space for this connector. Click on "Add" and select "SMTP Address Space" menu item (Figure 12).
|
Figure 12 - Add address space
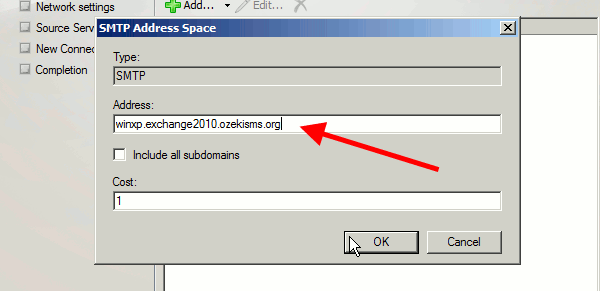
Enter the address space in the "Address" line. In our example the address is "winxp.exchange2010.ozekisms.org". Click on "OK" (Figure 13).
|
Figure 13 - Type address space
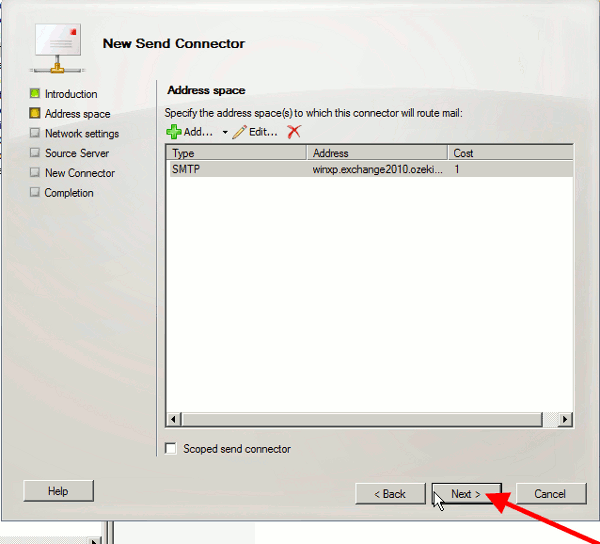
If it is done you can see the defined address space under "Address space" section (Figure 14).
|
Figure 14 - Created address space
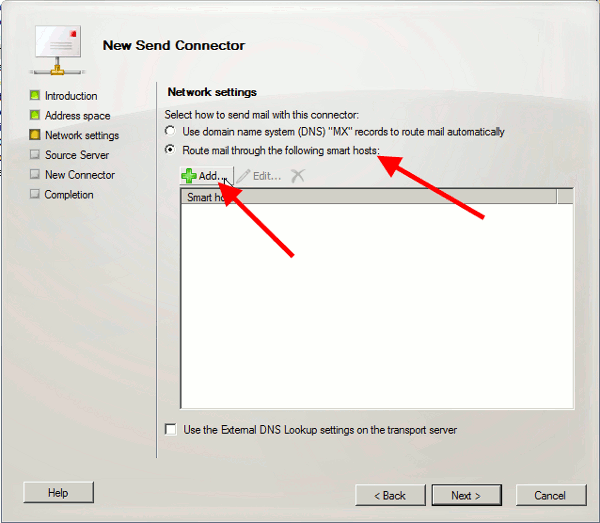
Next select "Route mail through the following smart hosts" menu item and click on "Add" (Figure 15).
|
Figure 15 - Add a smart host
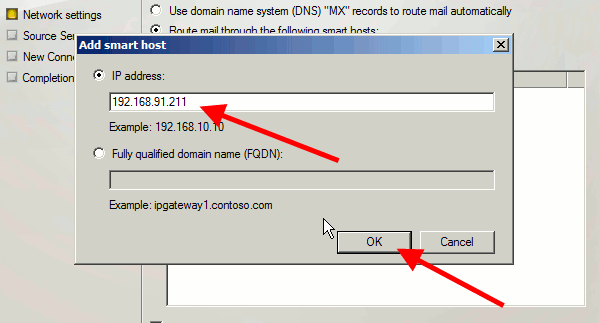
In the pop up window provide the IP address of the computer on which Ozeki NG SMS Gateway has been installed and click on "OK" (Figure 16).
|
Figure 16 - Smart host IP address
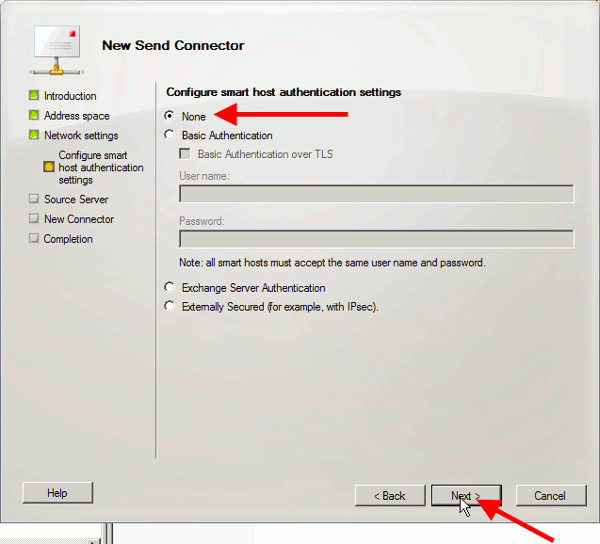
By default Ozeki NG SMS Gateway does not require authentication so set authentication settings to "none" and click on "Next" (Figure 17).
|
Figure 17 - Authentication settings for the smarthost
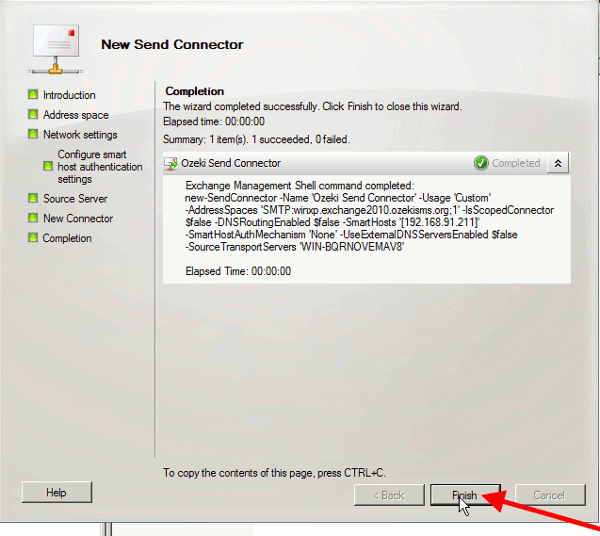
If it is finished you can see a summary about the provided information (Figure 18).
|
Figure 18 - Created Send Connector
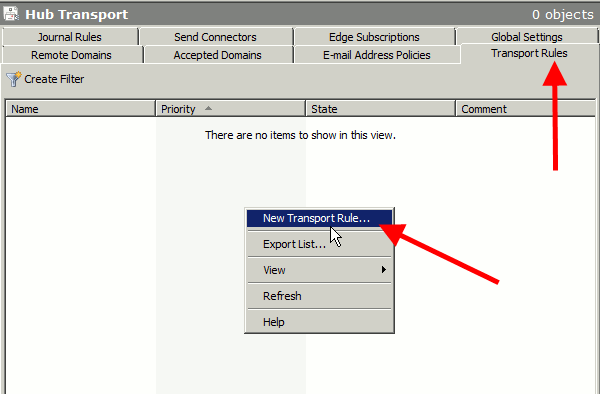
Now click on "Transport Rules" tab, right click on the pane and select "New Transport Rule" option (Figure 19).
|
Figure 19 - Create new transport rule
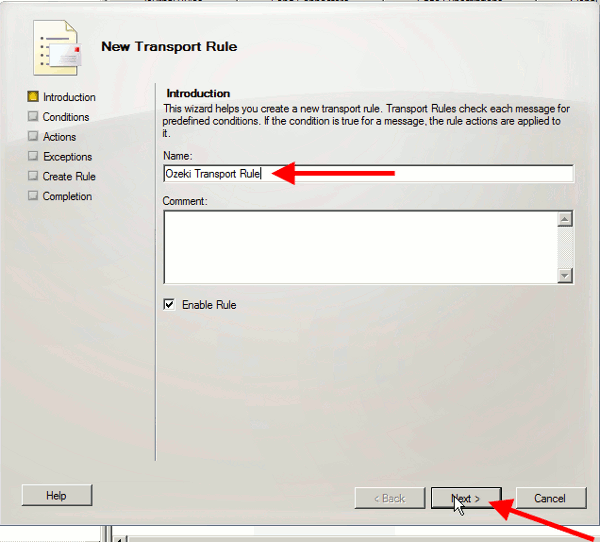
Provide a name for the transport rule (e.g."Ozeki Transport Rule") and click on "Next" (Figure 20).
|
Figure 20 - Transport rule name
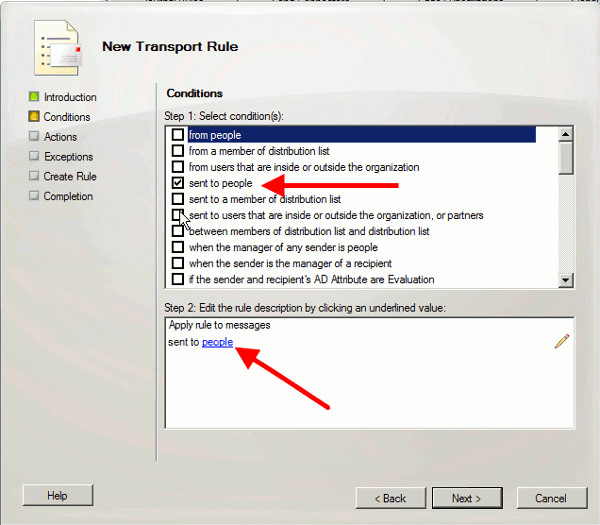
Check "sent to people" condition and click on "people" link below (Figure 21).
|
Figure 21 - Select condition
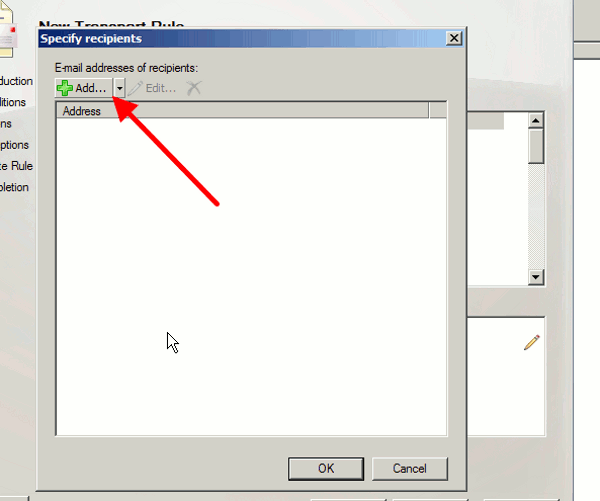
In the appeared "Specify recipients" window click on "Add" (Figure 22).
|
Figure 22 - Add a recipient
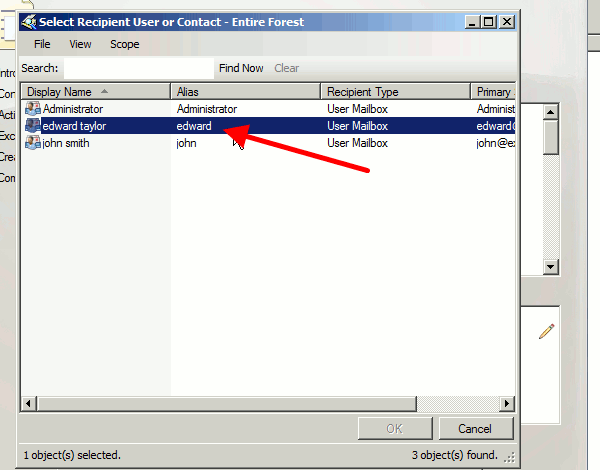
Select a mailbox user (in our example it will be "edward taylor") and click on "OK" (Figure 23).
|
Figure 23 - Select recipient
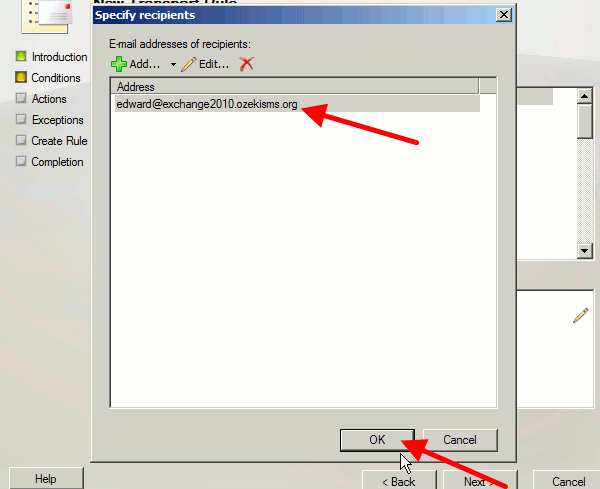
In "Specify recipients" window you can see the selected user. Click on "OK" (Figure 24).
|
Figure 24 - Added recipient
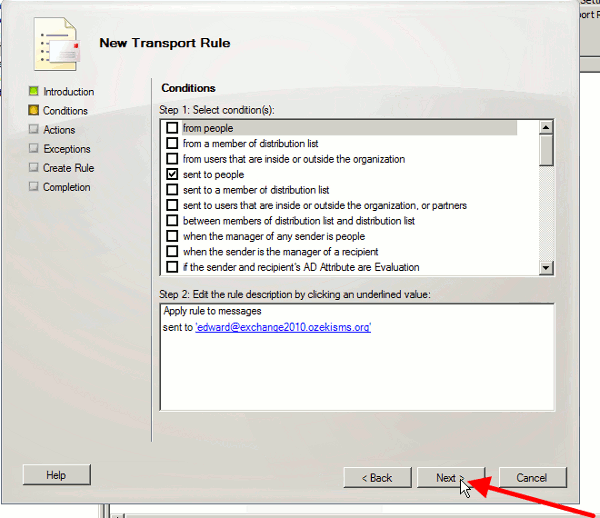
Now click on "Next" (Figure 25).
|
Figure 25 - Created condition
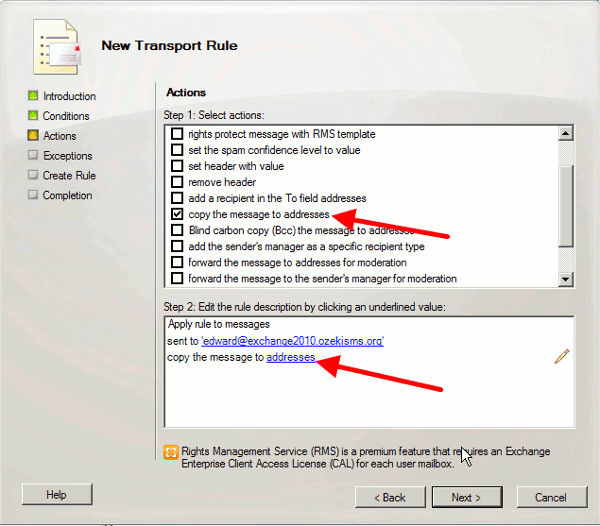
Next, you need to select an action for the rule. Select "copy message to addresses" option from the list and click on "addresses" link below (Figure 26).
|
Figure 26 - Select action
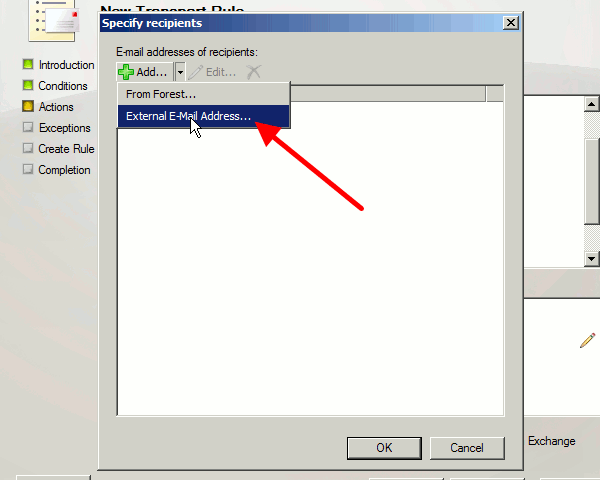
In the appeared "Specify recipients" window click on "Add" and select "External E-mail address" menu item (Figure 27).
|
Figure 27 - Add an external email address
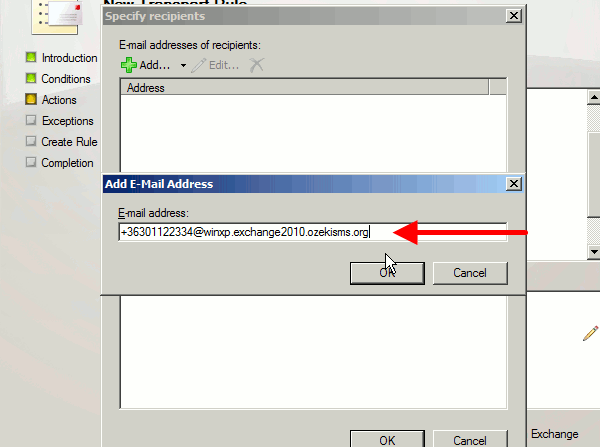
Enter the external IP address in the following way: phonenumber@address_space (Figure 28).
|
Figure 28 - External email address
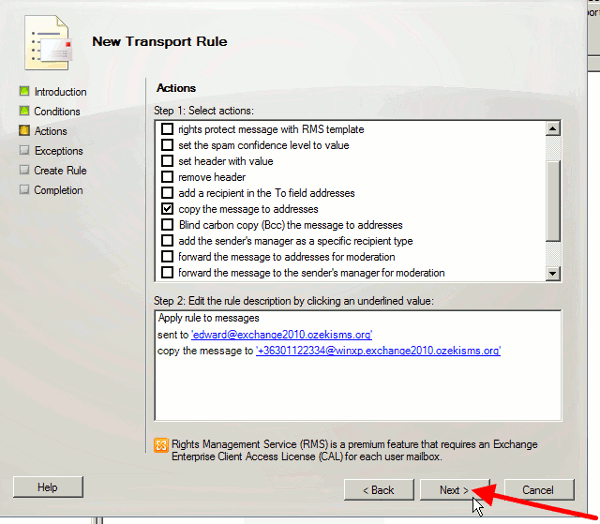
If it is done you can see the created condition and the action. Click on "Next" (Figure 29).
|
Figure 29 - Created external email address
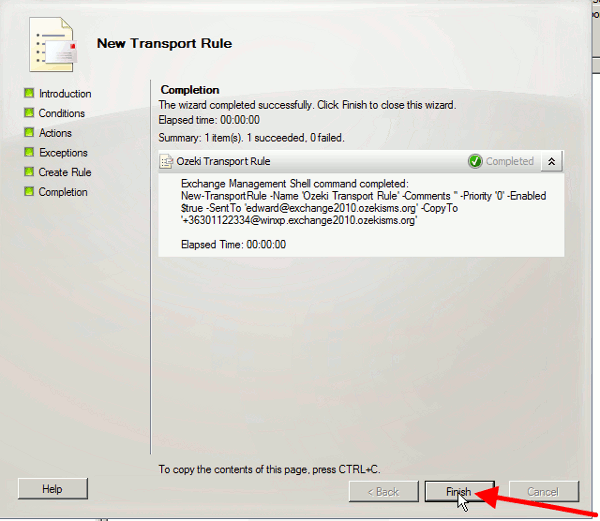
Finally, you will get a summary. Click on "Finish". In this way, MS Exchange server will forward the incoming messages of edward taylor to the defined email address. These messages will also be sent out to the user as SMS messages by Ozeki NG SMS Gateway (Figure 30).
|
Figure 30 - Completed transport rule
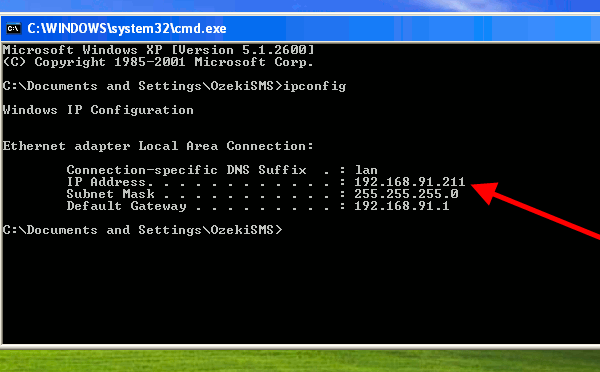
Now you need to configure the client computer. In our example, the IP address of the client computer is "192.168.91.211" (Figure 31).
|
Figure 31 - Client IP address
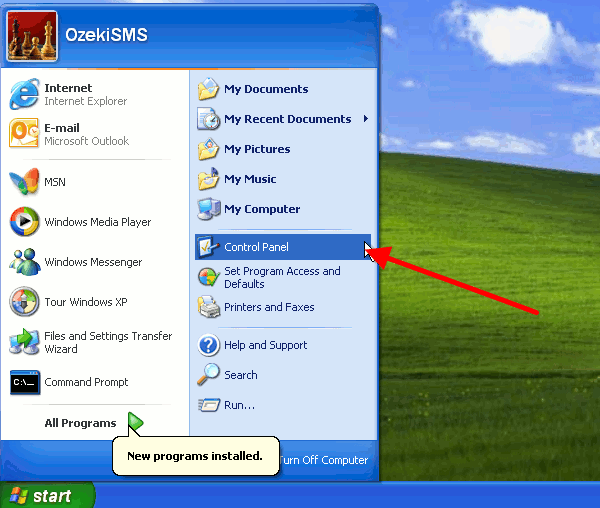
Start "Start menu" and select "Control Panel" menu item (Figure 32).
|
Figure 32 - Start Control Panel
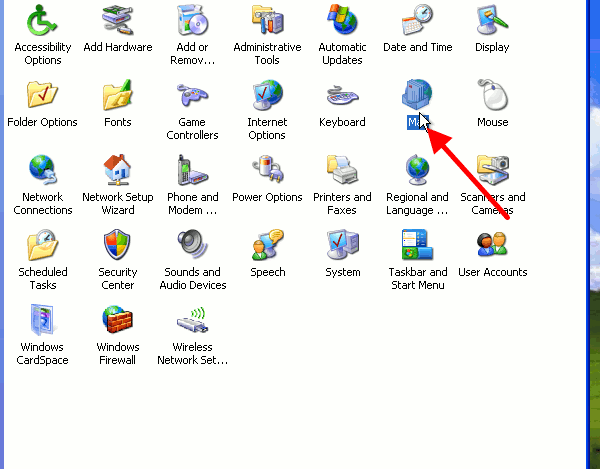
Select "Mail" from the list (Figure 33).
|
Figure 33 - Start mail
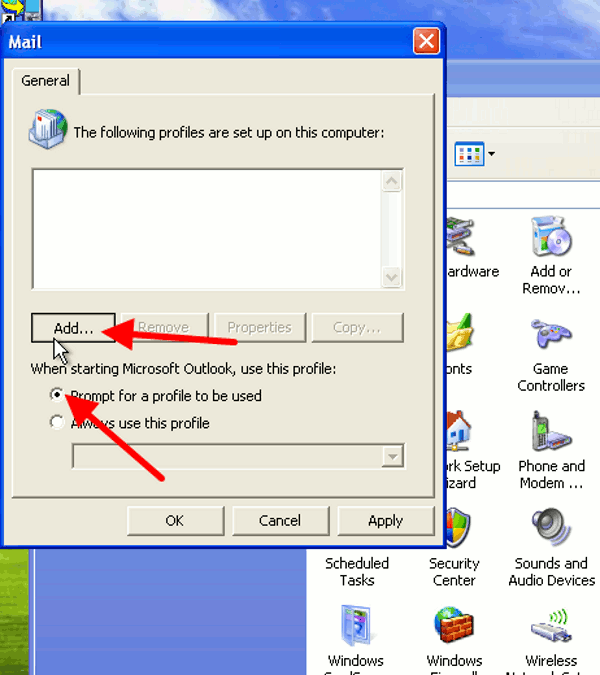
In the appeared window select "Prompt for a profile to be used" option and click on "Add" (Figure 34).
|
Figure 34 - Add profile
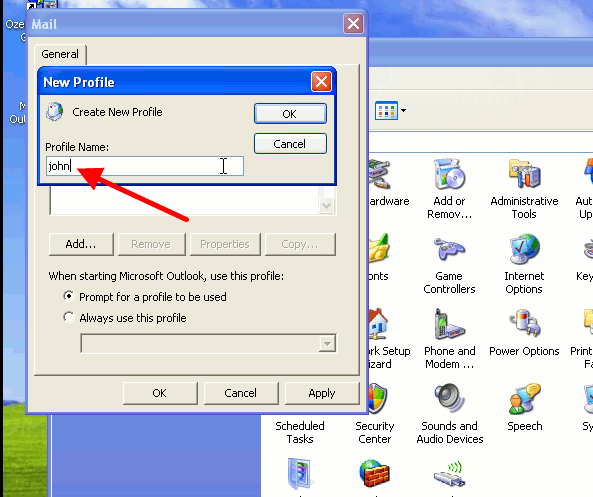
Provide a name for the profile (e.g. john) and click on "OK" (Figure 35).
|
Figure 35 - Provide a name for the profile
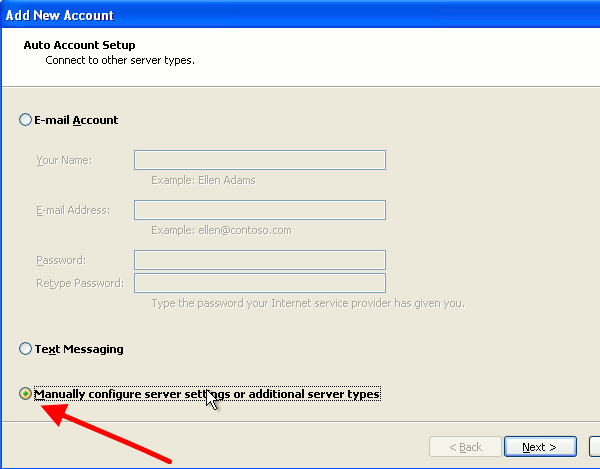
Select "Manually configure server settings or additional server types" option and click on "Next" (Figure 36).
|
Figure 36 - Configure server manually
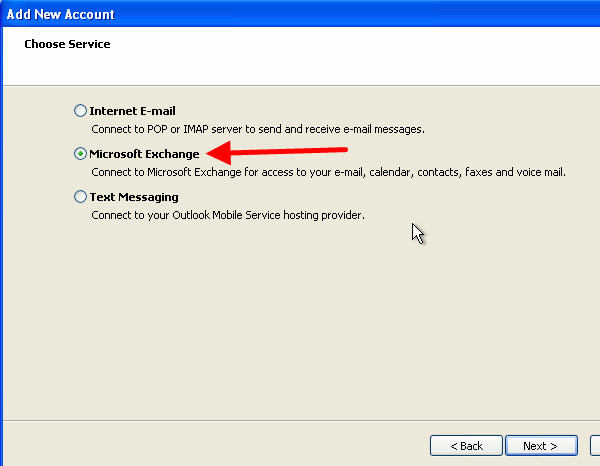
Select "Microsoft Exchange" menu item and click on "Next" (Figure 37).
|
Figure 37 - MS Exchange Server
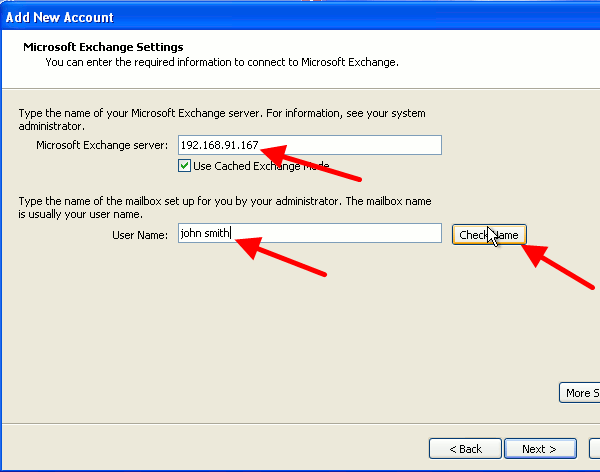
Enter the following values in the respective lines:
Microsoft Exchange server: enter the IP address of the Exchange server.
User Name: provide the username you want to use.
Click on "Check Name" (Figure 38).
|
Figure 38 - Enter server's address and username
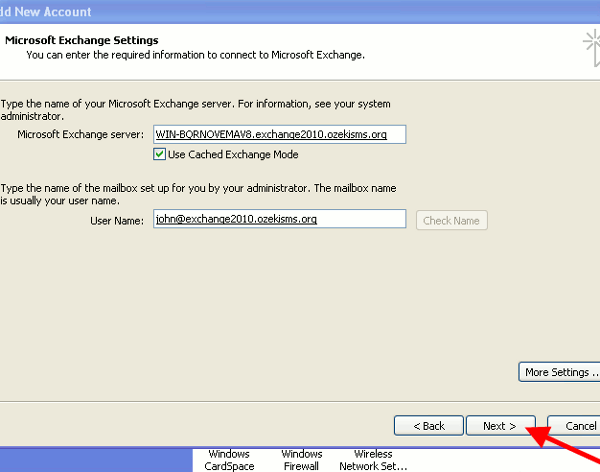
If the name is checked, click on "Next" (Figure 39).
|
Figure 39 - Checked settings
For a better demonstration I create an other profile
with the name of edward.
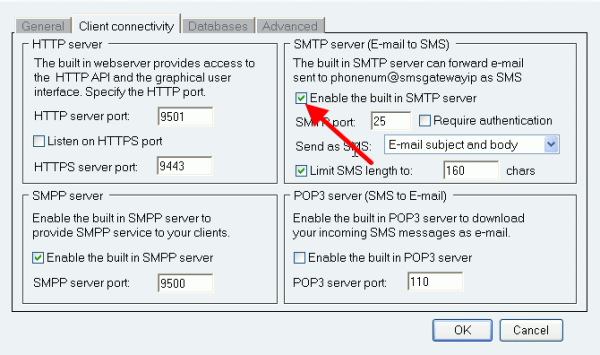
Now start Ozeki NG SMS Gateway. Select "Server preferences" in "Edit" menu
and click on "Client connectivity" tab. Here enable the built-in SMTP
server of Ozeki NG SMS Gateway and click on "OK" (Figure 40).
|
Figure 40 - Enable the built-in SMTP server in Ozeki NG SMS Gateway
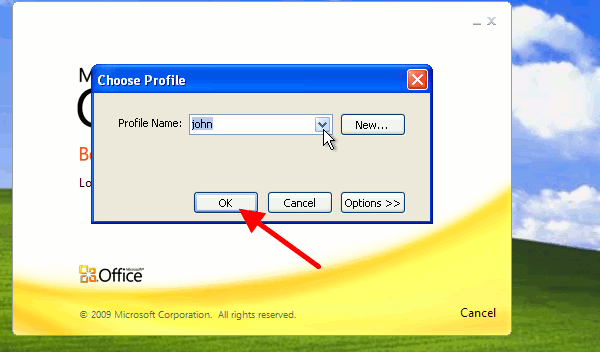
To test the system I start Outlook with john's profile (Figure 41).
|
Figure 41 - Select profile for Outlook
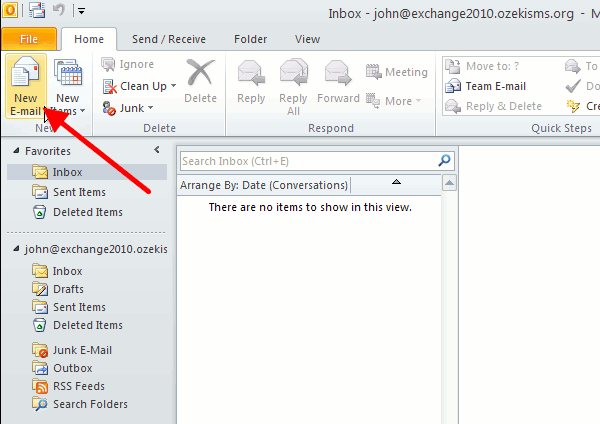
To create a new email, click on "New E-mail" (Figure 42).
|
Figure 42 - Create new email
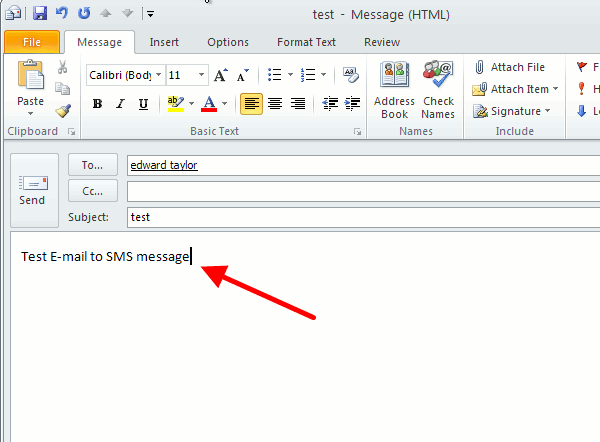
The recipient will be "edward taylor", after I composed the message I click on "Send" (Figure 43).
|
Figure 43 - Write the message
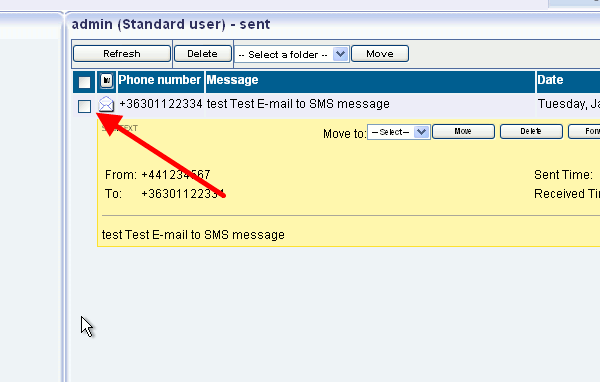
If you take a look at Ozeki NG SMS Gateway you can see the sent message (Figure 44).
|
Figure 44 - Sent message from Ozeki NG SMS Gateway
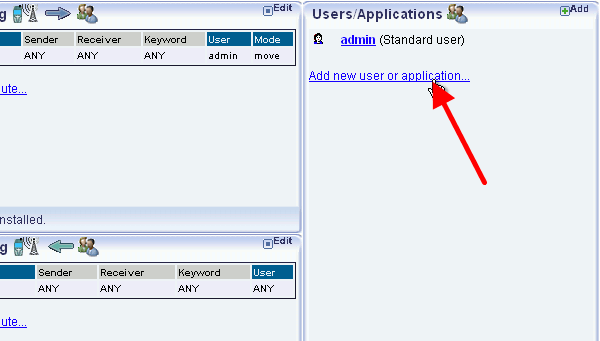
To use SMS-to-Email function, you need to add a new user in Ozeki NG SMS Gateway. Click on "Add new user or application" menu item (Figure 45).
|
Figure 45 - Add a new user
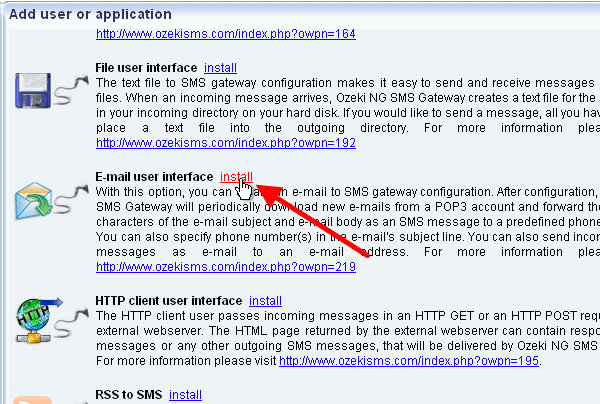
Select "Email user interface" user and click on "Install" next to it (Figure 46).
|
Figure 46 - Install an email user interface
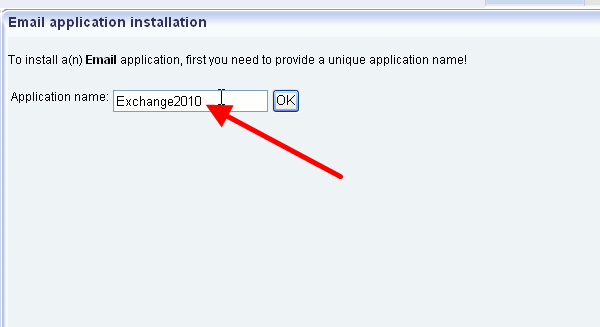
Provide a name for the user (e.g. "Exchange2010") and click on "OK" (Figure 47).
|
Figure 47 - Provide a name for the user
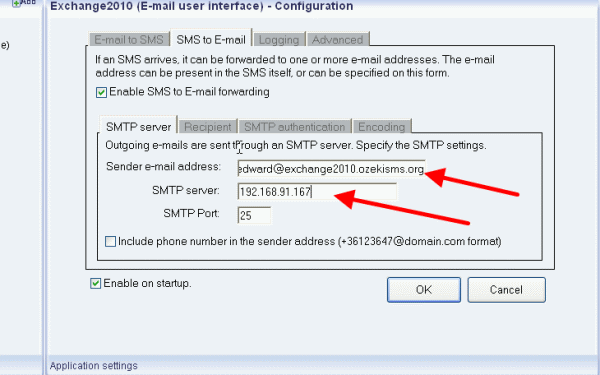
Now enable SMS to Email forwarding and enter the email address of the sender and the IP address of MS Exchange 2010. Then click on "Recipient" tab (Figure 48).
|
Figure 48 - Provide sender's email address and SMTP server address
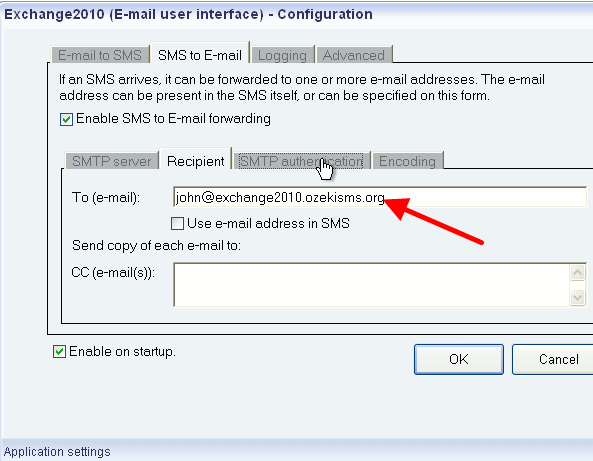
Now provide the email address of the recipient and click on "SMTP authentication" tab (Figure 49).
|
Figure 49 - Provide a recipient
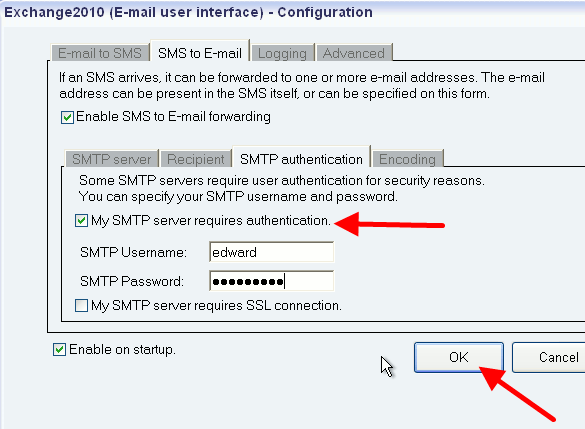
Check "My SMTP server requires authentication" option and provide SMTP username and password (Figure 50).
|
Figure 50 - SMTP authentication settings
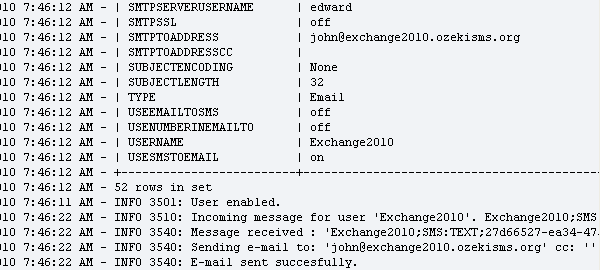
From this time, if there is an incoming SMS message for the user in Ozeki NG SMS Gateway, the software will forward it as an email message to the user (Figure 51).
|
Figure 51 - Sent email from Ozeki NG SMS Gateway
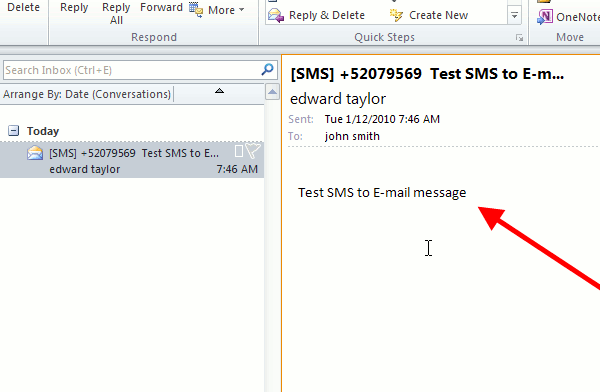
If I enter Outlook, it can be seen that the SMS message has been forwarded as an email message (Figure 52).
|
Figure 52 - Received email
Conclusion for MS Exchange 2010 SMS solution
MS Exchange 2010 with Ozeki NG SMS Gateway provides a competitive and high quality solution for your company. Corporate messaging will be easy and available for everyone. Therefore, you can pay attention to important business matters as corporate communication will be seamless. Furthermore, this solution helps improve public relations and attracts more customers with its next generation technology. If you decide to implement Ozeki NG SMS Gateway you will get SMS services at the highest quality while you can still save valuable time and money.
Download information:
Further readings:
