| Download: | CustomSMSProvider.groovy (1,27 Kb) |
SysAid is a help desk and customer service software, which
improves communication among its users by managing service calls
automatically and by using efficient system management. It includes help
desk, monitoring, managing, and reporting functions.
SysAid with
Ozeki
NG SMS Gateway is the best solution if you want to improve communication
inside and outside your company. If a problem occurs an SMS immediately can
be sent to the competent administrator so he can solve difficulties in time.
With this solution, your IT environment will be safe, well organized and
effective as SysAid monitors your system 24/7 and the automatically
generated reports about the results can be sent in SMS. It can be easily
used because of its well structured system: it places service requests in a
knowledge base so they can be searched easily, the users are automatically
informed about new, changed or intensified service requests and they are
sorted out by type, reference, etc.
With Ozeki's solution you can send SMS from SysAid as notifications,
alerts and reports. On this page you can find additional information on how
to send SMS from SysAid and how to configure it correctly.
Prerequisites
In order to setup this solution you need to find a way
to connect your system to the mobile network. You can do this
by using an Internet connection or you can
setup a wireless connection by attaching a GSM phone/GSM modem to your computer. To help you make a
decision, we have prepared a webpage for you:
Internet based SMS connections vs. GSM modem based (wireless) SMS connections.
Depending
on what you select, you need the following prerequisites.
Prerequisites for Internet based connection to the Mobile network
If you wish to connect your system to an SMS service provider over the Internet you need the following components:
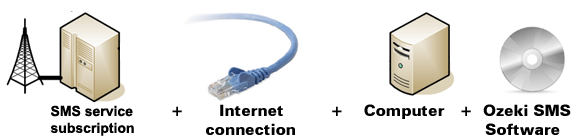
Figure 1/a - Prerequisites for Ozeki NG SMS Gateway IP SMS connection
In this case you need to find an SMS service
provider who can reach the mobile phones in your area. This SMS
service provider should be able to provide SMS service through
the Internet. To find such a provider, you can check our
website where we list some of them:
SMPP SMS Service providers.
Once you have found such a provider, you need to sign up for
their service to get the connection parameters. You can use these parameters
to configure your Ozeki NG SMS Gateway software.
Prerequisites for wireless (GSM modem) connection to the Mobile network
If you wish to connect your system to the mobile network wirelessly, you need a GSM modem or GSM phone, that you can attach to your computer with a data cable. In this case your Ozeki NG SMS Gateway software will operate this phone and will send and receive SMS messages wirelessly. To setup this connection method, you need the following components:
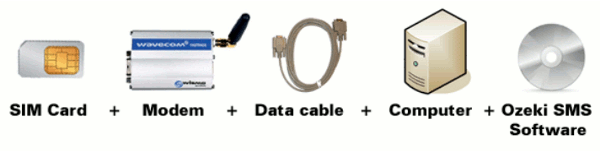
Figure 1/b - Prerequisites for Ozeki NG SMS Gateway GSM modem connection
Your checklist (for GSM modem connection): |
SIM Card - You can get this from your local mobile network operator.* |
|
Modem - Use a Wavecom, Siemens or Multitech modem. |
|
Data cable - Comes with the modem |
|
Computer - Recommended: Intel P4 3Ghz, 2GB RAM, 500MB HDD, Windows OS |
|
Ozeki NG SMS Gateway - Download it from http://www.sms-integration.com |
|
SysAid |
System architecture
When for example an alert occurs in the system SysAid generates a report for the user and this report can be sent to a mobile phone. This is done through Ozeki NG SMS Gateway, which is in direct connection with a service provider. This tool interprets the message and automatically sends it to the GSM Modem or to the IP SMS connection through COM1 channel. With SMPP (Short Message Peer-to-peer) protocol it is then forwarded to the SMSC (SMS Center). Then the SMS message arrives to the intended recipient with the help of an SMS compatible GSM modem or phone. This quick and reliable process is pictured in the architectural diagram (Figure 2).
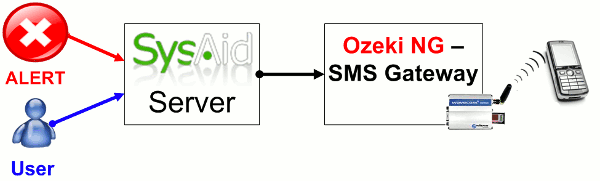 |
Figure 2 - Components of the solution
Installation guide for SysAid SMS solution
To install and configure Ozeki's solution for SysAid please follow the steps below.
Step 1. Copy the source file.
First you need to install the application.
If you follow the default installation process, please copy and save this file:
CustomSMSProvider.groovy into C:\Program Files\SysAidServer\root\WEB-INF\conf
(Picture 3).
You can download
CustomSMSProvider.groovy file from here.
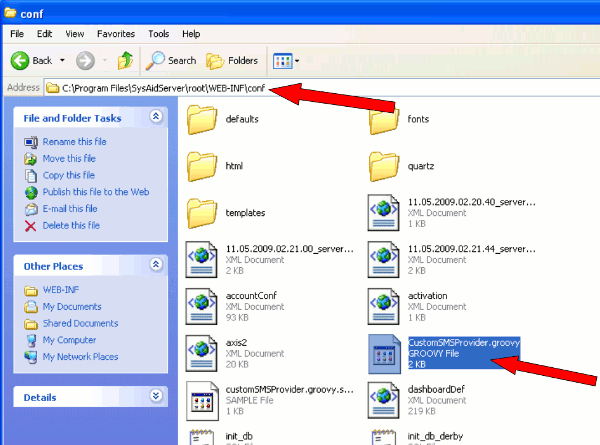 |
Figure 3 - Source file
Step 2. Setup SysAid
Now start SysAid. First I will create a new user in SysAid to demonstrate how to send SMS notification from SysAid. To do so, go to "Preferences" menu (Figure 4).
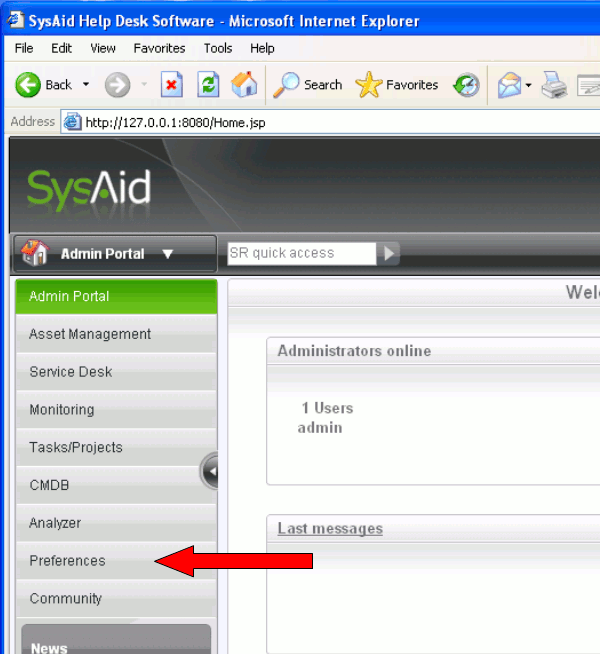 |
Figure 4 - Preferences
Then click on "User Management" (figure 5).
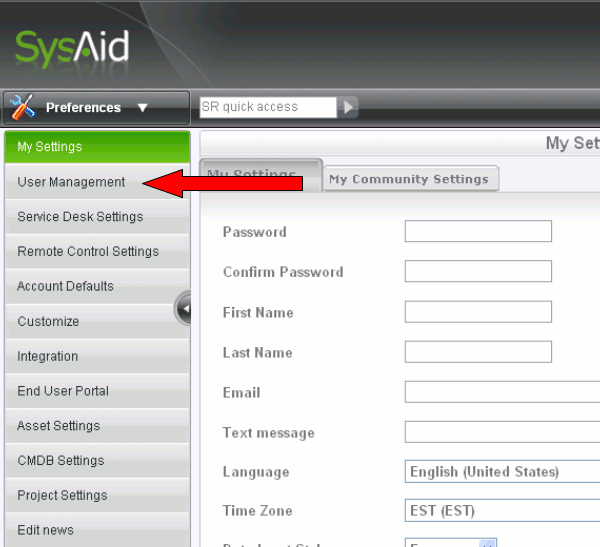 |
Figure 5 - User Management
If you click on "create new user" icon at the top of the page you can create a new user in SysAid (Please note that this step is for demonstration. We create a new user in our example to demonstrate its process) (Figure 6).
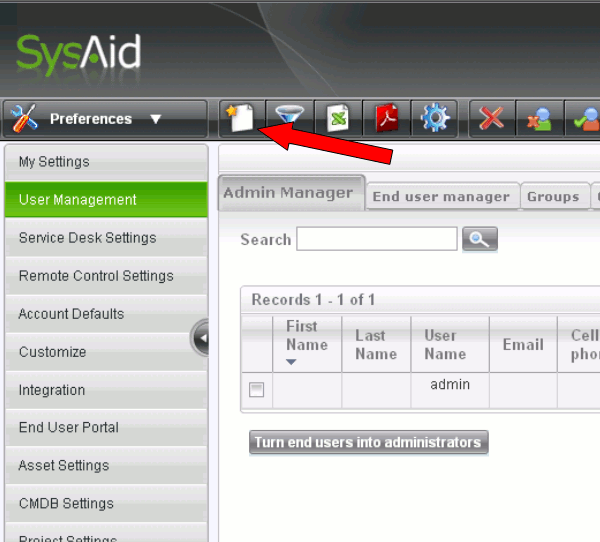 |
Figure 6 - Add user
Provide a username and password for this user. In "Text message" field provide a phone number. Finally click on "OK" (Figure 7).
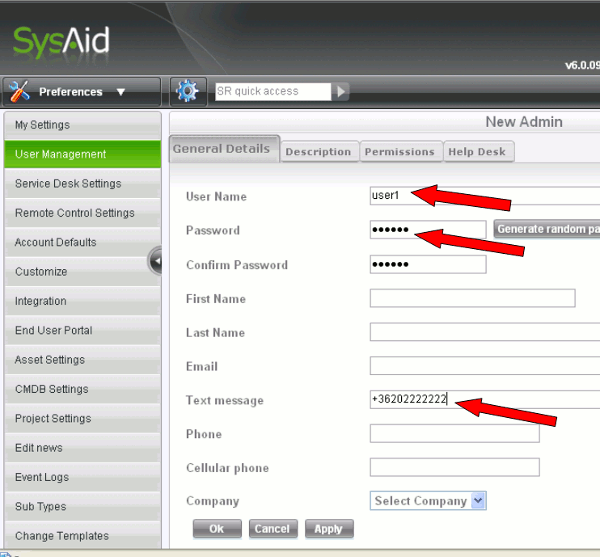 |
Figure 7 - User preferences
Here you can see the created user. Next click on "My settings" (Figure 8).
 |
Figure 8 - Created user
In "My settings" tab provide your own mobile phone number (Figure 9).
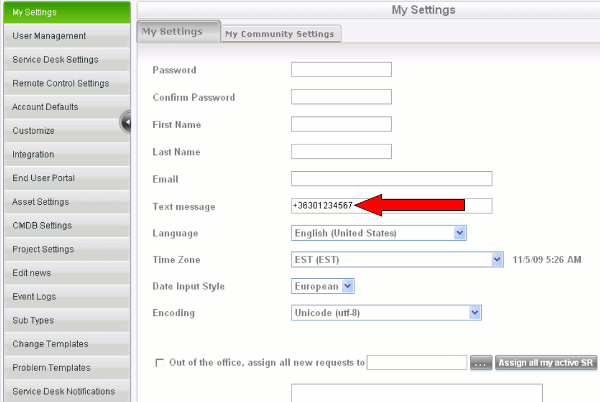 |
Figure 9 - My text message number
Then go to "Customize" menu item and click on "Customized Notifications" tab. Here you can customize the body of your text message (Figure 10).
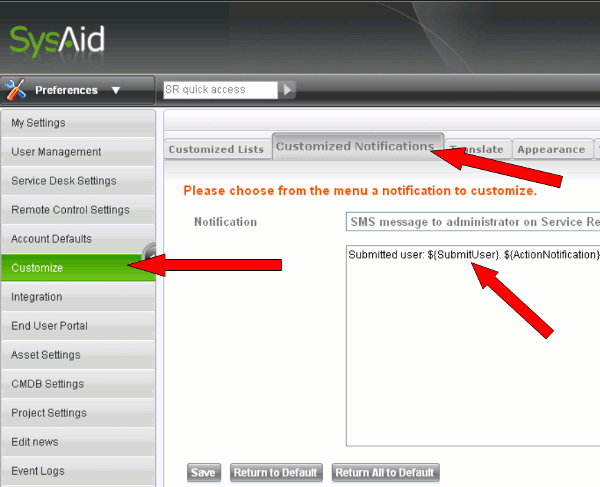 |
Figure 10 - Customize notifications
In our example it is: "Submitted user: ${SubmitUser}. ${ActionNotification}-${Title}
You can create your own custom text message using the following variables. These variables and their values are described in the following table:
| ${ActionNotification} | Message to user, sensitive to action taken. For example, "You have been assigned to Service Request #100" |
| ${StatusNotification} | Message to submitter, sensitive to status/"assign to" change. For example: "Service Request #100 has been closed." |
| ${Title} | The title of the service request |
| ${ModifyUser} | The user who modified the service request |
| ${Account} | The account the service request exists in |
| ${Computer} | The computer the service request applies to |
| ${Category} | The category of the service request |
| ${SubCategory} | The subcategory of the service request |
| ${AssignedTo} | The user the service request is assigned to |
| ${CloseTime} | The time the service request was closed |
| ${Description} | The description of the Service Request |
| ${DueDate} | The date the service request is due |
| ${ID} | The ID number of the service request |
| ${SubmitTime} | The time the service request was submitted |
| ${Notes} | The notes written in a service request |
| ${Priority} | The priority of the service request |
| ${Urgency} | The urgency of the service request |
| ${Status} | The status of the service request |
| ${RequestUser} | The user who requested the service request |
| ${Resolution} | The resolution of a service request |
| ${Solution} | The solution of a service request |
| ${SubmitUser} | The user who submitted the service request |
| ${ModifyTime} | The time the service request was modified |
| ${Location} | The location the service request applies to |
Then click on "Integration" menu item and "Text message"
tab. Provide the following values:
Provider Class:
com.ilient.util.CustomSMSProvider |
Gateway ID:
http://127.0.0.1:9501 |
Then you need to provide your username, password, and the sender ID. Please note that the User Name and Password are the same as the ones provided in Ozeki NG SMS Gateway. In our example it is the default "admin" user and its default "abc123" password. Please save the given data (Figure 11).
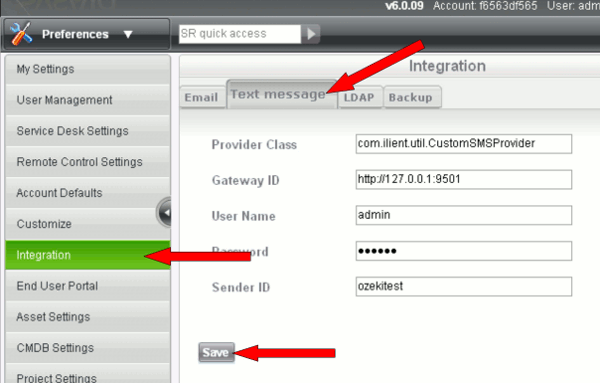 |
Figure 11 - Text message integration
Click on "Service Desk Settings" menu item and "General Settings" tab. Here enable: "SMS notification to the Assigned administrator on new Service Request with priority" (Figure 12). With this option, you can enable SMS sending.
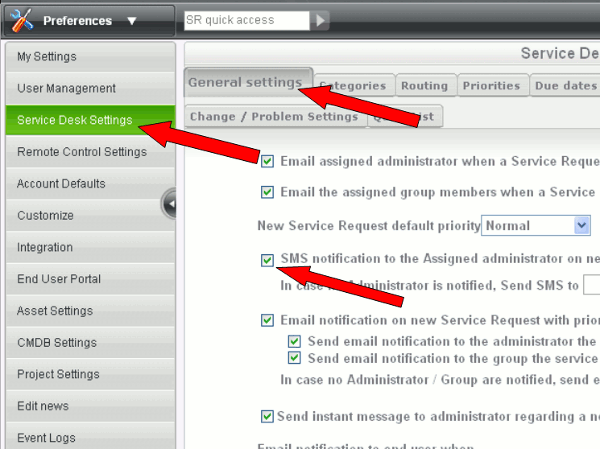 |
Figure 10 - Enable SMS notification...
Next go to "Service Desk Notifications" menu item and click on "General" tab. Select a notification and check "Send SMS" option. Click on "OK" (Figure 13).
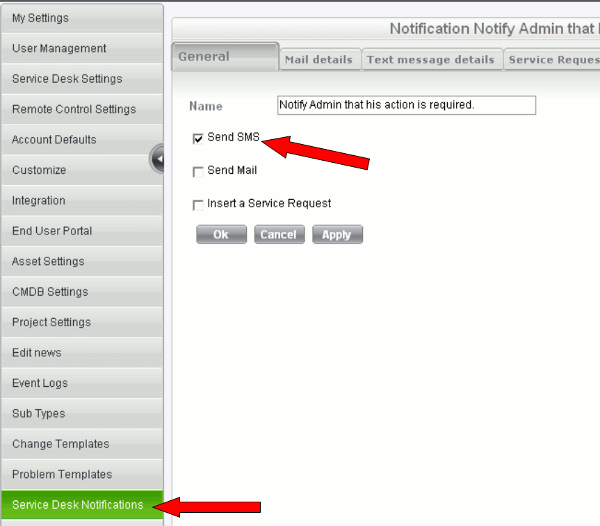 |
Figure 13 - Notify admin on service request
Now select "Service Request Details" tab in "Service Desk Notifications" menu item. Here you can add custom values to be sent. In "Description" field you can type for example:
Submitted user: $SubmitUser |
With this value you can customize your notification (Figure 14).
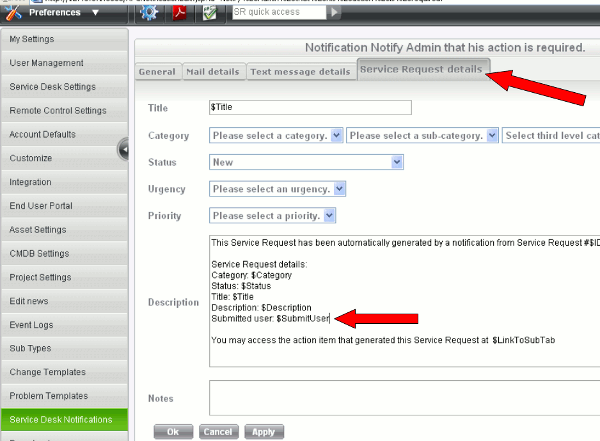 |
Figure 14 - Service request details
Step 3. Test the system by sending SMS from SysAid
Finally I will test the system. To do so I login as "user1". In "Service Desk" menu I click on "New SR" menu item. Here I select a category and subcategory then I provide a title and description for the service request (Figure 15).
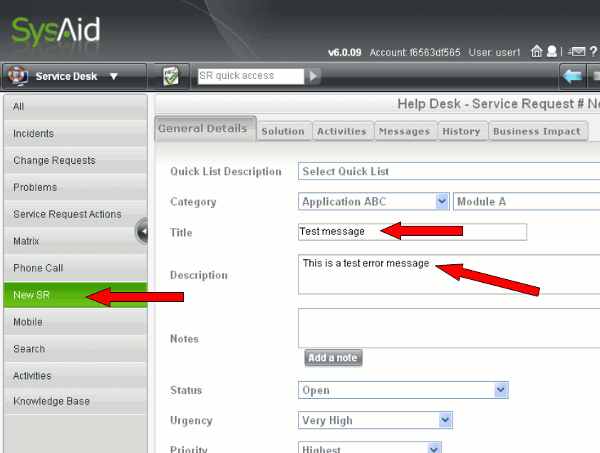 |
Figure 15 - Request a service as user1
Below on this website I change the "Request user" and "Assigned to" to "admin". Then click on "OK" (Figure 16).
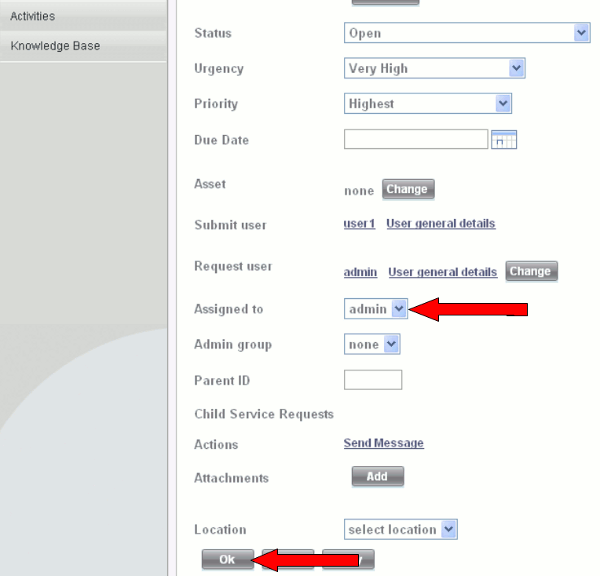 |
Figure 16 - Request and assign user
If I log into the system again as "admin" user the created service request can be seen (Figure 17).

|
Figure 17 - Service request as admin
If you take a look at Ozeki NG SMS Gateway you can see the sent message (Figure 18).
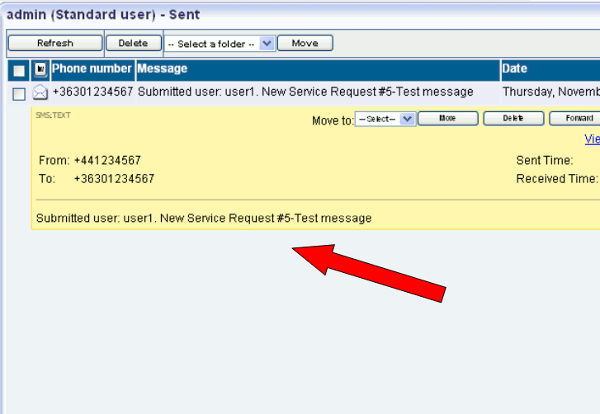 |
Figure 18 - Sent message in Ozeki
These steps conclude the installation and configuration procedure. If you followed the guide above correctly then you will have a swift, stable and working environment.
Please visit the
- Download page to download Ozeki NG SMS Gateway,
- Overview on how to send SMS from Ozeki NG SMS Gateway,
- Installation guide for detailed installation steps to configure Ozeki NG SMS Gateway!
Feature list of Ozeki NG SMS Gateway