Installation Guide
This article is about how to install the Android SMPP SMS Gateway to your android phone. We advise you to read the article carefully, because you can use your android phone as a GSM modem using the Android SMPP SMS Gateway. This solution only requires an android phone and 10 minutes of your time. The setup process is easy to do, and the tutorial is very detailed. You will have no problem with completing the process. The Ozeki SMPP SMS Gateway is a software solution that will connect to the Ozeki SMS Gateway using an SMPP SMS connection. The setup process requires no knowledge of SMS or other communication technologies to complete. It is mostly for beginners and users of the Android SMPP SMS Gateway. Now the first thing to do is to read the article carefully and start to install the Ozeki Android SMPP SMS Gateway.
What is the Android SMPP SMS Gateway?
The Android SMPP SMS Gateway is and android application that can turn your android phone into a GSM modem that can be used by the Ozeki SMS Gateway.
How the Android SMPP SMS Gateway works
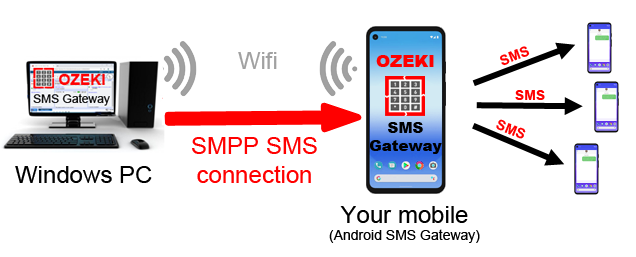
This application offers you a solution if you want to send bulk SMS messages, without an industry grade GSM modem. The system consists of a Windows PC running the Ozeki SMS Gateway and an android phone that runs the Ozeki Android SMPP SMS Gateway. The system works the following way. The Windows PC will be connected to the Android SMS Gateway with an SMPP SMS connection. This will make sure that the Ozeki SMS Gateway can use your mobile phone as a GSM Modem. The GSM modem will now be able to send your SMS messages to all the recipient’s phone.
Installation Guide (Rapid instructions)
How to install :
- Open the ozeki-sms-gateway.com download page
- Download the Ozeki 10 SMS Gateway .apk installer file or scan the QR code
- Open the downloaded apk file
- Select the INSTALL option to start the installation
- Click on Open when the installation is finished
- Allow the Ozeki SMS Gateway's permissons
- Write down the Desktop login URL
- Login to your mobile from your PC
Installation Guide (Video tutorial)
In this video, you are going to see the setup process of the Android SMPP SMS Gateway. The video starts with downloading the Android SMPP SMS Gateway apk file from the Ozeki website. At the end, you will see the login form of the Ozeki 10. The video is only 1:23 long and it features all the details you need to know to successfully install the application to your android phone. The Ozeki Android SMPP SMS Gateway is a solution that will turn your android phone into a GSM Modem that you can use to have access to the public mobile network. You will learn how to download and install the apk from our website and how you can connect it to the Ozeki SMS Gateway.
Download the APK from our website
As the first step of the installation process, you need to download the installer apk. To do so, you need to visit the download page. Here, you need to search for the download link (Figure 1). Click it to start the downloading process. You mobile browser will automatically download the requested APK file. You can use it later to install the Ozeki Android SMPP SMS Gateway.

Start the installation process
Now all you have to do is to wait for the installation process to finish. If you have the installer downloaded on your computer, you can start the installation process. Click the ‘Open’ button once your installer is ready to use. The ‘Open’ button is located in the pop-up window on the bottom of your screen that notifies you if your download is ready (Figure 2). Click it and the installation process will start immediately.

Start the installation process
Now the Ozeki SMS Gateway installer is opened. In the first step, the installer will ask you if you would like to install the Ozeki SMS Gateway on your phone. To proceed with the installation process, click the ‘Install’ button. This will start the installation process that will take no time to finish. As you can see on Figure 3, the Ozeki SMS Gateway android version does not require any special permission from the user.

Open the installed application
Once you have the application installed, you will see the screen on Figure 4. It means that the installation process was successful and you have a working copy of the software on your phone. TO start the Ozeki SMS Gateway immediately, click the ‘Open’ button located at the bottom of the screen on the right side. It will launch the Ozeki SMS Gateway application on your phone. There, you will be able to start the setup process to work with the Ozeki SMS Gateway PC version.

Allow application permissions
Once you start the Ozeki SMS Gateway, you will be presented with the screen visible on Figure 5. In this step, you will grant all the necessary permissions for the Ozeki SMS Gateway to work. All the permission will be detailed and you will know what the Ozeki SMS Gateway needs the permission for. To have a working gateway software, click the ‘Allow’ button for all the permissions. If you click the ‘Allow’ button for a permission, the next permission form will pop up.

Start the Ozeki SMS Gateway
If you have started the Ozeki SMS Gateway with all the permission allowed, you will be presented with this screen (Figure 6). This screen tells you that the gateway is up and running and you can start using it. You will see a link below the ‘Ozeki SMS Gateway is running’ text. Click it to reach the login form of Ozeki 10. Memorize or copy the username and the password visible right under the login link. You will use these to login to the gateway service and start using it.

The login form
In this page, you need to type in the previously seen username and password. As you can see on Figure 7, you have a ‘Username’ and a ‘Password’ input field. Provide both information and click the ‘OK’ button to proceed with the login. If you have logged in, you will have access to the public mobile network using the phone you just configured. The Ozeki SMS Gateway PC version will be able to send bulk SMS messages using this phone. All you need to do is to create an SMPP SMS connection between them.

Summary
This article explained to you how you can install the Ozeki SMS Gateway on you phone. Having the Ozeki SMS Gateway installed on your phone means that you can use the mobile as a GSM modem. You can send bulk messages, scheduled messages or automated messages without buying or setting up a GSM modem. It means that you can start your Bulk SMS business without investment. The only thing you will need is an android phone.
If you would like to know more about the Android SMPP SMS Gateway supplemented with the Ozeki SMS Gateway, feel free to visit these articles : Android SMPP SMS Gateway and Ozeki SMS Gateway.
The next step you need to do is to download the Ozeki SMS Gateway on your computer and start sending SMS messages.