SMS from/to Oracle
The connection between Oracle Database and Ozeki SMS Gateway is a perfect solution for SMS messaging. Ozeki SMS Gateway's Database User makes sure that incoming SMS messages can be inserted while outgoing SMS messages can be selected from database tables. Incoming and outgoing messages are handled in separate tables. The solution uses the Ozeki SMS Gateway software installed on your PC. This solution is divided into 4 sections:
Install Oracle
Create the database tables in Oracle
Configure the Oracle database connection in Ozeki
Send a test SMS from Oracle
This page extends the general guide to SMS from/to Database.
What is Oracle?
Oracle is a database management software product that works with the collection of data treated as units.
How to receive SMS with Oracle database
This SMS receiving system makes it possible to receive SMS using an Oracle Database Server. This arrangement consists of a phone that will be used to send messages, a computer with Ozeki SMS Gateway installed, a database server, and your application. The method works the following way: The phone sends the message. The computer with the Ozeki SMS Gateway will save the message in an Oracle Database Server. Your application could get the messages using an SQL Query. (Figure 1)

How to send SMS from Oracle database
This SMS sending system makes it possible to send SMS using an Oracle Database Server. This system consists of a phone that will be used to collect the messages from the database, a computer with Ozeki SMS Gateway installed, a database server, and your application. The procedure works the following way: Your application will send the message to the Oracle Database Server. It will store your message and the Ozeki SMS Gateway will be able to acquire it using an SQL Query. The message will be sent to the phone after it was acquired. (Figure 2)

SMS from/to Oracle (Video tutorial)
In this video, we are going to show you how you can send SMS messages from Oracle. The video will start with logging into the Oracle system and will end with an SMS sent by Oracle listed in the 'Sent' folder of the Ozeki SMS Gateway. You will learn how to log in to the Oracle system, how to create the connection between Oracle and Ozeki SMS Gateway, and how to modify the connection. The 2:13 long video is easy to understand and detailed. We are using the Ozeki SMS Gateway in most of the video, which means you will work with an intuitive user interface. You will have no problem with following the steps.
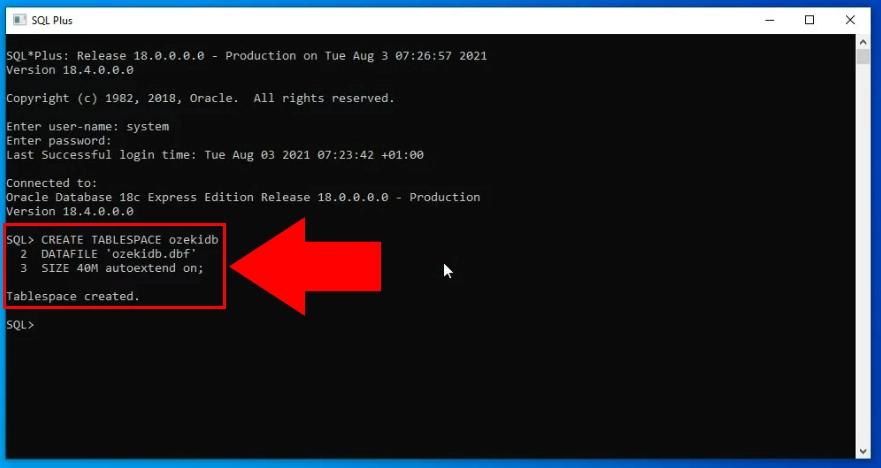
Create ozekidb tablespace
On Figure 1, you can see how you can create the table in Oracle, that will work with the Ozeki SMS Gateway. Execute the 'Create Tablespace' command that you can found below, in the 'Oracle SQL statements' section of this tutorial. It will start the table creating process with the settings provided in the ozekidb.dbf file. If you see the Tablespace created text, the process was successful.
Create a user
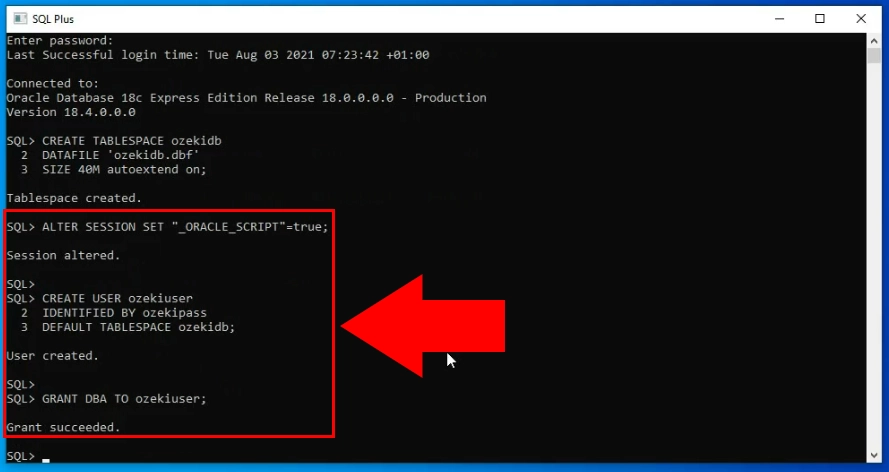
To use the connection, you need to create a new user in Oracle. Figure 3 shows you what commands create the user. You first need to use the 'Create user' commands that you can found below, in the 'Oracle SQL statements' section of this tutorial. You can create the user by giving the 'CREATE USER ozekiuser' command to Oracle. Now that you have the user, you need to provide DBA privileges to it. You can do so with the 'GRANT command' If you see the Grant succeeded text, the process was successful.
Create the 'ozekimessagein' table
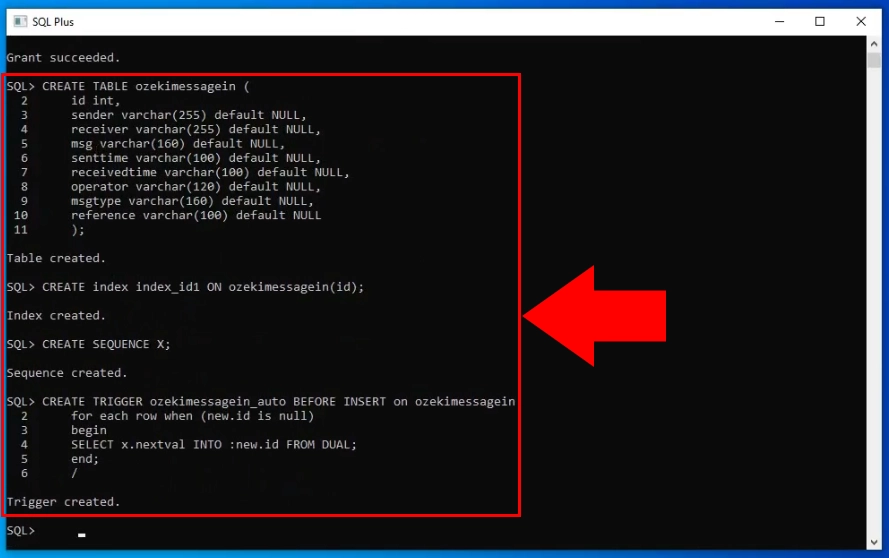
The next step is to create the tables that will be used to store your incoming and outgoing messages. The first table you need to create is the 'ozekimessagein' table. On Figure 4, you can see what command you need to provide to Oracle to create your table. The commands you need to execute can be found in the statements section, in the 'Create Tabel' section. If you can see the 'Trigger created' text, the process was successful.
Create the 'ozekimessageout' table.
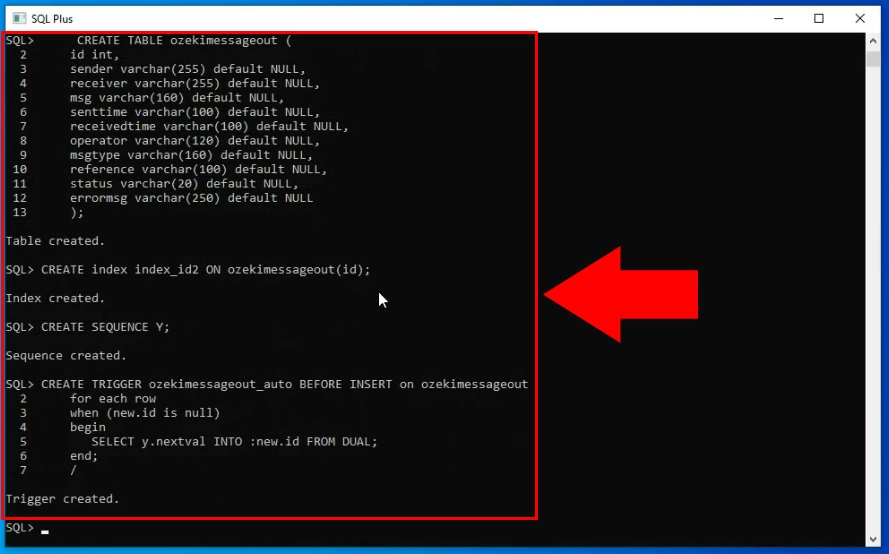
On Figure 5, you can see the process of creating the 'ozekimessageout' table. It will store all the messages you wish to send and all the sent messages as well. You can find the SQL statement you need to provide in the second part of the 'Create table' section below.
Create an SQL messaging application interface
Now you need to start working in the Ozeki SMS Gateway application. Open it and search for the 'Add new user/application..' button located on the left side of the home page (Figure 6). Click it and it will take you to the user/application install list. Here, you need to search for the 'SQL messaging' list item, located in the 'Application Interface' section. Click the blue Install button next to it and start the setup process.
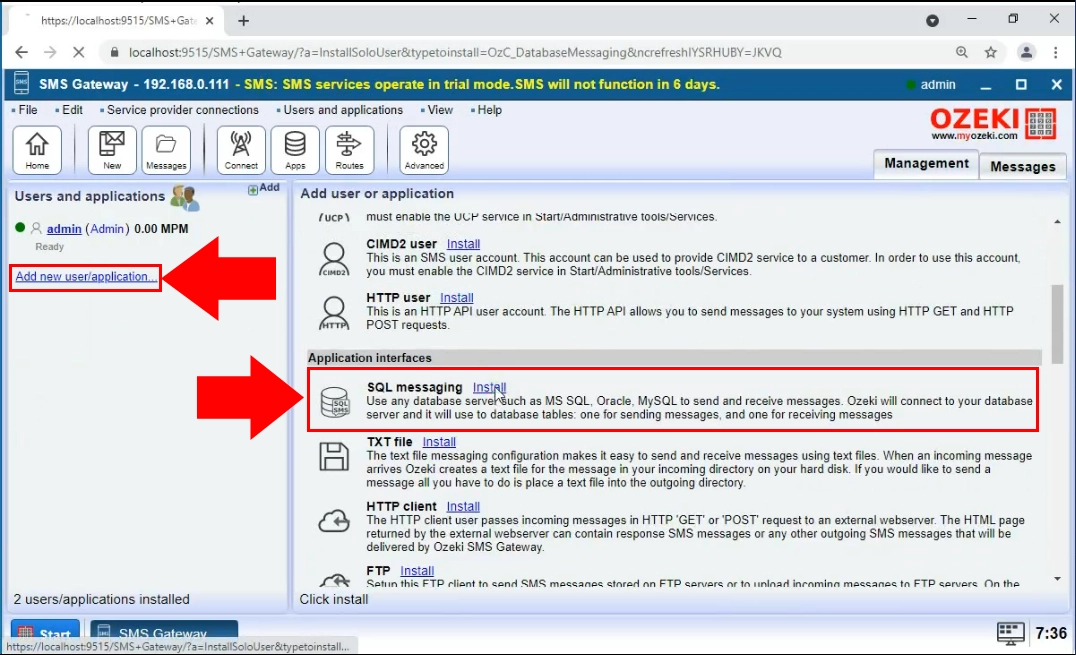
Click the Install button next to Oracle
In the Install user/application step, you need to choose which SQL database management software you wish to use with the Ozeki SMS Gateway. In this case, choose the Oracle option (Figure 7). Click the blue Install button next to the title and start the setup process.
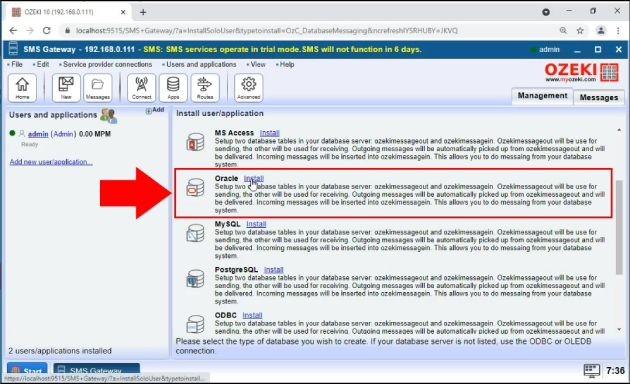
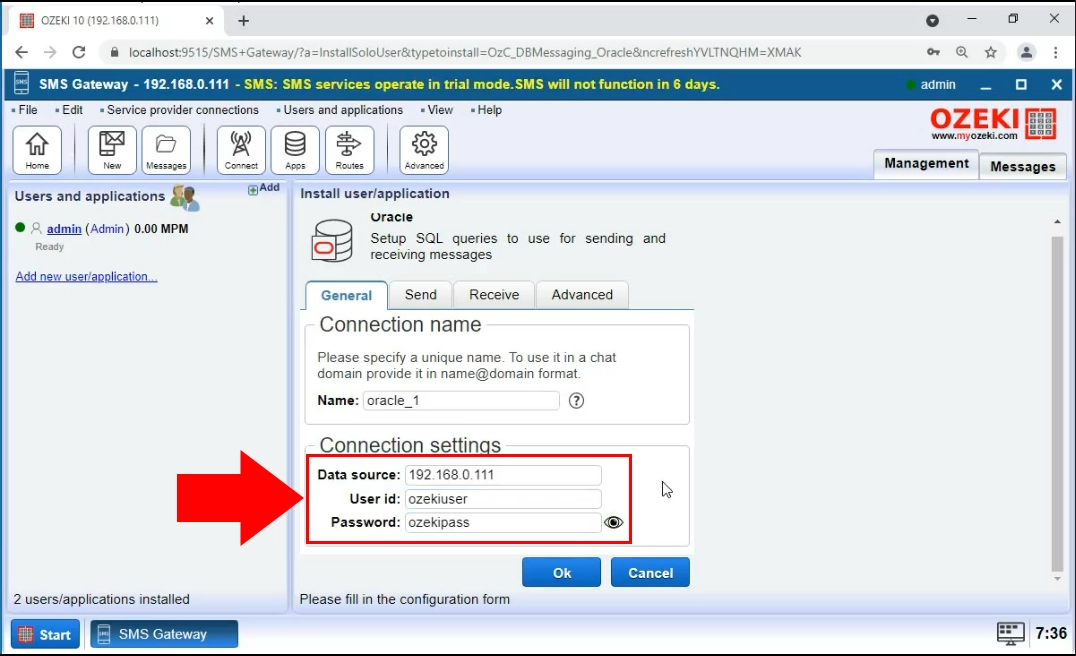
Provide the connection settings
In the General tab of the new Oracle application interface, you will see a 'Connection Settings' group box (Figure 8). Provide the IP address and the login credentials of the data source here. It will make sure that the connection between the Ozeki SMS Gateway and the Oracle database management system will be established.
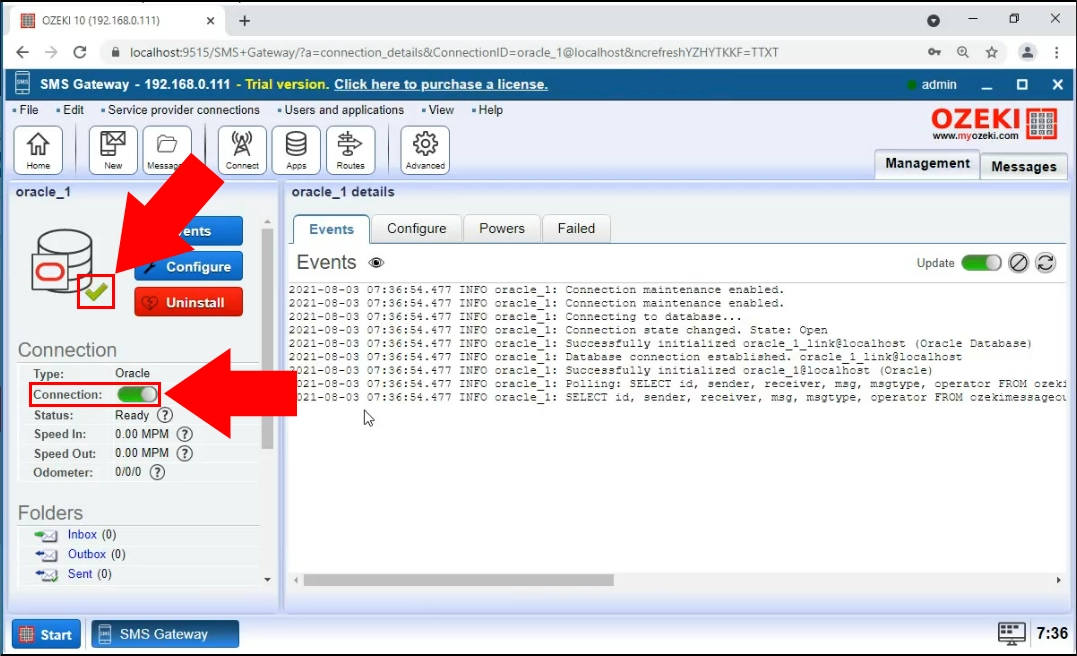
Turn on the Application interface
Now that you have successfully created an SQL Application interface, it is time to turn it on, by switching the 'Connection' switch button. If it is green and you can see a checkmark next to the icon of the application interface (Figure 9), it means that the connection is active. You will see the initialization process in the Events tab.
Use the 'INSERT' statement
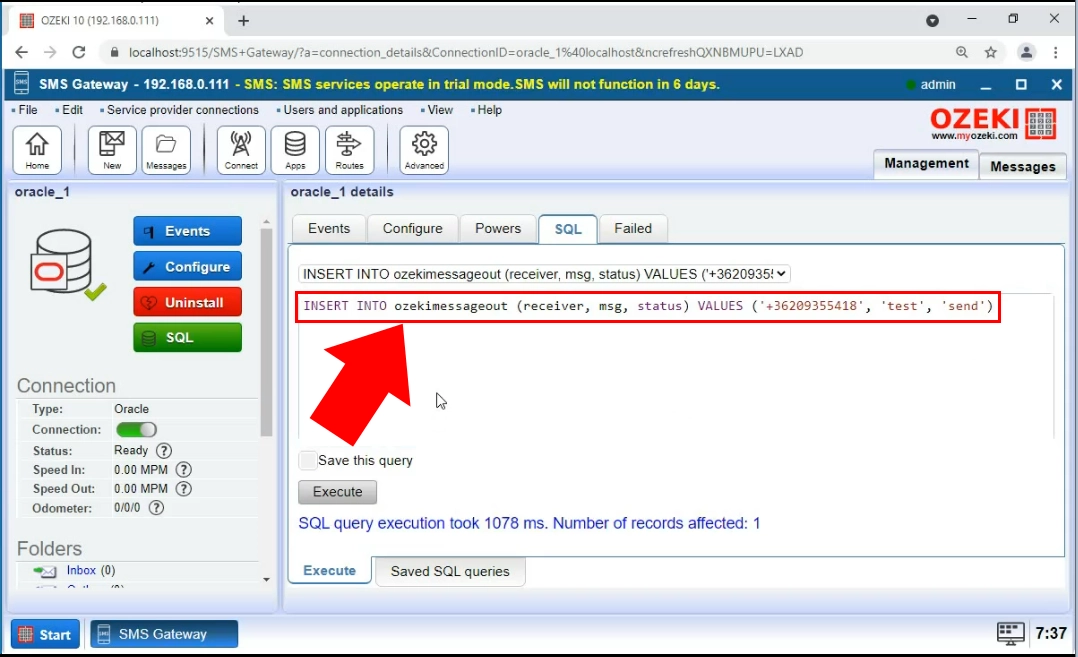
On Figure 10, you can see how you insert a message into the 'ozekimessageout' table. It means that the inserted message will be sent by the Ozeki SMS Gateway application, with any message found in the 'ozekimessageout' table. The INSERT statement will create a database item with the properties determined in the statement. If you are familiar with SQL, feel free to modify the properties of the statement to test your system.
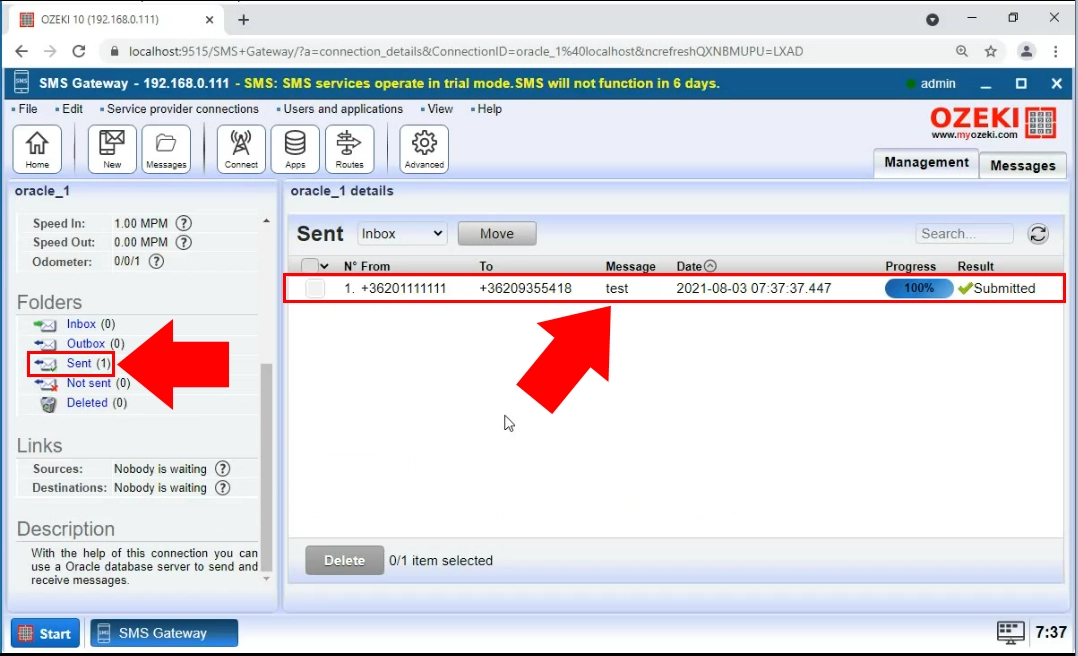
The Sent message
Now you have sent your first SMS message. Make sure to check the Sent folder in Ozeki SMS Gateway to confirm that the message was sent successfully. You can get all information about the message from the list of the sent messages. You can see the text of the message (Figure 11), the time it was sent, the result of the process, and the addresses of the sender and the receiver.
You should also make sure that Ozeki SMS Gateway is installed. You should also check if Oracle Database is installed. If Oracle is not installed on your machine, please download the server and client from the oracle website. You will see how to store outgoing and incoming SMS messages in your Oracle Database's tables.
You can choose from a wide variety of options to send and receive SMS messages. You can send messages through a wireless mobile link, by using an Android mobile phone or an SMS modem attached to your computer. You can also send SMS messages over the Internet using in IP SMS service. In this case you will likely setup an SMPP, CIMD2 or UCP/EMI service provider connection.
To use either of these connection methods, you need to setup a Database link on Ozeki SMS Gateway. For Oracle connections, you need to configure this link to connect to your Oracle Database server. You will need to use a connection string to specify the connection details.
Each Database Connection needs its own Database User.
The Database User belonging to an Oracle Database has the following connection string format:
| Connection string type: | Oracle |
| Connection string: | Data Source=127.0.0.1; User ID=username; Password=pwd123; |
In the connection string the 127.0.0.1 IP address should be replaced with the IP address of the machine where Oracle Database server is running and do not forget to use the login credentials belonging to your Oracle Server's account.
By including 'Unicode=True' to the connection string, you can use unicode characters like NVARCHAR2. Make sure that NLS_CHARACTERSET and NLS_LANGUAGE parameters are set to your language. You can also try to set HKEY_LOCAL_MACHINE\SOFTWARE\ORACLE\HOMEID\NLS_LANG registry key to UTF8.
Now the connection should be configured between Ozeki SMS Gateway's Database User and your Oracle Server, so it is time to create two database tables both for incoming and outgoing message by creating a proper database table structure:
Oracle SQL statements:
CREATE TABLESPACE:
CREATE TABLESPACE ozekidb
DATAFILE 'C:\oraclexe\app\oracle\oradata\XE\ozekidb.dbf'
SIZE 40M autoextend on;
Figure 1 - Create tablespace 'ozekidb'
CREATE USER:
CREATE USER ozekiuser
IDENTIFIED BY ozekipass
DEFAULT TABLESPACE ozekidb;

GRANT DBA TO ozekiuser;
Figure 2 - Create user 'ozekiuser' and grant access to tablespace
CREATE TABLE:
CREATE TABLE ozekimessagein (
    id int,
    sender varchar(255) default NULL,
    receiver varchar(255) default NULL,
    msg varchar(160) default NULL,
    senttime varchar(100) default NULL,
    receivedtime varchar(100) default NULL,
    operator varchar(120) default NULL,
    msgtype varchar(160) default NULL,
    reference varchar(100) default NULL
    );
CREATE index index_id1 ON ozekimessagein(id);
CREATE SEQUENCE X;
CREATE TRIGGER ozekimessagein_auto BEFORE INSERT on ozekimessagein
    for each row
    when (new.id is null)
    begin
    SELECT x.nextval INTO :new.id FROM DUAL;
    end;
    /
CREATE TABLE ozekimessageout (
    id int,
    sender varchar(255) default NULL,
    receiver varchar(255) default NULL,
    msg varchar(160) default NULL,
    senttime varchar(100) default NULL,
    receivedtime varchar(100) default NULL,
    operator varchar(120) default NULL,
    msgtype varchar(160) default NULL,
    reference varchar(100) default NULL,
    status varchar(20) default NULL,
    errormsg varchar(250) default NULL
    );
CREATE index index_id2 ON ozekimessageout(id);
CREATE SEQUENCE Y;
CREATE TRIGGER ozekimessageout_auto BEFORE INSERT on ozekimessageout
    for each row
    when (new.id is null)
    begin
    SELECT y.nextval INTO :new.id FROM DUAL;
    end;
    /
Figure 3 - Create table structure
The 'id' field should be maintained to support faster SQL updates.
The size of the message can be set higher than 160 character if it is necessary.
The 'msgtype' field can also be changed.
To sum it up
Congratulations, you have completed this task of connecting Oracle to the Ozeki SMS Gateway. Be proud of yourself!
Now you can set up a system where you can use Oracle to send SMS messages through Ozeki SMS Gateway. This gateway software is a powerful yet, easy-to-use software mostly used by the industry because of its outstanding reliability.
If you wish to learn more about the software solutions that Ozeki offers, make sure to visit ozeki-sms-gateway.com.
