How to send SMS from SQL databases
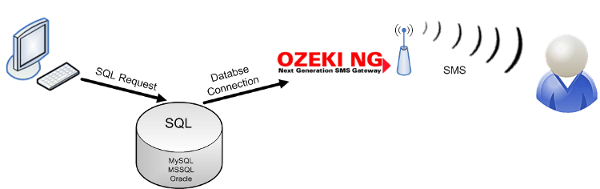
Ozeki NG SMS Gateway makes it possible to send and receive SMS text messages using a database server with the help of SQL queries as database servers allow the sharing of database tables between two applications. To use this solution you just need to configure your Ozeki NG SMS Gateway to be able to transmit text messages from databases.
Introduction
SMS messages are one of the easiest and simplest but still the most efficient ways of communication. SMS can be used both in ordinary and in business life. In a text message you can include information about important events, dates, meetings but also about your computer system and the status of it. In other words you can be informed about your IT environment by receiving an SMS about it. With the help of Ozeki NG SMS Gateway SMS functionality can be added for different kinds of applications.
If you are a database developer then you can configure your SMS gateway to transmit text messages with a database request using the graphical interface of the software. You just need to insert incoming messages into a database which periodically checks it for messages to be sent out.
To send and receive messages from database servers first you need a database such as: Oracle, Access, MySql, MSSQL, Postgres, Sybase, Informix, SQL Express etc. Then create two database tables: "ozekimessageout" and "ozekimessagein". "Ozekimessageout" can be used for sending messages and you can put an outgoing message into it by an SQL INSERT command. The Ozeki software checks this table from time to time and if it finds a new entry sends an SMS about it. Similarly, to receive messages you can use the "ozekimessagein" table. Ozeki NG SMS Gateway inserts the incoming SMS from a mobile phone into this database table and with the SQL Select command it reads the message (Figure 1). If you create these tables you need to connect your SMS gateway to your database by an ODBC connection or an OLEDb connection. This can be configured by a connection string which includes the database driver name, the IP address, the username, the password and the name of the database. You also need to install and configure a database user, a virtual one, to communicate with the database server and provide the SQL SMS Gateway functionality.
How to install a database user
You need to go to the Users and applications of the "Management Console" click on "Add" or "Add user" to add a new database user (Figure 2).
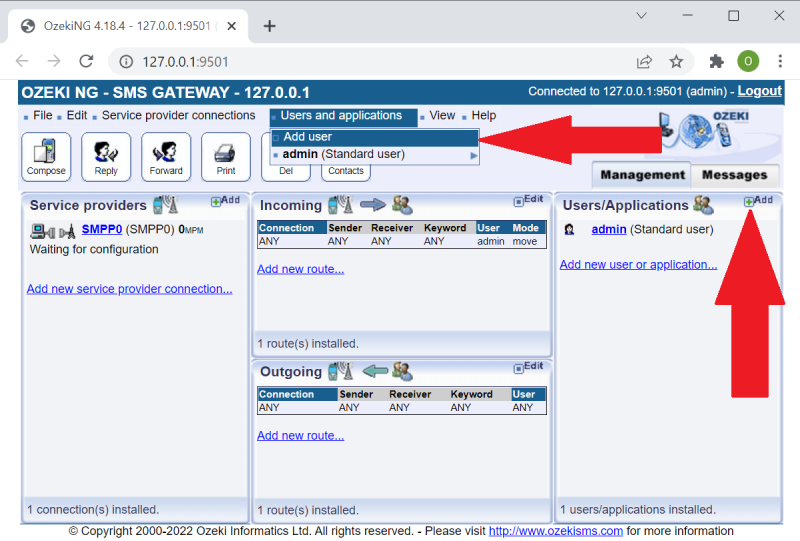
The appearing window consists of two sections. In the left one you can see the users that have been installed and in the right one those who can be installed. Click on the install link next to the chosen entry to add a user. If you do so a window appears and here you need to provide a unique name for the user. After this you will see the user in the list of users in the left section of the window.
How to configure a database user to send SMS
A configuration pane automatically opens after the installation of the user (Figure 3).
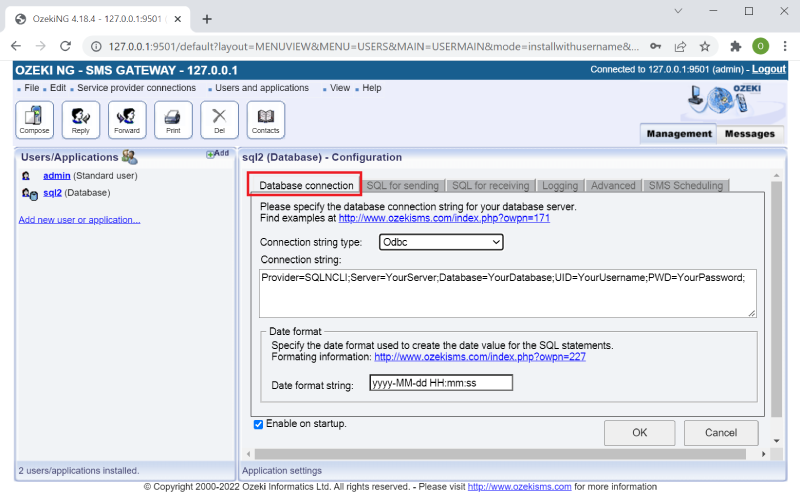
The first tab in it is the Database connection in which you need to define the proper Connection string type. For Open Database Connectivity, select Odbc. For Object Linking and Embedding Database, select OleDb. In Connection strings you can modify the data, if necessary, e.g. if you modify the username or the password. Different database servers require different connection strings. By default it contains the string of MySQL database server.
The connection string for the Oracle SQL server:
Provider=MSDAORA.1;Password=YourPassword;UserID=YourUserID;Persist Security Info=True
The connection string for the MS SQL server:
Provider=SQLNCLI;Server=YourServer;Database=YourDatabase;UID=YourUsername;PWD=YourPassword;
The connection string for the Sybase / SQL Anywhere Server:
Provider=ASAProv.90;UID=MyUsername;PWD=MyPassword;DatabaseFile=DatabaseFileLocationOnYourComputer.db;
EngineName=Yourdbenginename;Start=YourDatabaseBinaryLocation.exe
The connection string for the Postgre SQL server:
DRIVER={PostgreSQL};SERVER=YourServerIP;port=5432;DATABASE=YourDatabaseName;UID=YourUsername;PWD=YourPassword;
Please note that you need to enter the connection
strings in one line without line brakes!
In the Date format section defines the date.
To send SMS message you need to configure the SQL for sending tab
(Figure 4). Here, "Use this database connection for sending outgoing
messages" is checked by default and it is recommended if you use it for
this option. Here you can also define how often Ozeki NG SMS Gateway should
check the
outgoing messages and the SQL statements related to these messages.
Figure 4 - The SQL for sending tab
The next tab is SQL for receiving. In this tab you also need to make some settings. At first it is recommended to check "Use this database connection for receiving messages". Below you can modify the SQL Insert statement if necessary. You also can see in this tab three pairs of edit boxes. They are to change or modify some characters. By default, it contains some problematic ones (Figure 5).
Figure 5 - The SQL for receiving tab
You can also make logging settings by clicking on the Logging tab. Here you can check the proper option (if you want the program to log sent and received messages in human readable format, to log SQL SELECT statements and/or to log SQL UPDATE statements. You can define the size and the number of the available log files. By default in the line of log directory: C:\Program Files\Ozeki\OzekiNG - SMS Gateway\Logs. If you are satisfied with the default options then leave them unchanged (Figure 6).
Figure 6 - The Logging tab
If you would like to modify the configuration or to view server events related to a database user you need to go to the "Management console" and the "Users and applications" panel and here open the user's account and select what you want to do: To configure or modify the configuration of a user, click "Configure". To view the latest server events related to a user, click "Events". To uninstall the user, click on the "Uninstall" link.
If you use Interbase database you can find
- An overview about how to add SMS extension to Interbase and
- A detailed installation guide with a video tutorial on how to configure your system to be able to send SMS messages.
- If you have not downloaded Ozeki NG SMS Gateway yet, you can do it now on our product page
- If you wish to learn more on how your system can connect to the mobile network, please go to the following page: GSM Modem vs. IP SMS connectivity
- To learn how to benefit from implementing SMS solutions in your business, please go to SMS solutions for businesses page
- FAQ
- Feature list of Ozeki NG SMS Gateway
- User Guide for Ozeki NG SMS Gateway
- Product manual