GSM modem connectivity
You can send and receive SMS messages from and to your computer with a GSM modem or a mobile device using Ozeki NG SMS Gateway. With this solution you will be able to connect to the mobile network simply and at a lower price. In this article you will find detailed information on this solution.
With the use of this solution you do not need to connect
over the Internet to transmit SMS text messages. This process is very quick
so you can save time and money with it. Furthermore, Ozeki NG SMS Gateway
makes it
possible to attach more than one device to the computer so in this way you
can increase capacity.
If you usually do not send more than 15 000 messages per day you can use
Ozeki NG SMS Gateway with a GSM modem or mobile device connected to your PC
to send and receive SMS messages. In this case the Ozeki software
communicates with the mobile network through the attached device in the
following way: if the gateway sends a message, at first it arrives at the
GSM device and after this it is transmitted to the SMS Center of the GSM
service provider over a wireless link (Figure 1).

In case of receiving a message, the GSM device keeps it in its memory or its SIM card and a notification is sent to Ozeki NG SMS Gateway about it. The SMS gateway reads this message and deletes it to make place for further messages. The GSM device can be connected with a phone-to-PC data cable (USB or a serial RS232 cable), BlueTooth, or InfraRed. The modem or cellphone comes with a SIM card and its number will be the phone number the messages are sent to. You can check the list of suitable GSM devices on the Supported phones page.
Configuration of the GSM modem connectivity
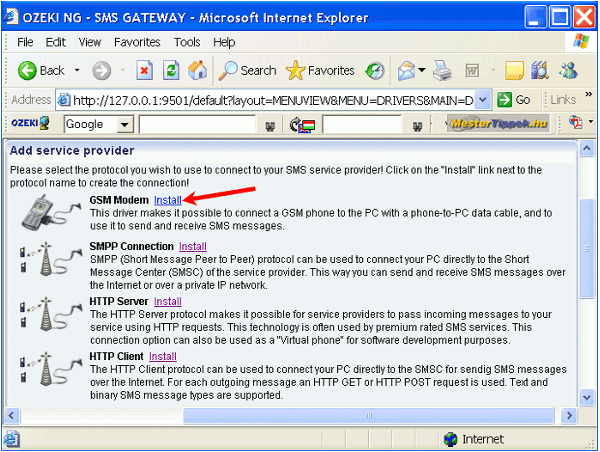
It is supposed that you have already downloaded and installed a GSM modem. So now you can start to install and configure your connectivity by using the Ozeki NG SMS Gateway's graphical interface. In it click on "Add" in the right side of the Service providers panel in Management console. You can arrive at the Management console right after you login the Ozeki software; it appears automatically. The "Add service provider" pane appears containing a list of protocols to install and to communicate with an SMS service provider. Click on the "Install" link next to the chosen entry in the list to select the GSM protocol (Figure 2).
|
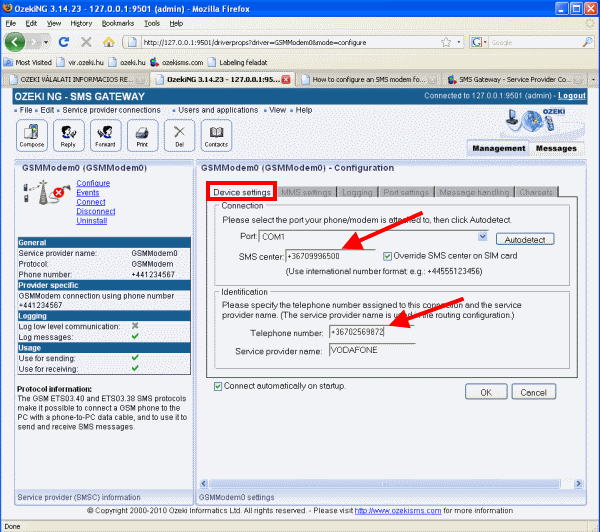
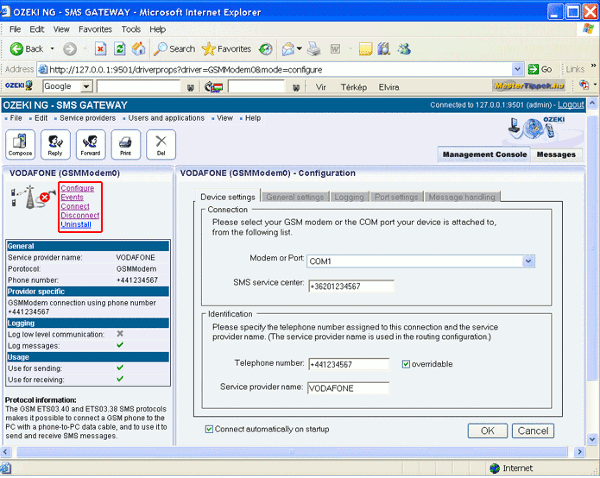
After the installation of the GSM protocol, the "Configuration" pane appears. The "Device setting" tab of it contains a "Connection" and an "Identification" section (Figure 3).
|
Select your GSM modem or the COM port (your modem is connected to it) in the "Modem" or "Port" menu of "Connection" section. You need to provide the phone number of the SMSC of your service provider (it was given by the service provider) in the SMS service center edit box; and into the "Identification" section type the telephone number of your GSM device and the name of the service provider into its edit box. Please note that if you do not provide the telephone number you cannot send messages. In order to avoid confusion it is recommended to provide a name for the connection after the service provider.
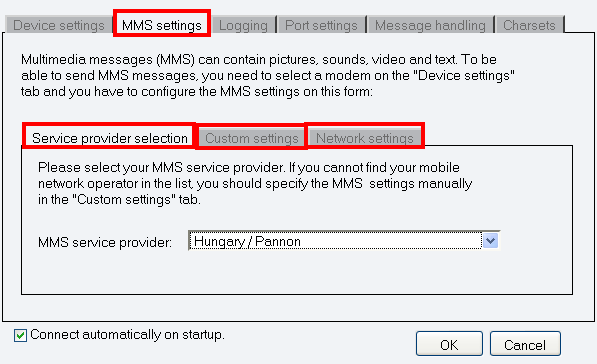
After this, click on "MMS settings" tab to provide settings of messages. Multimedia messages (MMS) can contain pictures, sounds, video and text. To be able to send MMS messages, you need to select a modem on the "Device settings" tab and you have to configure the MMS settings on this form. In "Service provider selection" section you can choose your service provider. If you cannot find it in the list, you can specify it manually in "Custom settings" tab. In "Network settings" tab you can specify the GPRS connection settings (Figure 4).
|
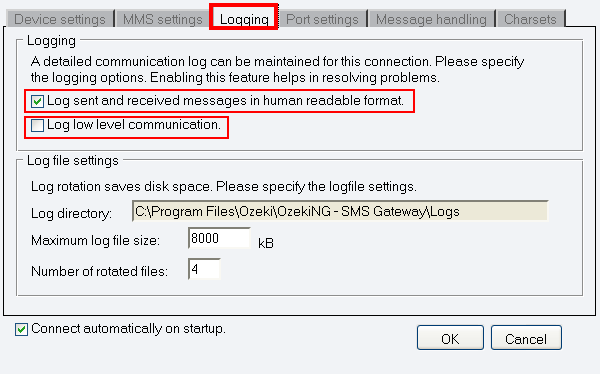
If you click on "Logging" tab in the Configuration section
you can configure logging. This tab consists of a "Logging" and a "Log file
settings"
section. In the first one you need to select at least the first option
(Log sent and received messages in human readable format) as they can be
useful for debugging communication problems. If you choose the second option
it enables the program to produce log files containing binary codes for
communication data.
In the "Log file settings" section Log rotation saves
disk space and makes it possible to delete the old and not necessary log
files from the Log directory. It can be reached by default:
C:\Program Files\Ozeki\OzekiNG - SMS Gateway\Logs.
You also can provide the "Maximum log file size" (if you reach the given size
a new log file will be created) and the "Number of rotated files"
(the maximum number that are saved) (Figure 5).
You can also leave the boxes unchanged if you are satisfied with the
default options.
|
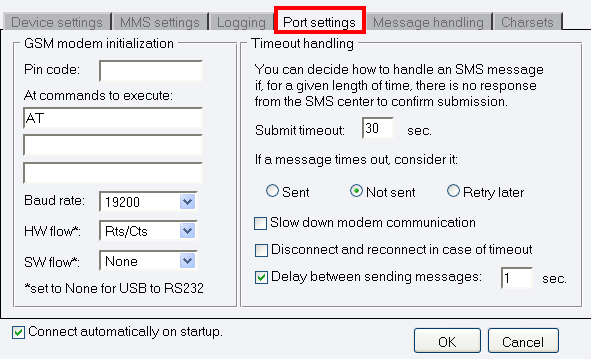
In the "Port settings" tab of the Configuration pane you
can
reach "GSM modem initialization" commands and "Timeout handling" section.
Please note, that several GSM devices allow only the default settings.
In "Timeout handling" time
you can define the handling of your connection to the SMSC and the status of
your messages. In Submit timeout box you can define the waiting time for
a response about your successfully submitted message. The default time is
30 seconds.
You can also define what to happen if there is no response from the SMSC
after the given time so you can choose "Sent", "Not sent", or "Retry options"
(Figure 6).
|
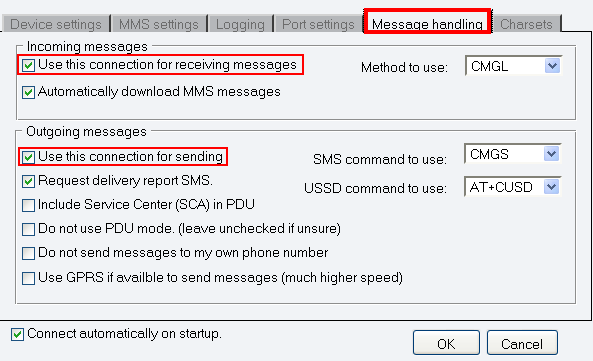
The next tab in the "Configuration" pane is "Message handling", which allows to make and modify settings of incoming and outgoing messages (Figure 7).
|
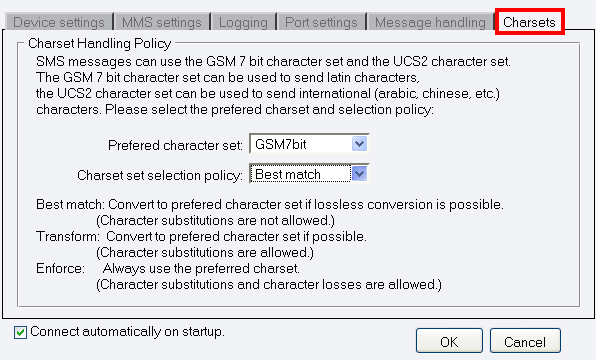
In "Outgoing messages" section you need to enable "Use this connection for sending" and "Request delivery report SMS" options. You can also specify "SMS command to use" and "USSD command to use". Further options can also be checked. The last tab is "Charset" tab on which you can specify the "Preferred character set" and the characterset selection policy (Figure 8).
|
|
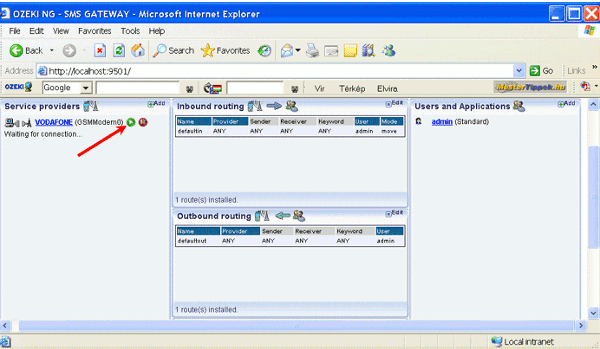
The connection can also be initiated manually by clicking on the "Connect" link in the panel of the service provider connection (Figure 10).
|
In the "Service providers" panel in the "Management Console"
click on the name of the service provider connection to open it. It contains
three sections: In the upper one you can see the name of the service
provider connection and its protocol in brackets next to its name. Next
there is an icon showing if there is a connection or not (in this case an x
sign marks no connection). To the right of the icon you can find different
options.
"Configure": to configure or modify the connection. It takes you to the
"Configuration" panel.
"Events": to check the logging of the latest server
events related to the connection. It takes you to the "Events" panel.
"Connect": to connect your connection with the SMSC.
"Disconnect": to disconnect from the SMSC
"Uninstall": to uninstall the service provider connection.
Below in this section you can see "General", "Provider specific", "Logging",
and
"Usage" information those are (re)activated during the configuration are
marked with a tick. The x marks those that are not activated or deactivated
during the configuration.
In the lower section you can read some
protocol information.
If you follow the steps of the configuration you will get a
stable and well-working program.
To learn more about the possible connections to
the mobile network, please go to Modem vs IP SMS connection page.
Further readings:

