SMS from/to MySQL
In this tutorial, you can see how to install and configure the MYSQL database connection and how to create the recommended database structure. You can combine Ozeki SMS Gateway with a MySQL database to send, receive and store SMS messages. The Ozeki SMS Gateway is a powerful SMS gateway software that is capable of sending 1000 SMS / second, while still managing to run on your computer offering security for your messages and contact. This article is aimed at users who are familiar with MySQL. The process itself should not take more than 20 minutes to perform, with the help of this detailed tutorial. You will learn how to set up a MySQL database, user and give permissions to it. You will also create a user in Ozeki SMS Gateway. Don't waste any more time. Start sending SMS now!
How to send SMS from MySQL
MySQL Installation (![]() Video guide)
Video guide)
Create Database Tables (![]() Video guide)
Video guide)
Configure Database User (![]() Video guide)
Video guide)
Send Test Message (![]() Video guide)
Video guide)
What is MySQL?
MySQL is a relational database management system that is based on SQL. It is widely used due to being open-source and free, but very reliable and fast.
The solution uses Ozeki SMS Gateway installed on your PC. The Database User of SMS Gateway can easily communicate with your MySQL database user.
How to receive SMS with MySQL database
This SMS receiving system makes it possible to receive SMS using a MySQL Database Server. This arrangement consists of a phone that will be used to send messages, a computer with Ozeki SMS Gateway installed, a database server, and your application. The method works the following way: The phone sends the message. The computer with the Ozeki SMS Gateway will save the message in a MySQL Database Server. Your application could get the messages using an SQL Query.

How to send SMS from MySQL database
This SMS sending system makes it possible to send SMS using a MySQL Database Server. This system consists of a phone that will be used to collect the messages from the database, a computer with Ozeki SMS Gateway installed, a database server, and your application. The procedure works the following way: Your application will send the message to the MySQL Database Server. It will store your message and the Ozeki SMS Gateway will be able to acquire it using an SQL Query. The message will be sent to the phone after it was acquired.

SMS from/to MySQL (Video tutorial)
In this video, you will see the process of connecting MySQL to the Ozeki SMS Gateway. It will start with launching a MySQL Command Line Client and will take you to send your first message to test your system. In the process, you will learn how to set up a MySQL database that will be usable and how to create a new application interface for MySQL in Ozeki SMS Gateway. The process is easy to do, and the video is very detailed. Plus, the Ozeki SMS Gateway offers a very intuitive interface, so you will have no hard time following the tutorial.
Create the database
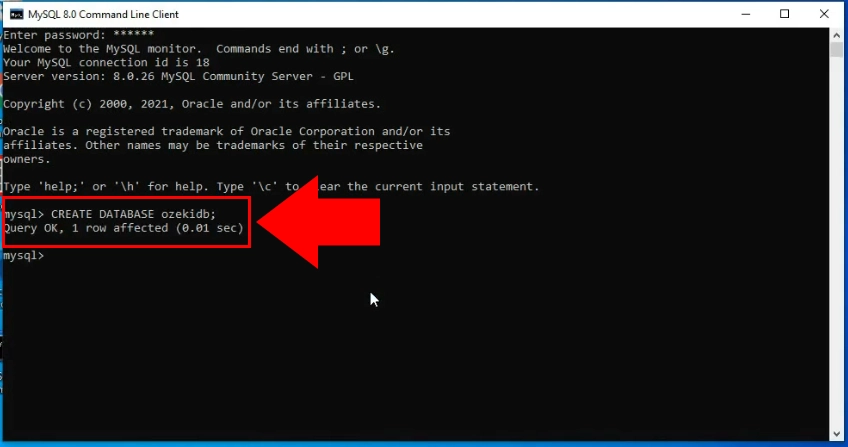
The first step of the process is setting up a new database. You can see on Figure 3, the statement that will create the 'ozekidb' database is the following: 'CREATE DATABASE ozekidb;'. This will create a database that is usable by the Ozeki SMS Gateway.
Create a user
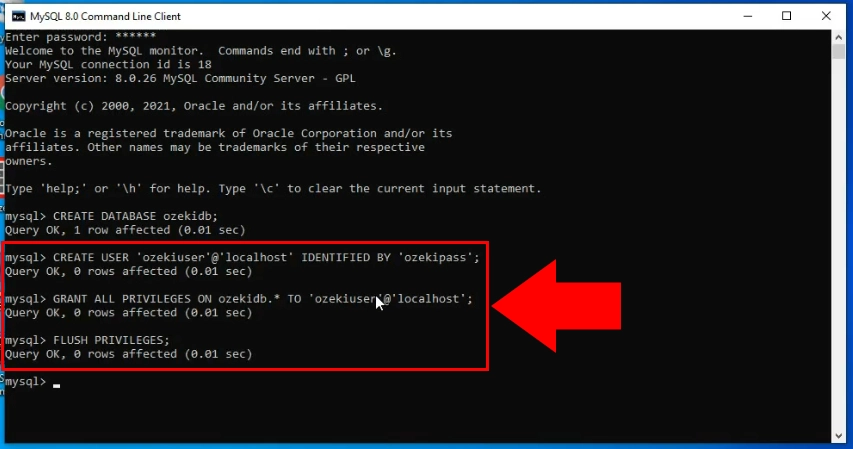
In the next step, you need to create a user for the 'ozekidb' database. You can do so with the 'CREATE USER' statement visible on Figure 4. The next statement will grant privileges to the user and the flush statement will reload the database and activate the privileges.
Create the 'ozekimessagein' table
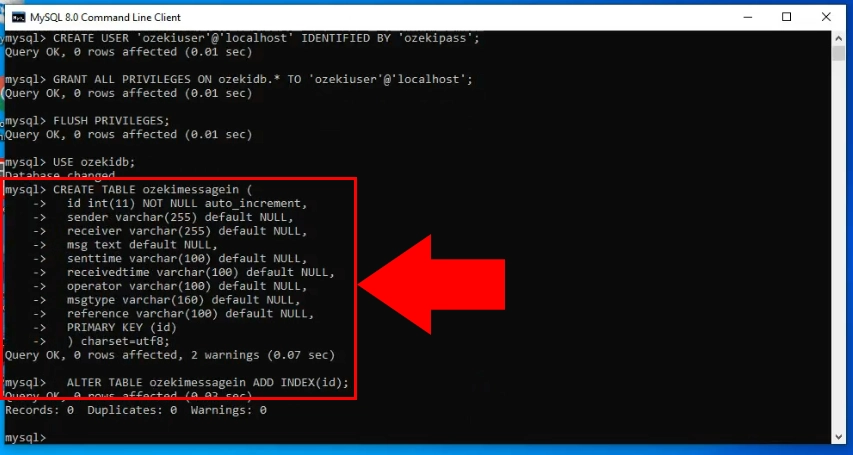
Now that you have a database, let's create tables in them. You need two tables to work with the Ozeki SMS Gateway. The first table you will create is the 'ozekimessagein' table. It will store all your incoming messages. It checks periodically for them and stores them in a record in the database.
You can create this table (Figure 5) by simply copy-pasting the MySQL create table script from this tutorial. You can find the code at the end of the tutorial.
Create the 'ozekimessageout' table
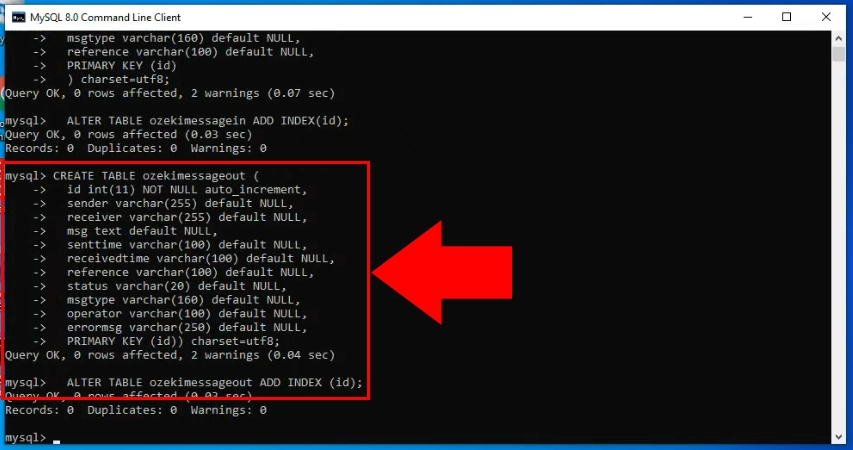
The second table is the 'ozekimessageout' table. It is responsible for storing your sent messages. If you send a message from the database, this table will store it in a record with all the information about it. (Figure 6)
You can create both tables by simply copy-pasting the MySQL create table script from this tutorial. You can find the code at the end of the tutorial.
Install an SQL messaging user
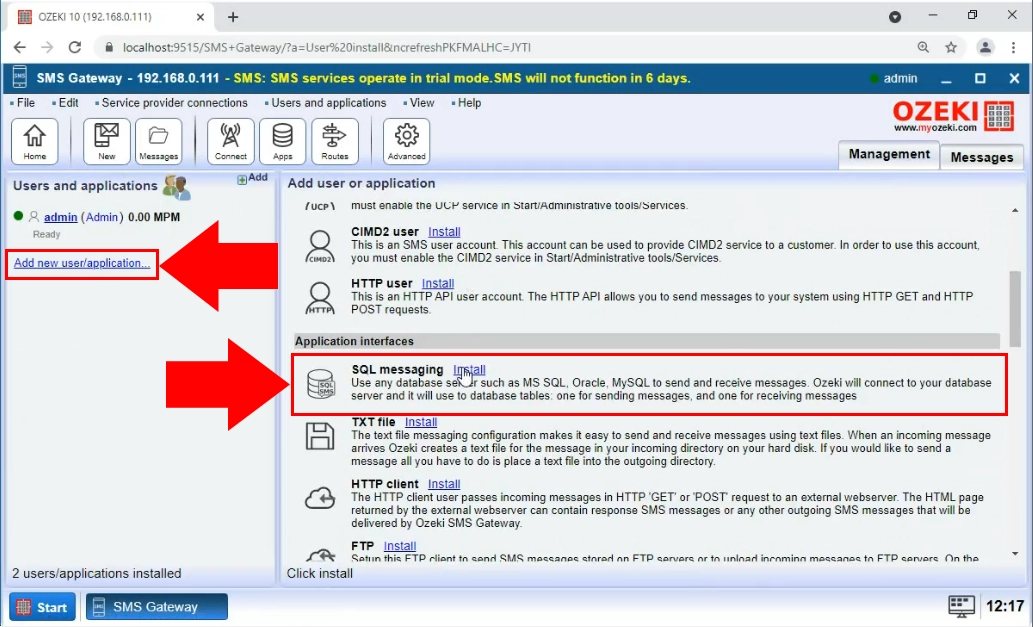
Now you will start working in Ozeki SMS Gateway. The first thing you need to do is creating an SQL messaging user. You can do this by opening the Ozeki SMS Gateway application and searching for the 'Add new user/application...' button (Figure 7). By clicking this button, you will open the 'Add user or application' install list. Search for the SQL messaging install list that is located in the 'Application Interfaces' section. Click the Install button next to it and you will start the installation process.
Choose the MySQL option
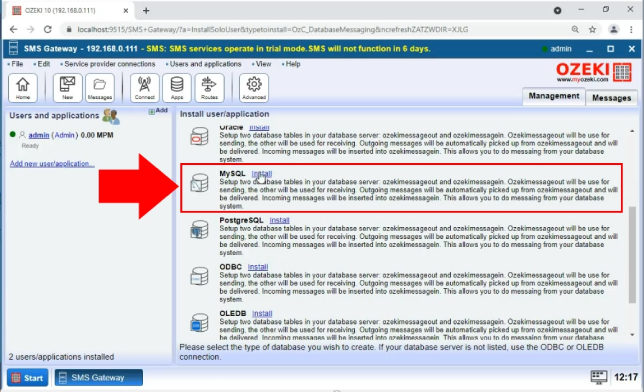
In the next install list, you will see all the database management software that the Ozeki SMS Gateway supports (Figure 8). In this case, choose the MySQL option, by clicking the Install button next to the title. It will start the setup process.
Provide the connection settings
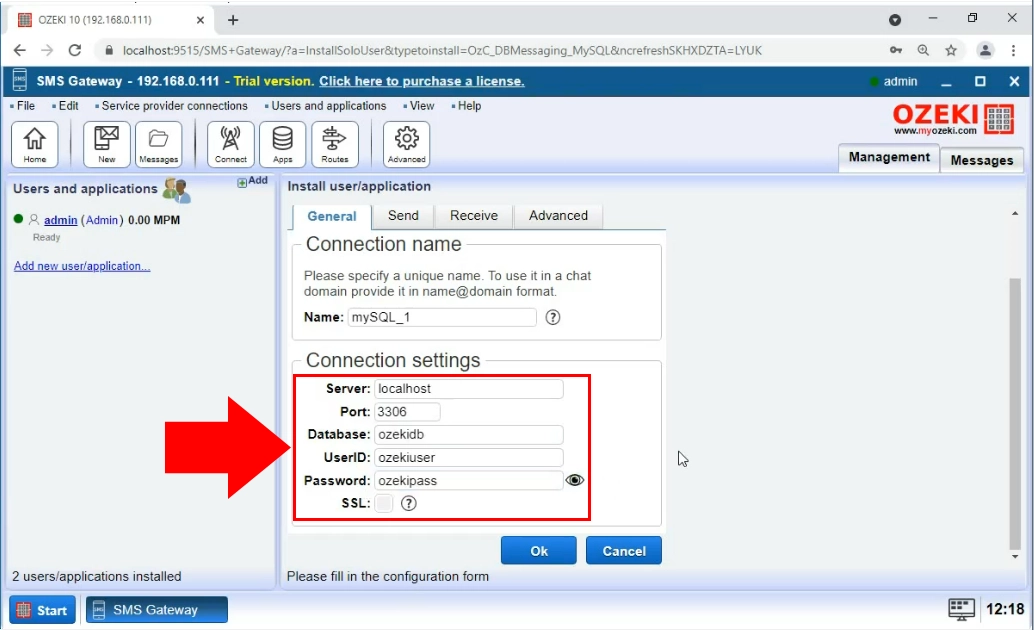
In the next step, you need to provide the connection settings of the MySQL application interface. This will make sure that the connection between the Ozeki SMS Gateway and the MySQL client can be established. Search for the 'Connection settings' group box and provide a hostname, a port number, the name of the database, and the login credentials for it (Figure 9). If you have successfully completed the group box, click the 'OK' button.
Turn on the application interface
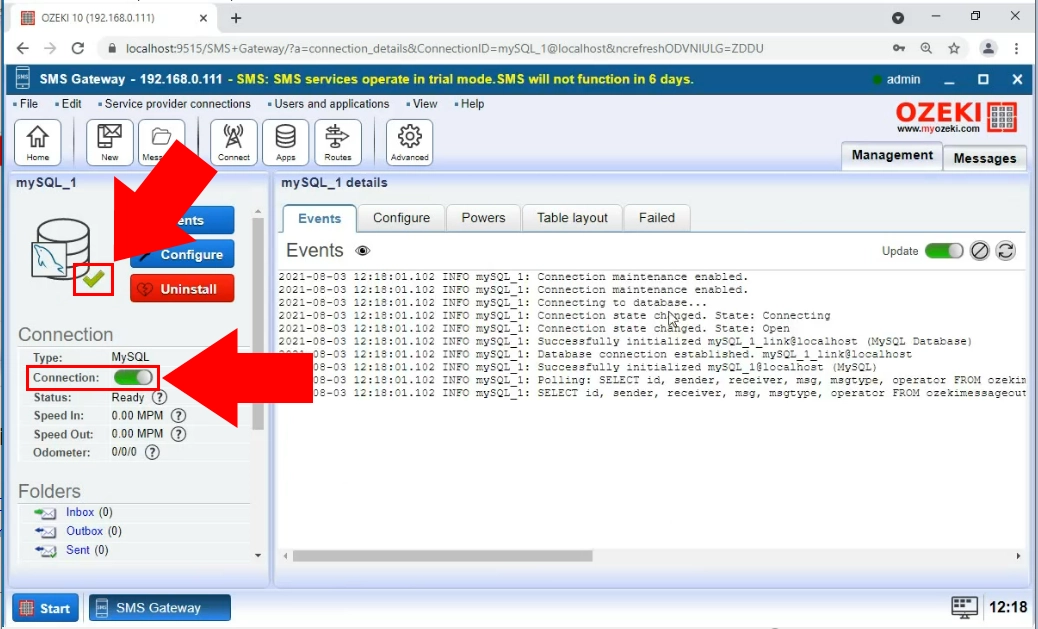
Now that you have successfully created a MySQL Application interface, it is time to turn it on, by switching the 'Connection' switch button. If it is green and you can see a checkmark next to the icon of the application interface (Figure 10), it means that the connection is active. You will see the initialization process in the Events tab.
Use the INSERT statement
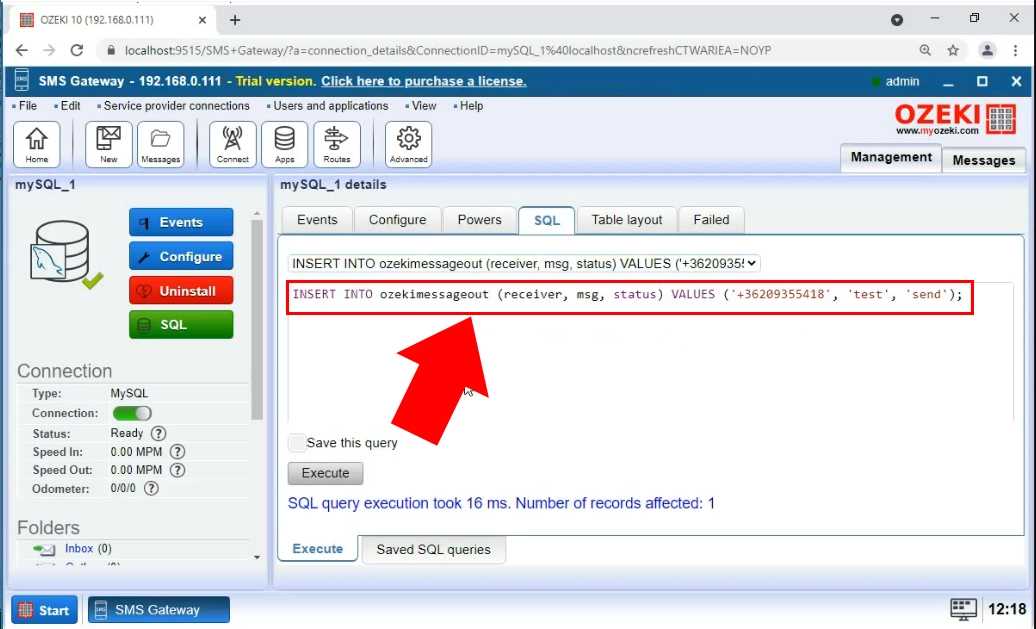
Now you have a working connection between the Ozeki SMS Gateway and MySQL. You can test your system by sending a test SMS with the help of the INSERT statement. This will insert messages into the ozekimessageout table, so the Ozeki SMS Gateway will send the message to the predefined destination (Figure 11). If you are familiar with SQL, feel free to modify the statement to your liking.
The sent folder
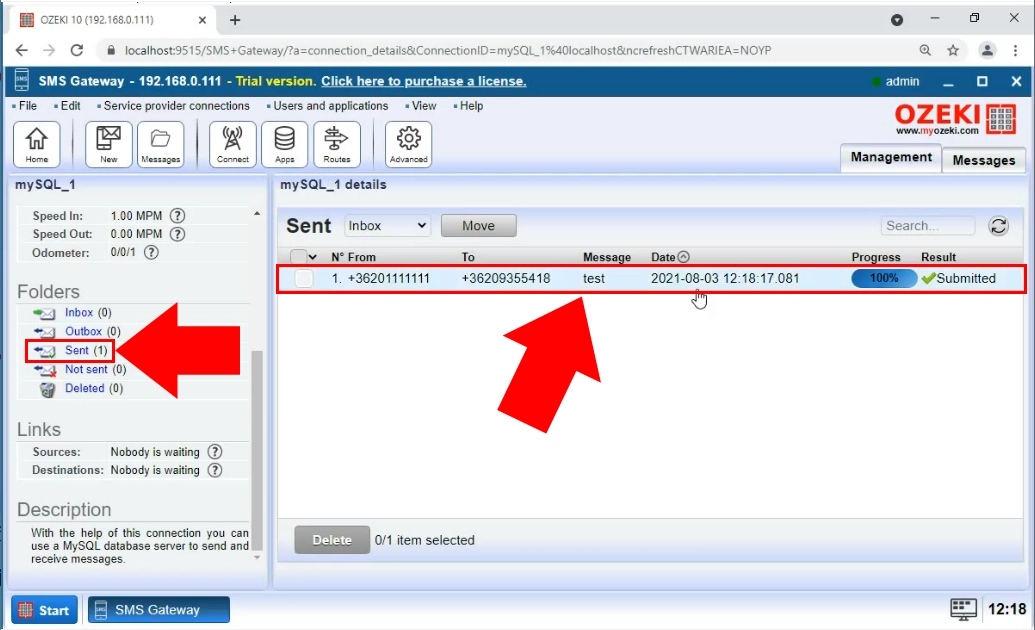
Make sure to check the Sent folder after the test SMS, to confirm that the message was sent (Figure 12). If you see the record of the sent message in the Sent folder, it means that the system is working as intended. You can get more information about the test SMS here.
After the connection details are set, it is very important to create the database table structure. The example database in this tutorial consists of two tables 'ozekimessageout' and 'ozekimessagein'. You can choose any table name, although you should keep them in mind. You are recommended to use the following table layout:
MySQL create table script:
CREATE TABLE ozekimessagein (
id int(11) NOT NULL auto_increment,
sender varchar(255) default NULL,
receiver varchar(255) default NULL,
msg text default NULL,
senttime varchar(100) default NULL,
receivedtime varchar(100) default NULL,
operator varchar(100) default NULL,
msgtype varchar(160) default NULL,
reference varchar(100) default NULL,
PRIMARY KEY (id)
) charset=utf8;
ALTER TABLE ozekimessagein ADD INDEX (id) ;

CREATE TABLE ozekimessageout (
id int(11) NOT NULL auto_increment,
sender varchar(30) default NULL,
receiver varchar(30) default NULL,
msg text default NULL,
senttime varchar(100) default NULL,
receivedtime varchar(100) default NULL,
reference varchar(100) default NULL,
status varchar(20) default NULL,
msgtype varchar(160) default NULL,
operator varchar(100) default NULL,
errormsg varchar(250) default NULL,
PRIMARY KEY (id)
) charset=utf8;
ALTER TABLE ozekimessageout ADD INDEX (id);
Figure 13 - CREATE database tables
Please maintain the 'id' field in your database to support faster SQL updates.
If you modify database tables. For example, if you add additional columns, please review the SQL templates used by Ozeki SMS Gateway. Please make sure that they are compatible with the customized database table layout.
Conclusion
Congratulations, you have completed this task of connecting MySQL to the Ozeki SMS Gateway. Good Job!
You can use this knowledge to create a system where the Ozeki SMS Gateway and the MySQL database service is connected and can work together. This solution combines the performance and reliability of the Ozeki SMS Gateway and the cost-effectiveness of MySQL.
If you wish to learn more about the software solutions that Ozeki offers, make sure to visit ozeki-sms-gateway.com.
