| Download: | ozeki_sms_site.stp (647 Kb). |
SharePoint software is often used to
keep workflow and documentation management in hand since these are the key
factors in a well-organized work process.
After you added SMS functionality to your system, you will be able to organize
several cases by sending an SMS text message increasing the flexibility of
your company. You can send messages to recipients chosen from your address
book thus a large number of messages can be sent at the same time. Sending important SMS
messages can prevent several problems. For instance you can inform your
staff about changes so they immediately get the necessary information to work
with. Everyone will know his/her responsibility and exact tasks so there will
be no delays in deadlines. Moreover customers can be involved in several
cases of your company keeping them well-informed as they are
notified about the important steps of, for example, production or delivering,
etc.
To sum it up, with this solution you can be competitive and
flexible at the same time. You will improve the communication flow and
provide a composed workplace for employees and an attractive company for
customers and business partners.
Prerequisites for this solution
In this section you can find the prerequisites for this solution.
Firstly, sending SMS messaging requires to setup a connection to the mobile
network. Ozeki NG SMS Gateway allows you to use both possible connection types:
you can choose from IP SMS connection (direct connection to the SMS Center of the
service provider via the Internet) or from GSM modem connection (attach a GSM modem
or GSM phone to the PC). You can compare the two types at the following
webpage:
Internet based SMS connections vs. GSM modem based (wireless) SMS connections.
Depending
on what you select, you need the following prerequisites.
Prerequisites for Internet based connection to the Mobile network
If you wish to connect your system to an SMS service provider over the Internet you need the following components:

Figure 1/a - Prerequisites for Ozeki NG SMS Gateway IP SMS connection
For this connection type you need to find an SMS service
provider who can reach the mobile phones in your area. The selected SMS
service provider should be able to provide SMS service through
the Internet. To find such a provider, you can check our
website where we list some of them:
SMPP SMS Service providers.
Once you have found such a provider, you need to sign up for
their service to get the connection parameters. You can use these parameters
to configure your Ozeki NG SMS Gateway software.
Prerequisites for wireless (GSM modem) connection to the Mobile network
If you wish to connect your system to the mobile network wirelessly, you need a GSM modem or GSM phone, that you can attach to your computer with a data cable. In this case your Ozeki NG SMS Gateway software will operate this phone and will send and receive SMS messages wirelessly. To setup this connection method, you need the following components:

Figure 1/b - Prerequisites for Ozeki NG SMS Gateway GSM modem connection
Your checklist (for GSM modem connection): |
SIM Card - You can get this from your local mobile network operator.* |
 |
Modem - Use a Wavecom, Siemens or Multitech modem. |
 |
Data cable - Comes with the modem |
 |
Computer - Recommended: PC 3 GHz, dual processor, 2GB RAM, 500MB HDD, Windows OS |
 |
Ozeki NG SMS Gateway - Download it from http://www.sms-integration.com |
 |
SharePoint |
System architecture
In order to send SMS with this solution, first you need to compose text message in the given box in SharePoint. Then in the contact information boxes you need to provide the necessary information; the list of the addressees. After this, SharePoint transmits the message to Ozeki NG SMS Gateway with a HTTP request. Ozeki NG SMS Gateway reads the message and forwards it through a GSM device to the given recipient or recipients. You can check this process in Figure 2.

|
Figure 2 - Ozeki NG SMS Gateway solution for how to send SMS from SharePoint
Configuration guide for SharePoint SMS
In SharePoint you can create own webpage or website and you also can customize them with the help of the built-in webparts or with the creation of further webparts. This guide gives you step by step details on how to configure SMS text messaging in Microsoft SharePoint. During the configuration a new webpage is integrated into SharePoint and a GSM modem is used to send the messages.
To configure this solution, please follow the steps below:
Step 1. Importation of the Ozeki SMS site
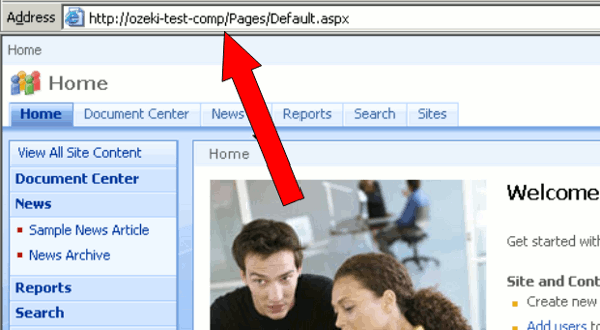
First you need to download the following file: ozeki_sms_site.stp. Save it for example in "ozeki_temp" library. You also need to know how the SharePoint software refers to your computer. To know this run SharePoint and the reference to your computer will be on the opening page (Figure 3). In our example: http://ozeki-test-comp.
|
Figure 3 - The name of the computer
To start the configuration you need to run the command line
then open the following library:
C:\Program Files\Common Files\Microsoft Shared\web server extensions\12\BIN.
To do so type in the following command:
cd C:\Program Files\Common Files\Microsoft Shared\web server extensions\12\BIN |
Then from the saved stp file you need to import the page into SharePoint.
To do so type in the followings:
stsadm.exe -o import -url http://ozeki-test-comp/ozekisms -filename c:\ ozeki_temp\ozeki_sms_site.stp |
Here the http://ozeki-test-comp/ozekisms is the name of the website to be generated (the http://ozeki-test-comp can be replaced by the name of the computer) and the :\ozeki_temp\ozeki_sms_site.stp signs the place of the saved file, (c:\ozeki_temp can be replaced by the access path of the file.) (Figure 4).
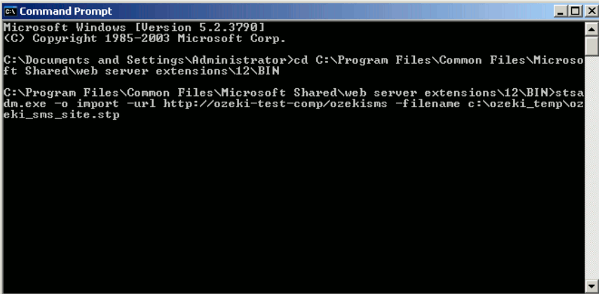 |
Figure 4 - Import website
If the importation is complete you will receive a message about it (Figure 5).
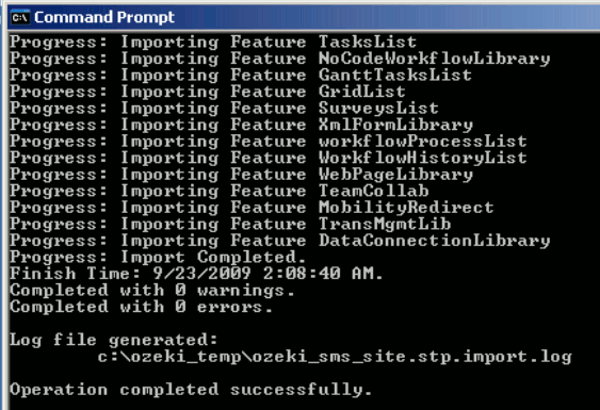 |
Figure 5 - Importation is successful
If the importation was successful then the link of the imported website appears on the opening page of SharePoint (Figure 6).
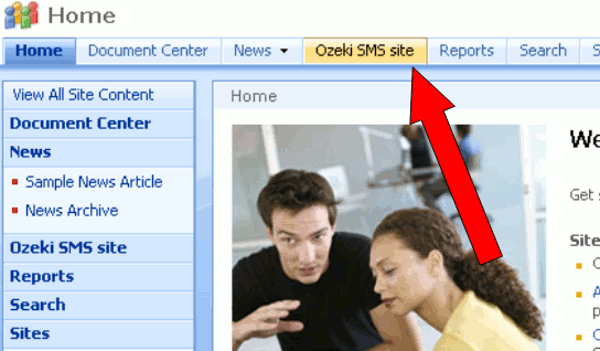 |
Figure 6 - Imported site
Click on the link to see the website itself (Figure 7).
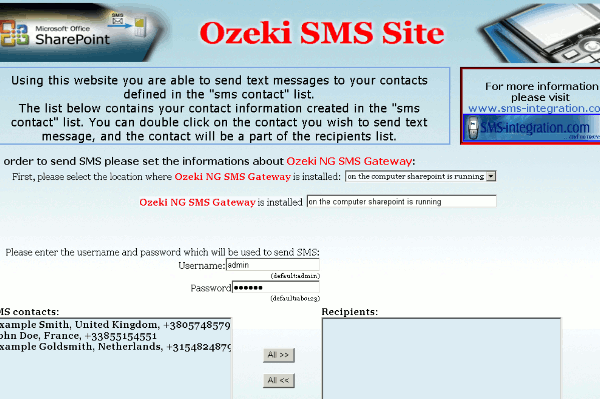 |
Figure 7 - Ozeki SMS site
Step 2. Sending SMS from SharePoint
To send SMS messages first you need to select the location
where Ozeki NG SMS Gateway has been installed. You can choose from three
possibilities:
- Ozeki NG SMS Gateway is on the same computer as SharePoint
- It is on your local computer from which you are watching
the website.
- It is installed on a third computer. In this case the following text appears: "Please enter the IP address of the machine Ozeki NG SMS Gateway is installed on". In the box next to it you need to provide the IP address of the third computer (Figure 8).
 |
Figure 8 - Location of Ozeki NG SMS Gateway
Next you need to provide your username and password used in Ozeki NG SMS Gateway (Figure 9).
 |
Figure 9 - Authentication
On the right hand side you can see the "SMS Contacts" containing the contact information generated in SMS contact list. Double click on them and you can add them to the list of addresses or click on "All" if you want to add all of them to this list (Figure 10).
 |
Figure 10 - Select recipients
Under recipients there is a "Message text" box in which you can type your text message. Click on "Send" and the website sends it to Ozeki NG SMS Gateway on the chosen computer which will forward it to the given recipients (Figure 11).
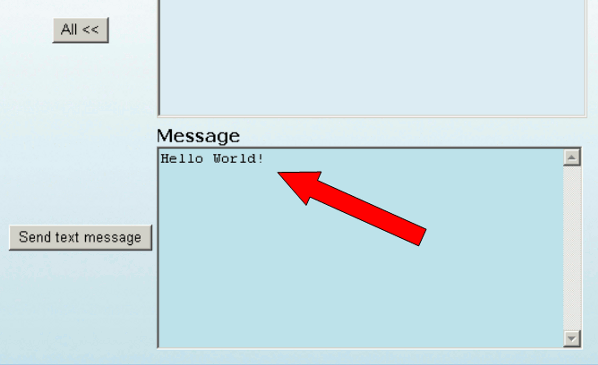 |
Figure 11. - Compose a message
A window notifies you about the status of the message with the following message: "Your message has been successfully sent" (Figure 12).
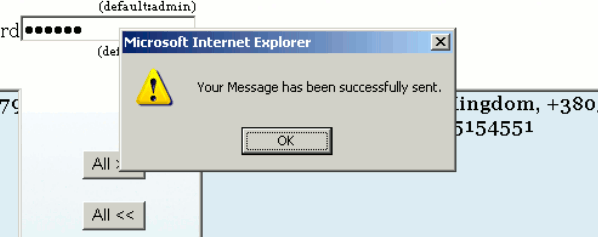 |
Figure 12 - Successfully sent message
You can see this sent message in the Ozeki NG SMS Gateway, too (Figure 13).
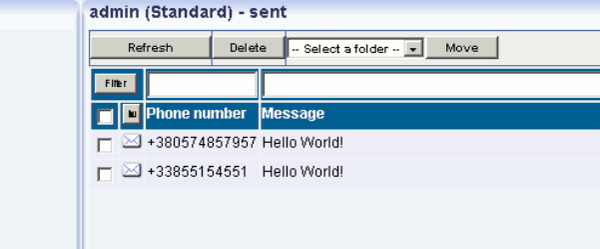 |
Figure 13 - Sent message in Ozeki NG SMS Gateway
Please visit the
- Download Page to get Ozeki NG SMS Gateway to add SMS functionality to SharePoint
- Solution List to learn more solutions of SMS functionality or the
- Products Site to get information about Ozeki NG SMS Gateway and Wavecom Fastrack modem!
- FAQ
- Feature list of Ozeki NG SMS Gateway
- User Guide for Ozeki NG SMS Gateway
- Product manual
