Send SMS from MS Exchange 2003 (part 1/2, configure your modem)
Send SMS from MS Exchange 2003 (part 2/2, configure your system)
If you already use MS Exchange 2003 now there is a possibility to add SMS functionality to it with the help of Ozeki NG SMS Gateway. With this solution you can further improve the features of Exchange 2003.
Checklist for prerequisites
In order to setup this solution you need to find a way
to connect your system to the mobile network. You can do this
by using an Internet connection or you can
setup a wireless connection by attaching a GSM phone/GSM modem to your computer. To help you make a
decision, we have prepared a webpage for you:
Internet based SMS connections vs. GSM modem based (wireless) SMS connections.
Components for Internet based connection to the Mobile network
You need the following components if you wish to connect your system to an SMS service provider over the Internet:

Figure 1/a - Prerequisites for Ozeki NG SMS Gateway IP SMS connection
In this case you need to find an SMS service
provider who can reach the mobile phones in your area. This SMS
service provider should be able to provide SMS service through
the Internet. To find such a provider, you can check our
website where we list some of them:
SMPP SMS Service providers.
Once you have found such a provider, you need to sign up for
their service to get the connection parameters. You can use these parameters
to configure your Ozeki NG SMS Gateway software.
Components for wireless (GSM modem) connection to the Mobile network
You need a GSM modem or GSM phone that you can attach to your computer with a data cable if you wish to connect your system to the mobile network wirelessly. In this case your Ozeki NG SMS Gateway software will operate this phone and will send and receive SMS messages wirelessly.

Figure 1/b - Prerequisites for Ozeki NG SMS Gateway GSM modem connection
Checklist (for GSM modem connection): |
SIM Card - You can get this from your local mobile network operator.* |
 |
Modem - Use a Wavecom, Siemens or Multitech modem. |
 |
Data cable - Comes with the modem |
 |
Computer - Recommended: Intel P4 3Ghz, 2GB RAM, 500Mb HDD, Windows OS |
 |
Ozeki NG SMS Gateway - Download it from http://www.sms-integration.com |
 |
MS Exchange 2003 |
*The SIM card will come with a plan, that will determine how much money you will spend on each SMS.
|
| Ozeki NG SMS Gateway can be obtained by opening the download page: Download Ozeki NG SMS Gateway! |
SMS messaging process in MS Exchange 2003
Ozeki NG SMS Gateway
continuously checks MS Exchange Server 2003 for new incoming email messages
with POP3 protocol. If it finds a new email message, it downloads and forwards the email
message as SMS text message to mobile phones. This is called email to SMS
forwarding.
In case of incoming SMS messages, the SMS gateway forwards it as
email message via the SMTP server of MS Exchange 2003. This is called SMS to
email forwarding. Figure 2 demonstrates this process. Ozeki NG SMS Gateway
forwards messages to the mobile network either with a GSM modem attached to the
computer with a data cable or it connects to the SMS center of the mobile
service provider over the Internet.

|
Figure 2 - SMS sending in MS Exchange 2003 with e-mail user interface using Ozeki NG SMS Gateway
Configuration guide for MS Exchange 2003 SMS solution
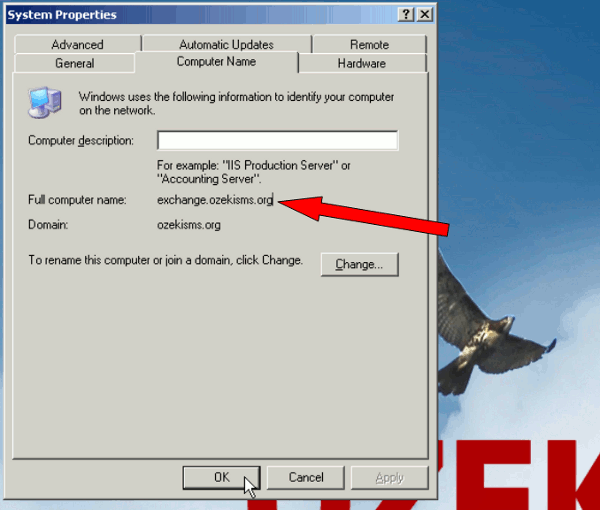
At first you need to install MS Exchange 2003 on your computer. In our example it is on the server called "exchange" (Figure 3).
|
Figure 3 - Server's name
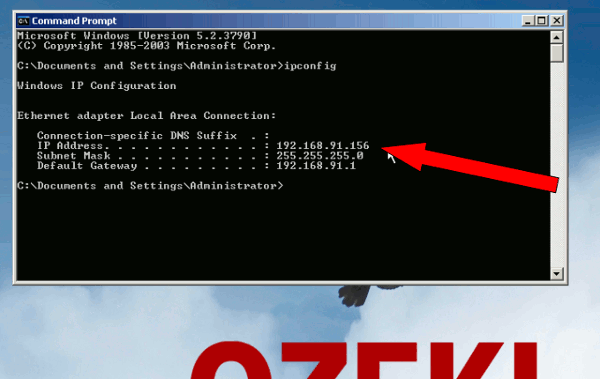
The server has a fixed IP address which is "192.168.91.156" (Figure 4).
|
Figure 4 - Server's IP address
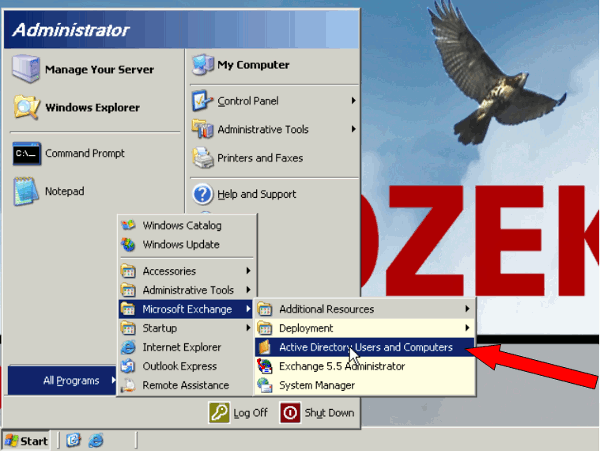
Now go to "Start" menu and select "Active Directory Users and Computers" console from "Microsoft Exchange" menu (Figure 5).
|
Figure 5 - Users and computers console
After you have opened "Active Directory", click on "Users" menu item, then right click on the right side of the interface and select "User" menu item from "New" menu (Figure 6).
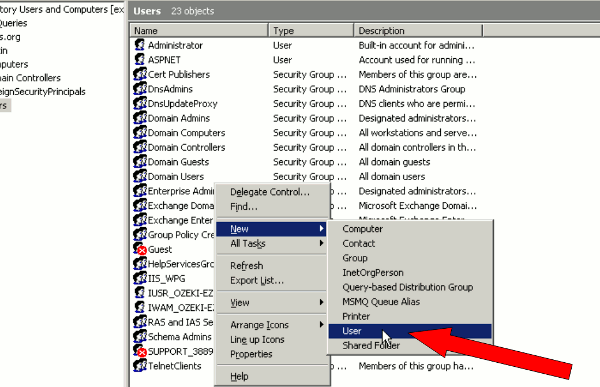 |
Figure 6 - New user
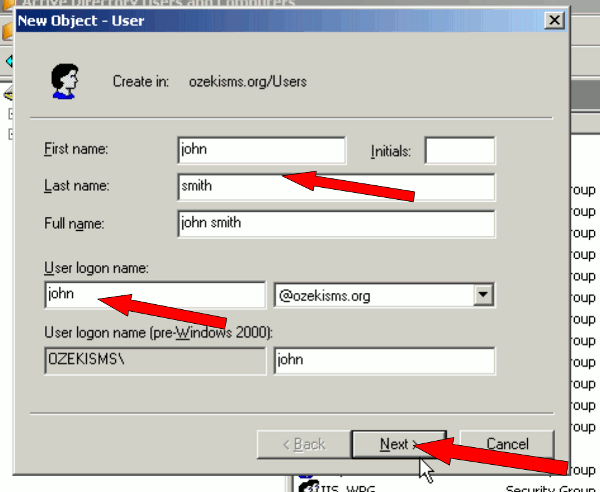
In the appeared window provide a username and provide a logon name for this user as well, then click on "Next". In our example it will be "John Smith" (Figure 7).
|
Figure 7 - User's name and logon name
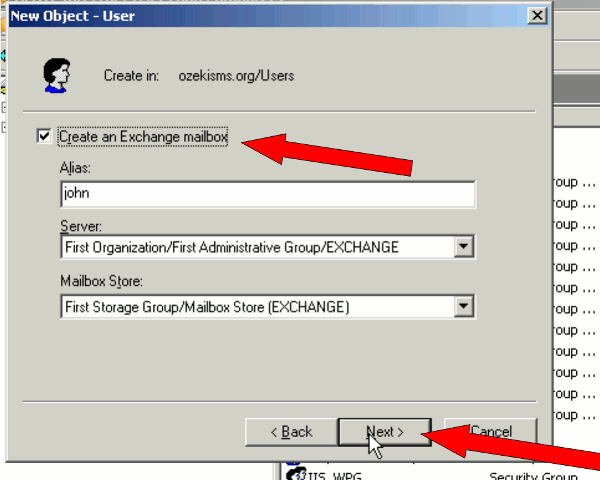
In the next window, make sure that "Create an Exchange mailbox" option is checked. Then provide an e-mail address for the user (Figure 8).
|
Figure 8 - Exchange mailbox name
If it is done, click on "Finish". For a better demonstration I
create an other user with the name of Edward Taylor. Close "Active Directory
Users and Computers" console.
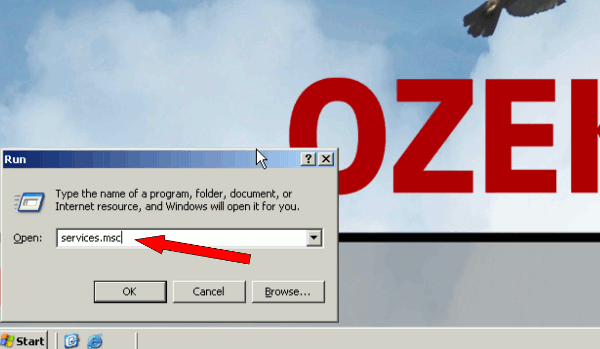
Now go to "Start" menu and select "Run" menu item. In the appeared window type:
"services.msc" to start the service console (Figure 9).
|
Figure 9 -Services console
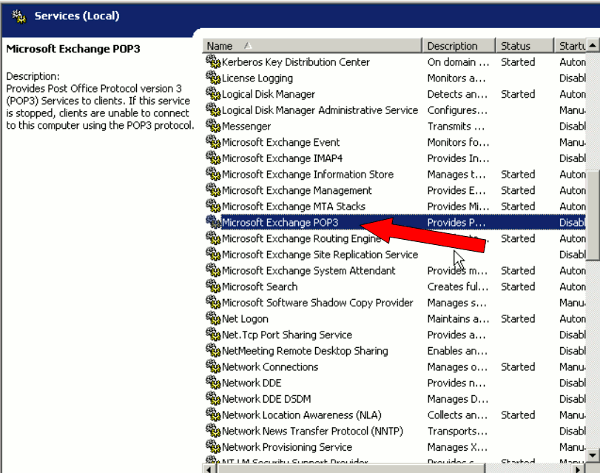
If the console starts, select the following option: "Microsoft Exchange POP3" (Figure 10).
|
Figure 10 - POP3 service
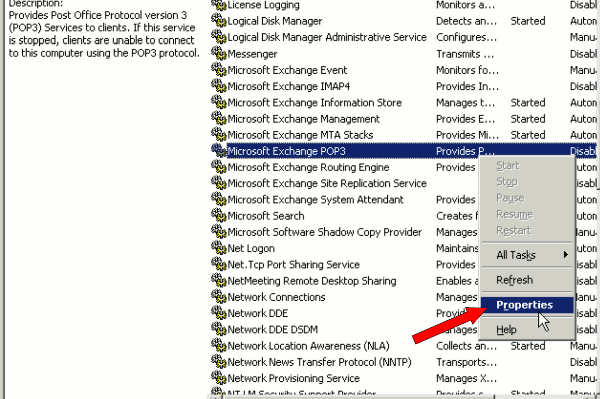
Right click on it and select "Properties" (Figure 11).
|
Figure 11 - POP3 service properties
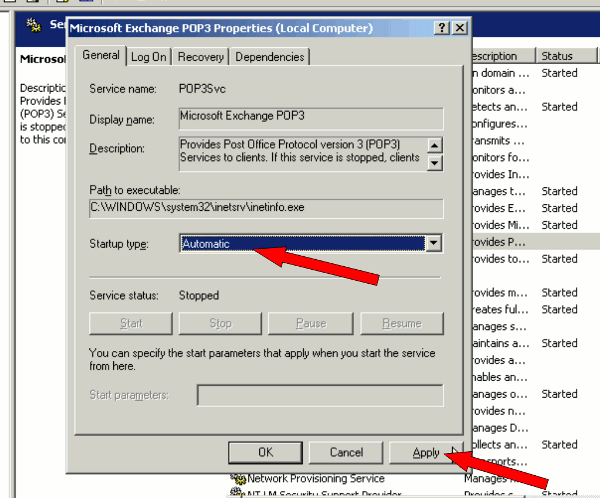
Set "Startup type" to "Automatic" and click on "Apply" (Figure 12).
|
Figure 12 - Select startup type
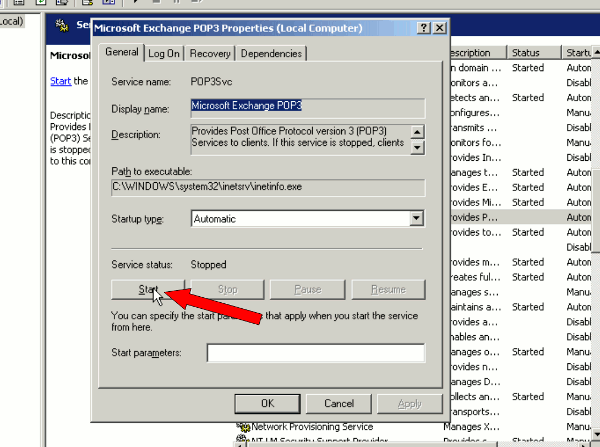
Finally, start the service by clicking on "Start" (Figure 13). The configuration of the server computer is complete.
|
Figure 13 - Start service
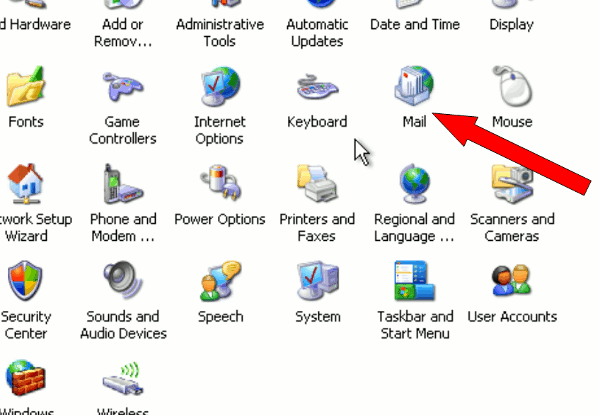
Now on the client computer go to control panel and select "Mail" menu item (Figure 14).
|
Figure 14 - Mail settings
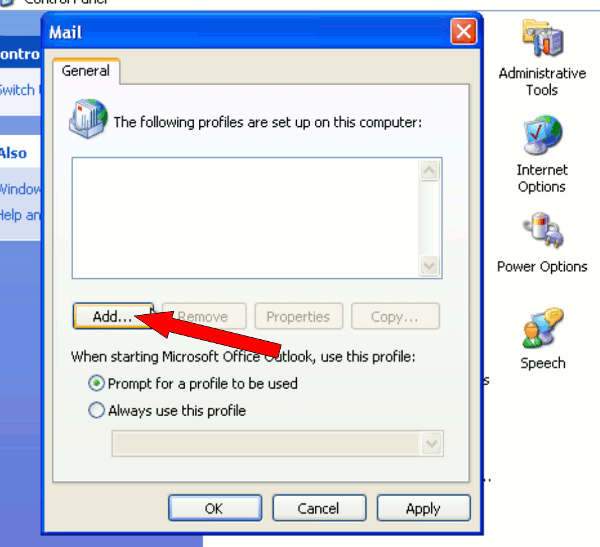
To add a profile to it, click on "Add..." (Figure 15).
|
Figure 15 - Add mail profile
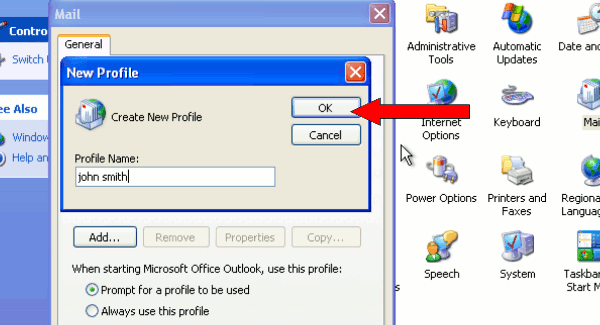
Provide a name for the profile and click on "OK" (Figure 16).
|
Figure 16 - Profile name
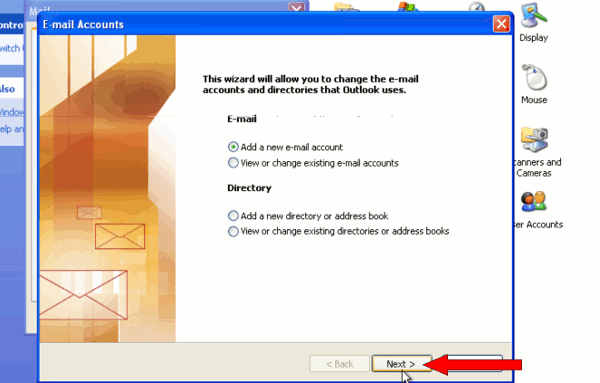
Select "Add a new e-mail account" option and click on "Next" (Figure 17).
|
Figure 17 - Add e-mail account
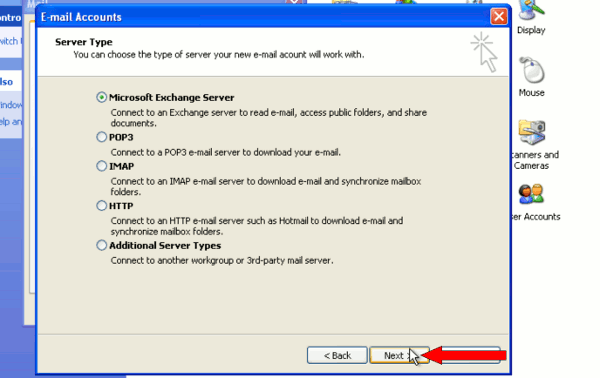
Next select "Microsoft Exchange Server" and click on "Next" (Figure 18).
|
Figure 18 - Exchange e-mail server
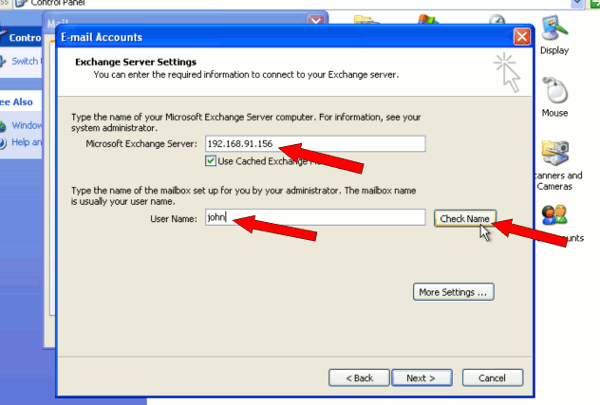
In the next window provide the IP address of the server then a username you wish to use, and click on "Check Name" (Figure 19).
|
Figure 19 - Exchange server address and username
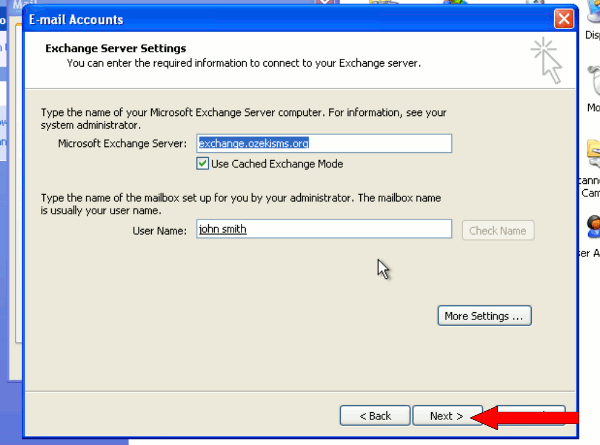
If the data have been checked, the server's IP address will turn into the server's full computer name, and the user's logon name will turn into the full name of the user. These will be underlined (Figure 20).
|
Figure 20 - Checked settings
For a better demonstration I create a profile for the other
user, Edward Taylor, on the client computer.
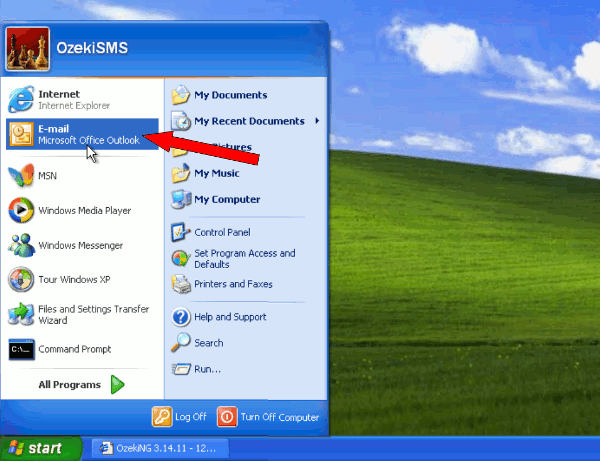
If it is done, close the "Control Panel" and to test the system I start
Microsoft Outlook in "Start" menu (Figure 21).
|
Figure 21 - Start outlook
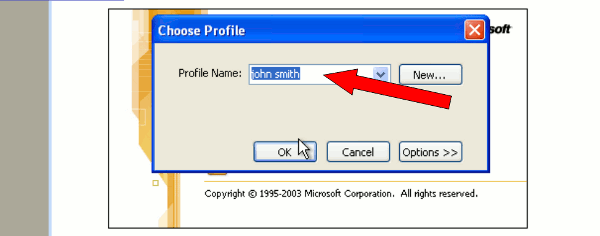
I select a profile for login and click on "OK" (Figure 22).
|
Figure 22 - Select profile
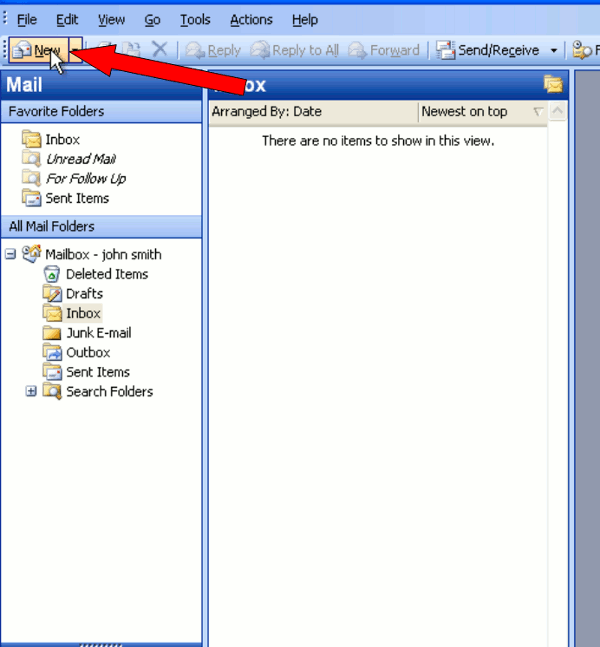
After login, I click on "New" to send a test message (Figure 23).
|
Figure 23 - New mail
I enter the recipient, in our example it will be Edward Taylor, write your message and click on "Send" (Figure 24).
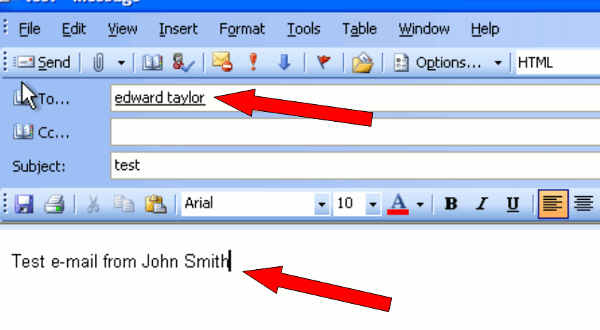 |
Figure 24 - Provide recipient and write e-mail
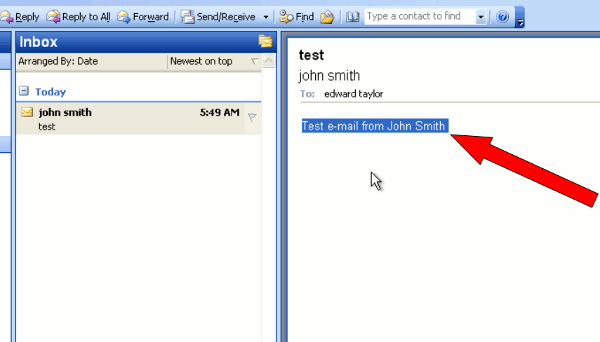
After I log into Outlook with Edward Taylor's profile, you can see the received test message (Figure 25).
|
Figure 25 - Received e-mail
To add a new user in Ozeki NG SMS Gateway click on "Add new user or application" after you log into Ozeki NG SMS Gateway with your username and password (Figure 26).
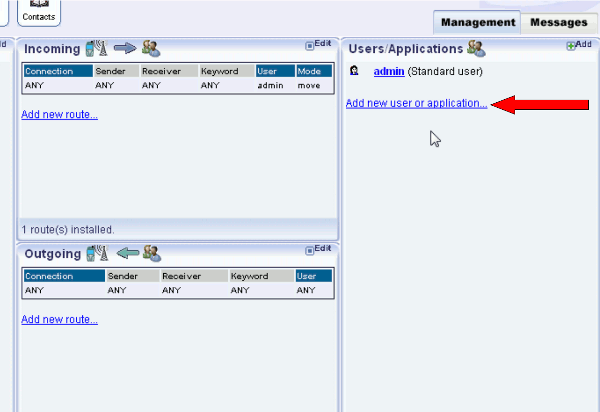 |
Figure 26 - Add user
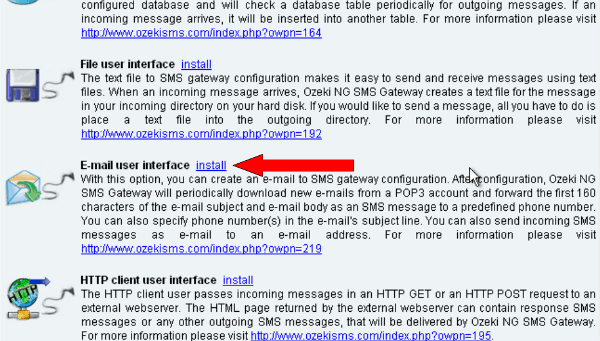
Select "E-mail user interface" user and click on "Install" next to it (Figure 27).
|
Figure 27 - Add e-mail user
Provide a name for this user and click on "OK" (Figure 28).
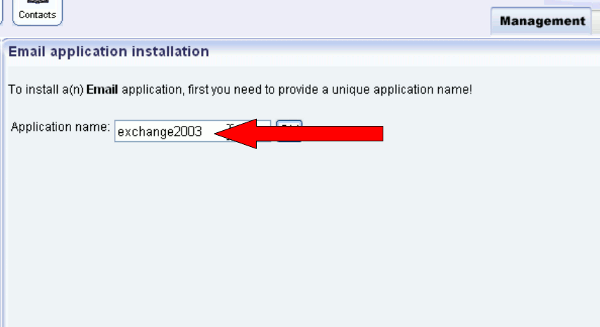 |
Figure 28 - Provide a name for the user
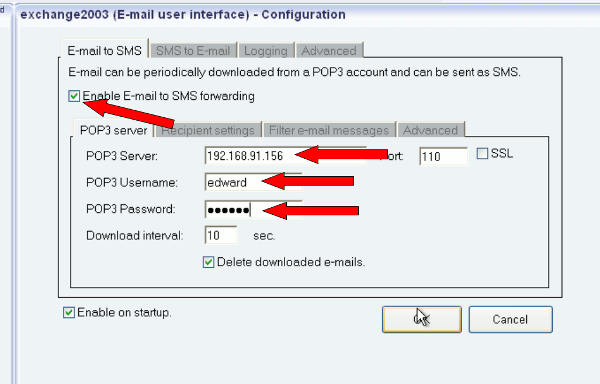
Then click on "E-mail to SMS" tab and enable "Enable E-mail
to SMS forwarding" option and provide the following POP3 settings:
POP3 Server: IP address of the server (in our example it is
"192.168.91.156")
POP3 Username : the username to be monitored
POP3 Password : its password
(Figure 29).
|
Figure 29 - POP3 settings
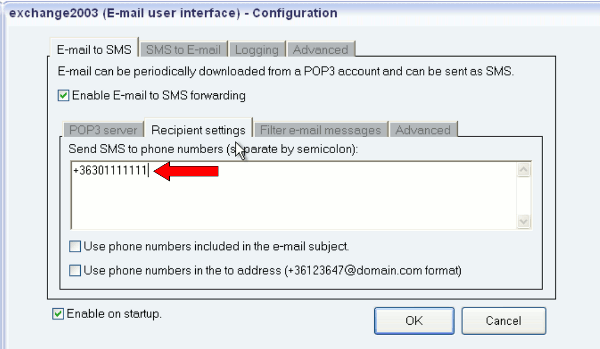
If it is done click on "Recipient settings" tab and provide the phone number of the recipient (Figure 30).
|
Figure 30 - Recipient phone number
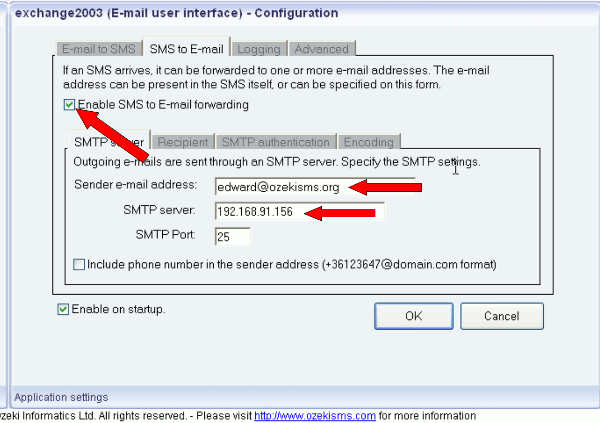
Click on "SMS to E-mail" tab and check "Enable SMS to E-mail forwarding" option. Then provide the MS Exchange 2003 Server's IP address and the e-mail address of the sender (Figure 31).
|
Figure 31 - SMTP settings
Click on "Recipient" and provide the e-mail address of the recipient (Figure 32).
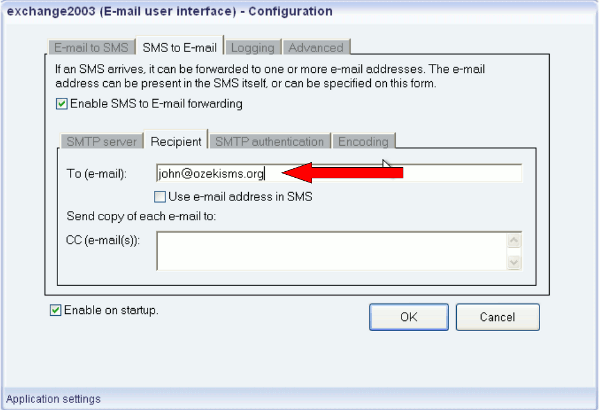 |
Figure 32 - Recipient e-mail address
Now go to "SMTP authentication" tab and enable: "My SMTP server requires authentication" and specify your SMTP username and password (Figure 33).
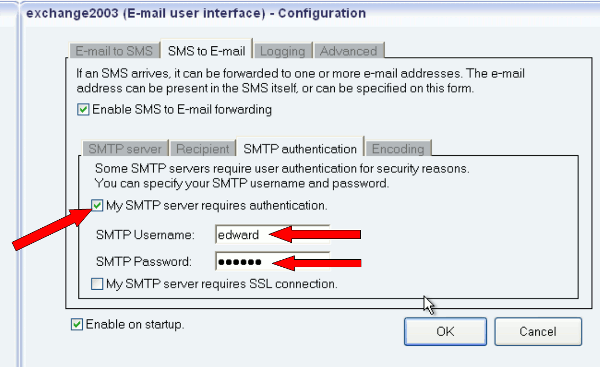 |
Figure 33 - SMTP authentication settings
Now I log into Outlook with John Smith's profile and send a test e-mail to Edward (Figure 34).
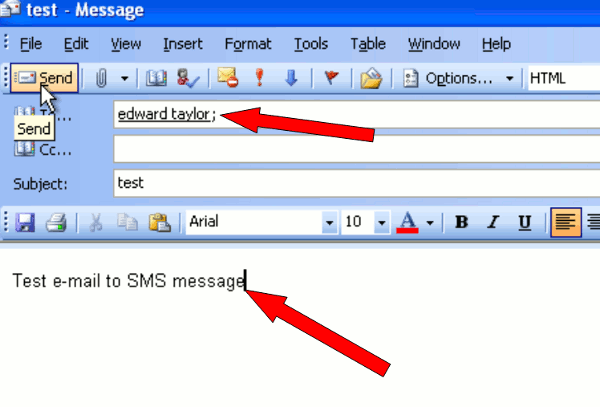 |
Figure 34 - Test message for Edward
If you take a look at Ozeki NG SMS Gateway, you can see that the message has been sent by the SMS gateway, as well (Figure 35).
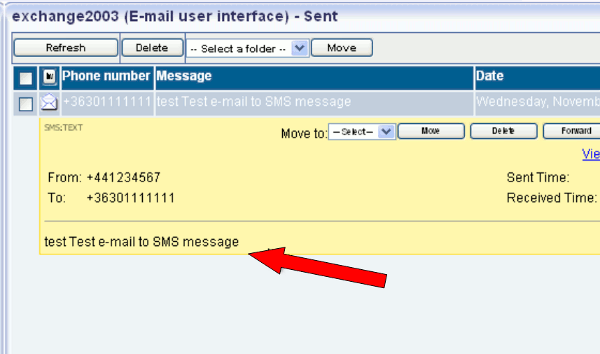 |
Figure 35 - Sent SMS
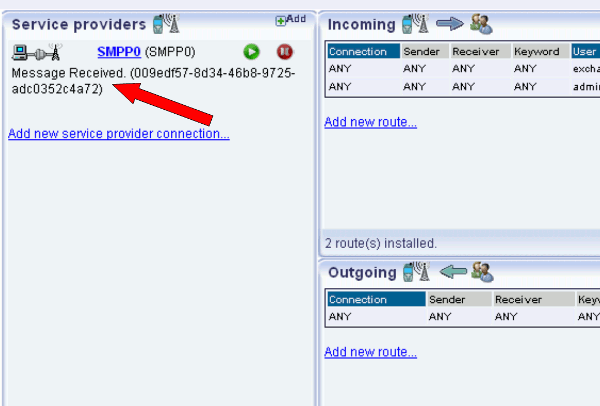
Now I simulate an incoming message via SMPP connection (Figure 36).
|
Figure 36 - Received message
At the "Events" of the E-mail user you can see that the e-mail message has been sent to the recipient (Figure 37).
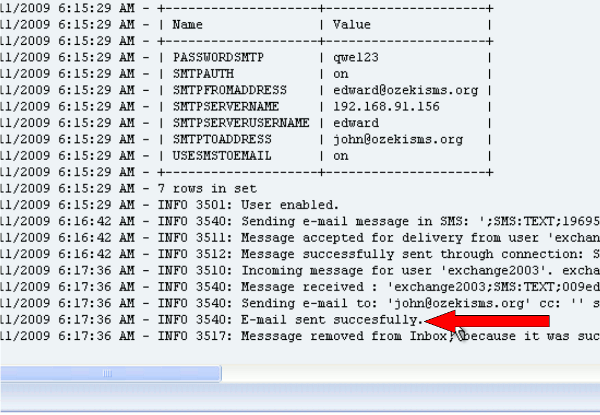 |
Figure 37 - Sent e-mail from Ozeki NG SMS Gateway
After logging into Outlook with John's profile, you can see the received message (Figure 38).
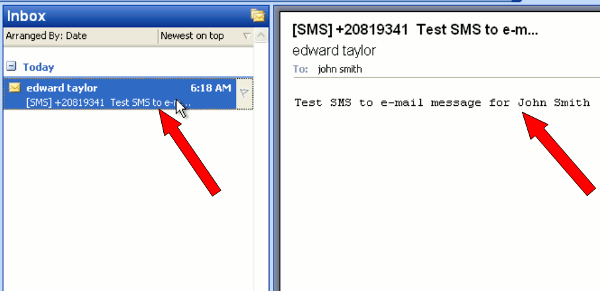 |
Figure 38 - Sent e-mail
Thank you for reading this guide about MS Exchange 2003 SMS solution!
If you wish to add SMS extension to your MS Exchange
2003 software, please go to the download page to download Ozeki NG
SMS Gateway >>>
